← The review guideReference pages
Module 5 · Basic ladder programming
First draft, for your review · about 5 hours
Recommended first
Module 4, PLC fundamentals (recommended, not enforced)
What the learner will be able to do
- Write rungs with normally open and normally closed contacts in series (AND) and in parallel (OR) to drive coils. (plc.m5.o1)
- Write a seal-in rung that starts and stops a motor, with a Stop button wired normally closed. (plc.m5.o2)
- Use limit switches and an interlock so that a motion stops at its limit and two outputs are never on together. (plc.m5.o3)
- Use set and reset coils to latch a memory tag, and control a process with it. (plc.m5.o4)
- Use an edge contact to act once when a signal changes, and remember an event until it is acted on. (plc.m5.o5)
Topics
Contacts and coils · Series (AND) and parallel (OR) · The seal-in · Limit switches and interlocks · Set and reset (latching) · Edge detection
About this module
Your first PLC programs. Each item has two machines. The Example tab runs a working program on a machine like the exercise's, so you see the idea worked out, and a common mistake beside it. Then you write your own program for the exercise's machine on the Exercise tab and press Check my program to test it. Each item builds on the one before it.
The relay ideas from module 3 come back here as programs: the seal-in, interlocks and limit switches.
The items
Each item has four tabs in PLC+: Learn (the lesson below), Example (a machine running a working program), Exercise (the learner writes the program; PLC+ checks it) and Reference. Every item has a comment box under it.
- 5.1 Contacts and coils: a pilot light station
- 5.2 The seal-in: start and stop a motor
- 5.3 Limit switches and interlocks: a garage door
- 5.4 Set and reset: fill and drain a tank
- 5.5 Edges and memory: sort metal from plastic
- 5.6 Module check
5.1 Contacts and coils: a pilot light station
about 40 minutes
- Example
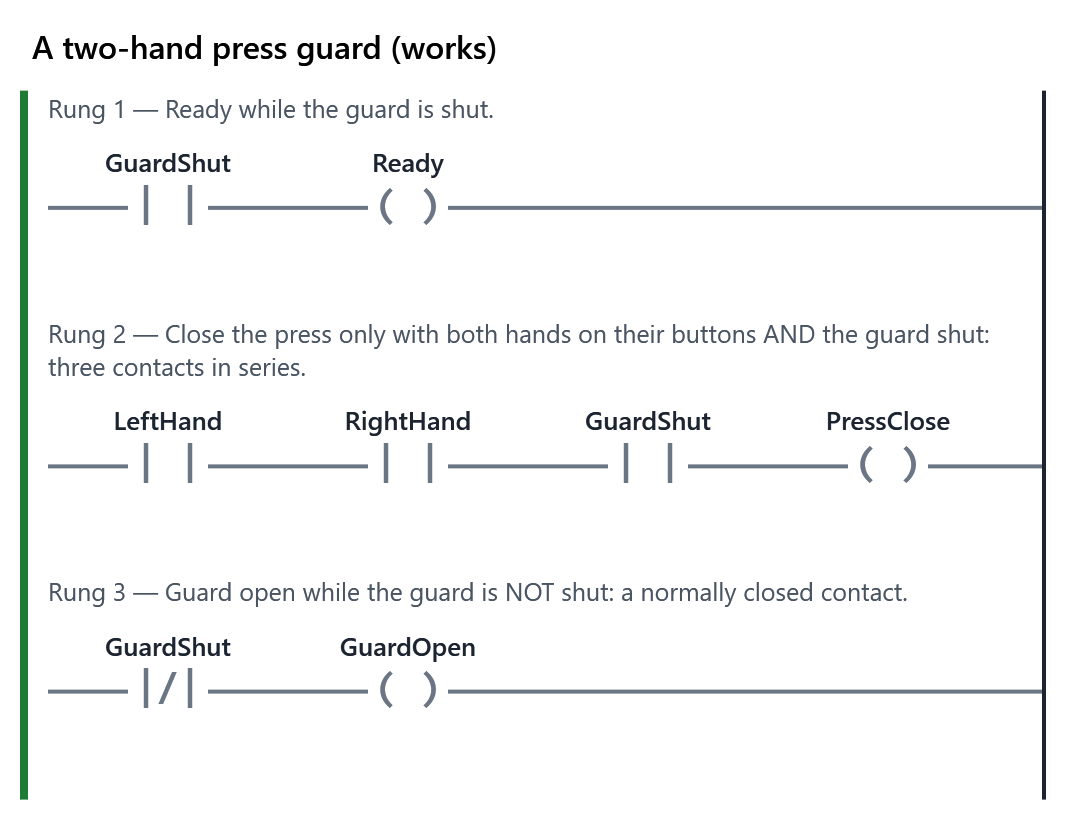
- The machine for “A two-hand press guard”, running the working program (also: A common mistake). The working program.
- Exercise
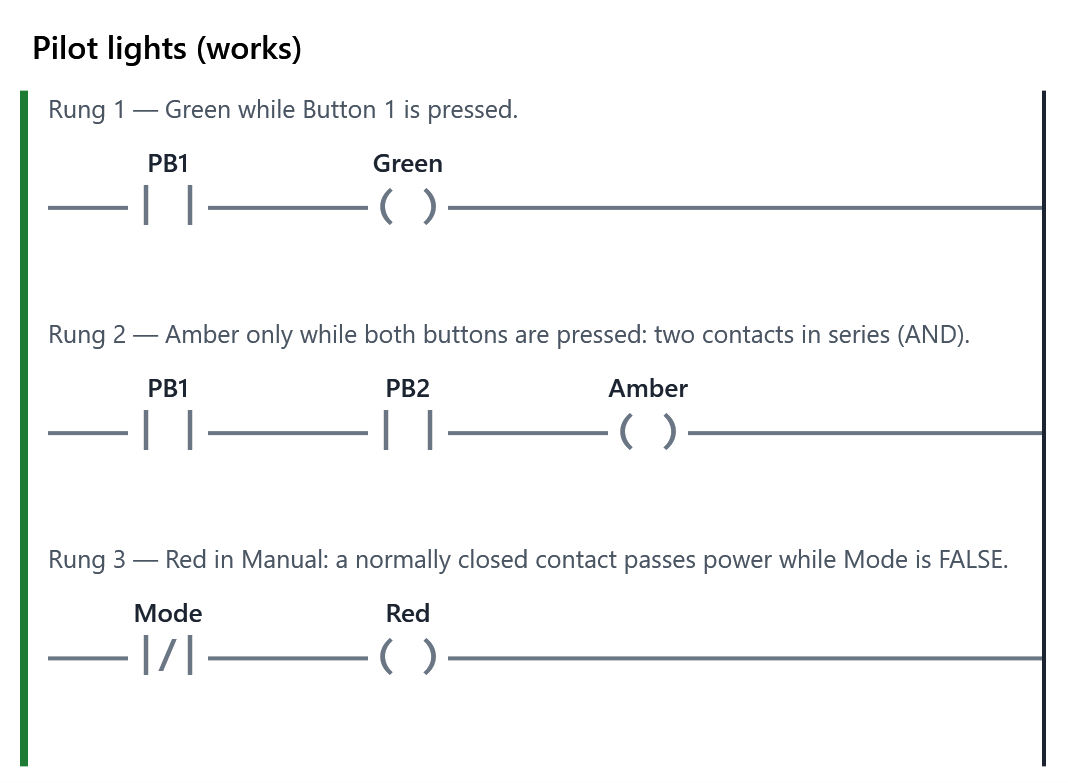
- The learner writes the program for: Green is lit while Button 1 is pressed. Amber is lit only while Button 1 AND Button 2 are both pressed. Red is lit while the Mode switch is in Manual. PLC+ checks it with 4 tests (1 hidden). Passing every test completes the item.
- Reference
- Contacts, Coils, AND and OR with contacts
The Learn tab
Contacts and coils: a pilot light station
Every rung you write has the same shape: contacts on the left that read tags, and a coil at the right-hand end that sets one.
- A normally open contact
-| |-passes power while its tag is TRUE. - A normally closed contact
-|/|-passes power while its tag is FALSE. - A coil
-( )-makes its tag TRUE while power reaches it, and FALSE when it does not.
Put contacts one after the other (in series) and power must pass through all of them: that is AND. Put them side by side (in parallel, a branch) and power can pass through either: that is OR.
The task
A station has two push buttons (PB1, PB2), a Mode switch and three lights. Light them like this:
- Green while Button 1 is pressed;
- Amber only while Button 1 AND Button 2 are both pressed;
- Red while the Mode switch is in Manual. Mode is TRUE in Auto and FALSE in Manual, so which kind of contact passes power when its tag is FALSE?
How to do it
- Open the Example tab: a press guard station worked out with the same ideas (series contacts for AND, a normally closed contact for NOT). Press the hand buttons, turn the Guard switch, and watch the rungs. A common mistake (choose it in Program, above the machine) puts the hand buttons in parallel: try one hand alone. Then write your own program for the pilot lights:
- Open the Exercise tab. Your program starts with the station's tags and one rung. Click the contact: its Tag box (above the rungs) is ready for typing. Type PB1 and press Enter. Click the coil, type Green and press Enter.
- Add a rung (New rung) for each of the other lights. For Amber, add a second contact after the first (select the first contact, then Contact).
- Press Check my program. Each test says what it expected and when.
When every test passes, this item is complete.
Your comments on this item
5.2 The seal-in: start and stop a motor
about 40 minutes · builds on 5.1
- Example
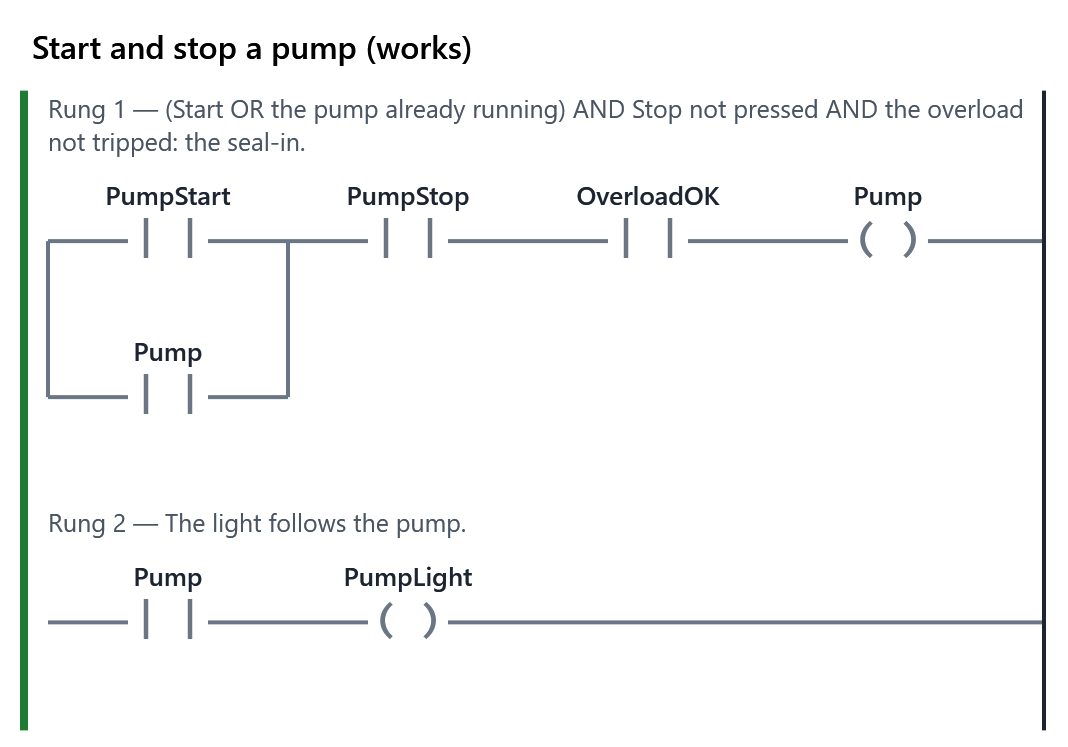
- The machine for “Start and stop a pump”, running the working program (also: A common mistake). The working program.
- Exercise
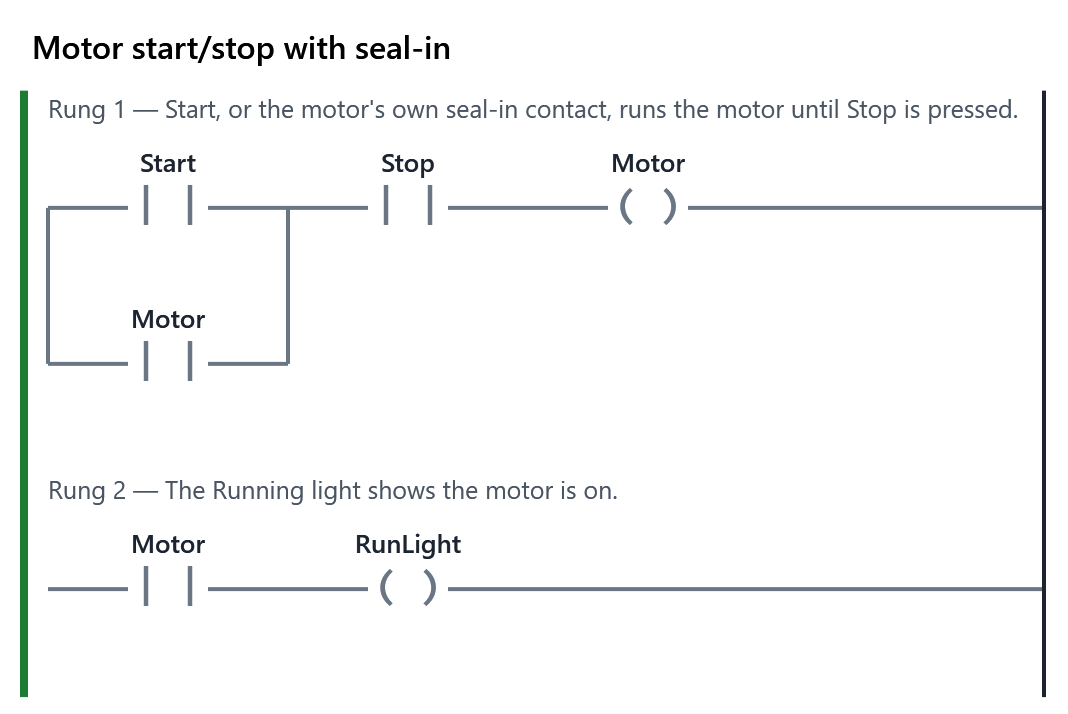
- The learner writes the program for: Press Start and the motor runs, and keeps running after you let go. Press Stop and it stops. The Stop button is wired normally closed: its input is TRUE while nobody is pressing it. PLC+ checks it with 3 tests (1 hidden). Passing every test completes the item.
- Reference
- The seal-in (holding) circuit, Why Stop is checked with a normally open contact, Contacts, Coils
The Learn tab
The seal-in: start and stop a motor
In module 3 you met the seal-in circuit as relays. Now you write it as a program.
The motor station has a Start button, a Stop button wired normally closed, a Motor output and a Running light (tag RunLight). The task:
- press Start and the motor runs, and keeps running after you let go;
- press Stop and it stops;
- if both are pressed, Stop wins.
The rung
The motor's coil needs power while (Start OR Motor) AND Stop:
- a branch puts the Motor's own contact in parallel with Start: that is the seal-in;
- after the branch, a contact of Stop. Stop is TRUE until it is pressed, so a normally open contact passes power until someone presses Stop.
A second rung lights RunLight while Motor is on.
How to do it
First, the Example tab: a different machine, a pump, running the same idea, with an overload relay in series as well. Its A common mistake (choose it in Program, above the machine) is the one students make most often: a normally closed contact for Stop, because the button is "a stop button". Press Start on it and see what happens; the Reference tab explains why. Then write your own program for the motor:
- In the Exercise tab, click the first contact. Its Tag box (above the rungs) is ready for typing: type Start and press Enter.
- Press Branch: a new contact appears below Start, in parallel with it, with its Tag box ready. Type Motor and press Enter.
- Click the coil, type Motor and press Enter. Then press Contact: with the coil selected, the new contact goes in before the coil. Type Stop and press Enter.
- New rung: a contact of Motor and a coil of RunLight.
- Hold Start, let go, then press Stop, and watch the rungs. Then press Check my program.
In your own program, try leaving out the seal-in contact too, and see what the motor does when you let go of Start.
Your comments on this item
5.3 Limit switches and interlocks: a garage door
about 50 minutes · builds on 5.2
- Example
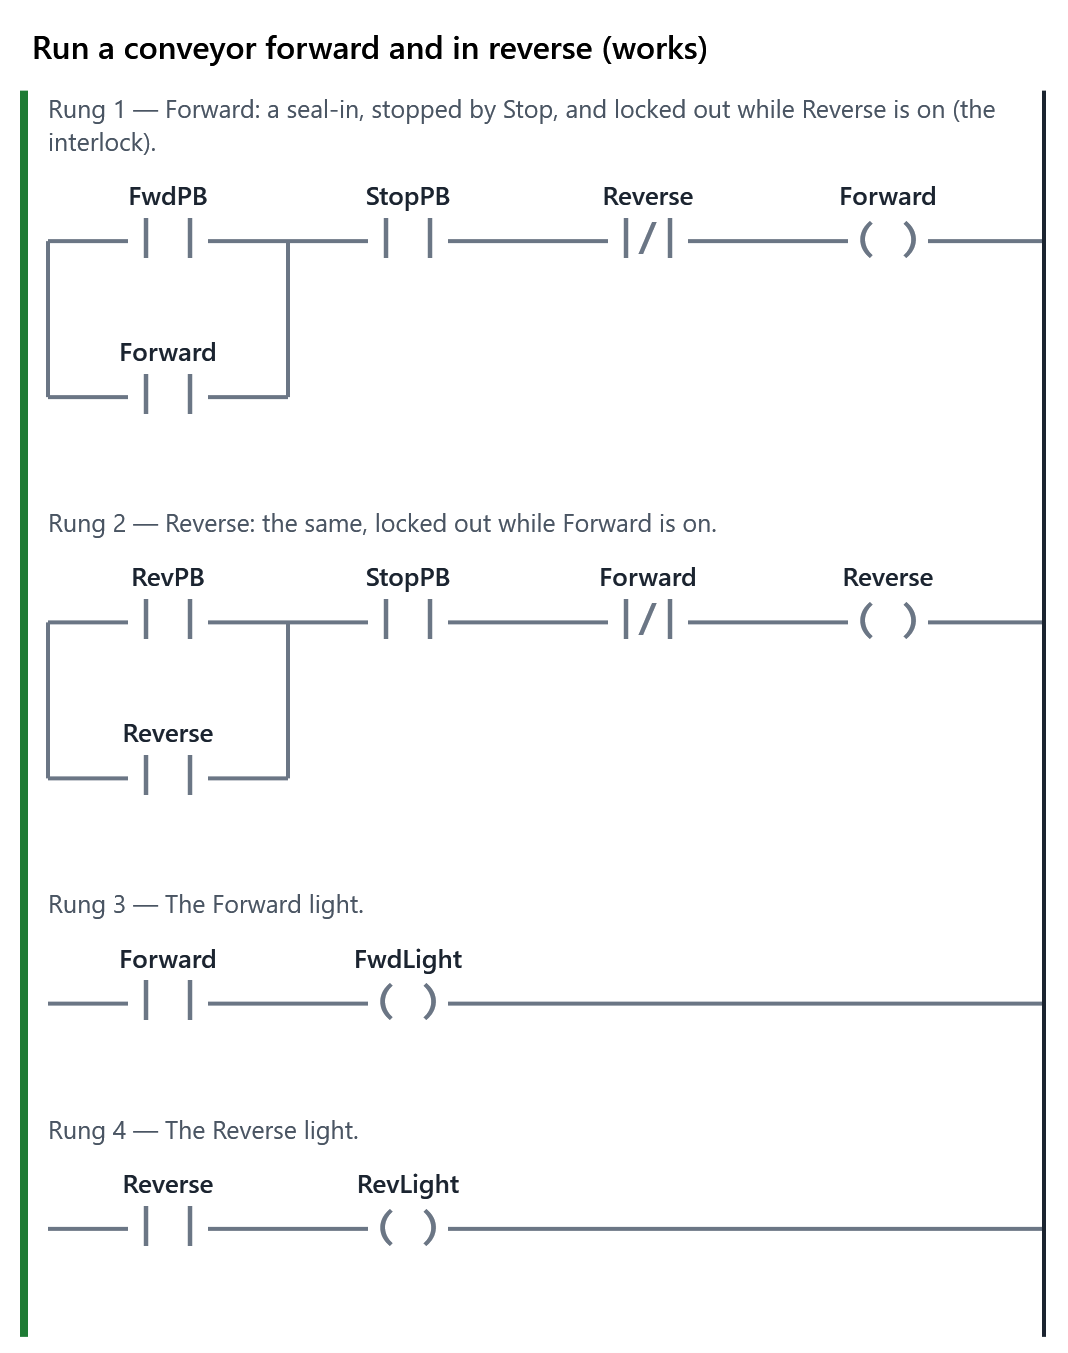
- The machine for “Run a conveyor forward and in reverse”, running the working program (also: A common mistake). The working program.
- Exercise
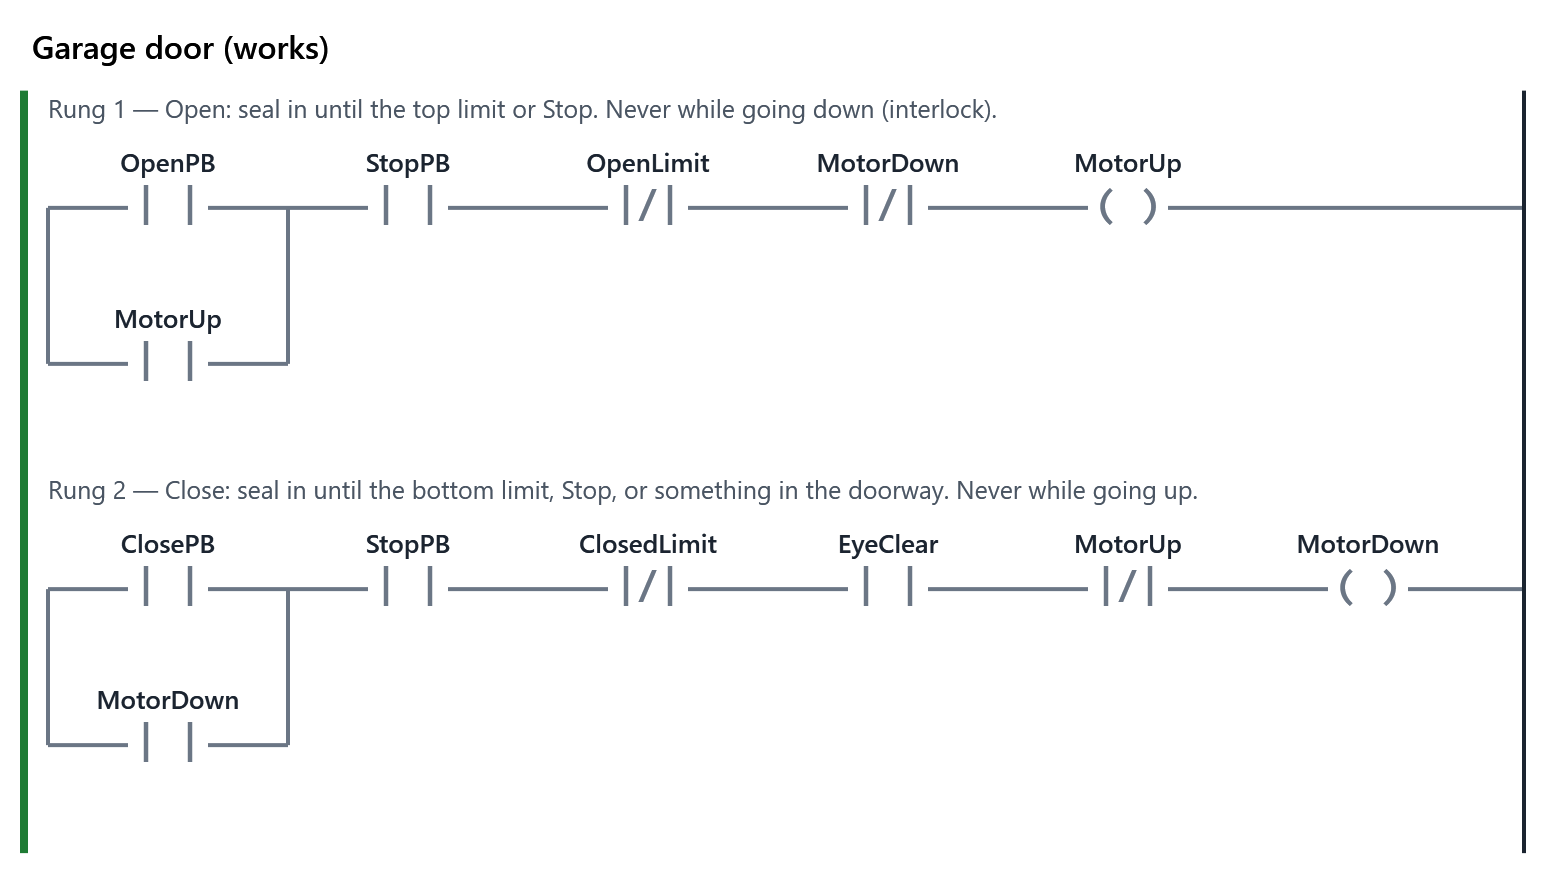
- The learner writes the program for: Open runs the door up until the top limit switch. Close runs it down until the bottom limit switch. Stop stops it either way. While the door is moving one way, the other button does nothing (an interlock), and up and down are never on together. If something is in the doorway (the safety eye is blocked), the door must stop coming down. (A real opener also reverses; that comes in a later challenge.) PLC+ checks it with 5 tests (1 hidden). Passing every test completes the item.
- Reference
- Interlocks and limit switches, The seal-in (holding) circuit, Sensors
The Learn tab
Limit switches and interlocks: a garage door
A garage door opener is two seal-in circuits, one per direction (MotorUp and MotorDown), with three extra rules:
- Limit switches. Each direction stops on its own at the end of its travel. The top limit (OpenLimit) breaks the Up rung; the bottom limit (ClosedLimit) breaks the Down rung.
- An interlock. Up and Down must never be on together: each rung has a normally closed contact of the other direction's output.
- The safety eye. While something is in the doorway, the eye is blocked (EyeClear is FALSE), and the door must not come down. The Down rung needs EyeClear.
Stop (StopPB) stops either direction. Like the motor station's Stop, it is wired normally closed.
How to build it
Start from your seal-in. The Up rung is:
(OpenPB OR MotorUp) AND StopPB AND NOT OpenLimit AND NOT MotorDown, then the MotorUp coil.
Write the Down rung the same way, with ClosePB, ClosedLimit, MotorUp and EyeClear.
The Example tab shows the interlock on a simpler machine: a conveyor motor that runs forward or in reverse. Press Forward, then Reverse while it runs: nothing happens until Stop. A common mistake (choose it in Program, above the machine) has no interlocks: try the same and read what the motor says. Your door adds the limit switches and the safety eye; test each rule on the Exercise tab as you go: open the door, close it, press Close while it is opening, and step into the doorway (the button beside the safety eye).
Then write it in the Exercise tab and press Check my program. One of the tests is hidden: it checks that the door is safe in a case the brief describes but the visible tests do not.
Your comments on this item
5.4 Set and reset: fill and drain a tank
about 50 minutes · builds on 5.3
- Example
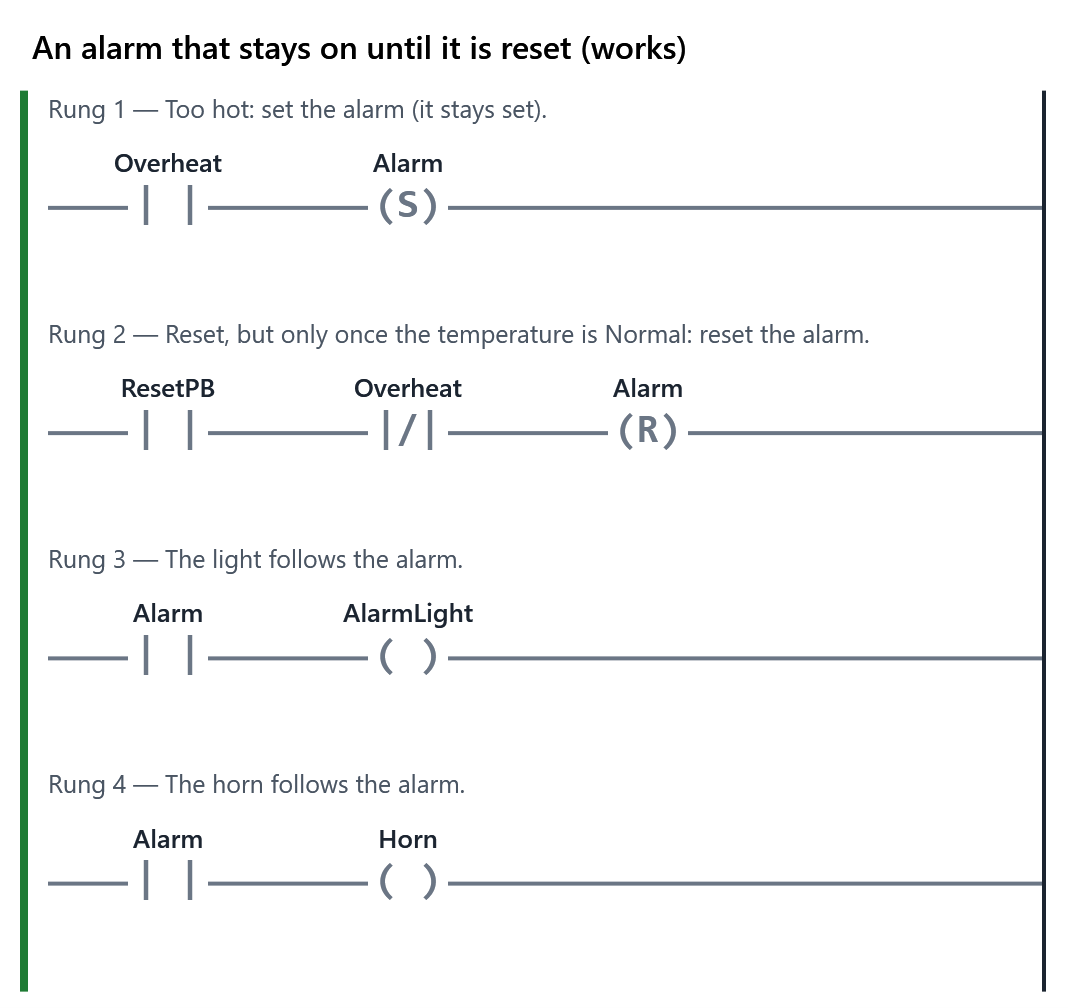
- The machine for “An alarm that stays on until it is reset”, running the working program (also: A common mistake). The working program.
- Exercise
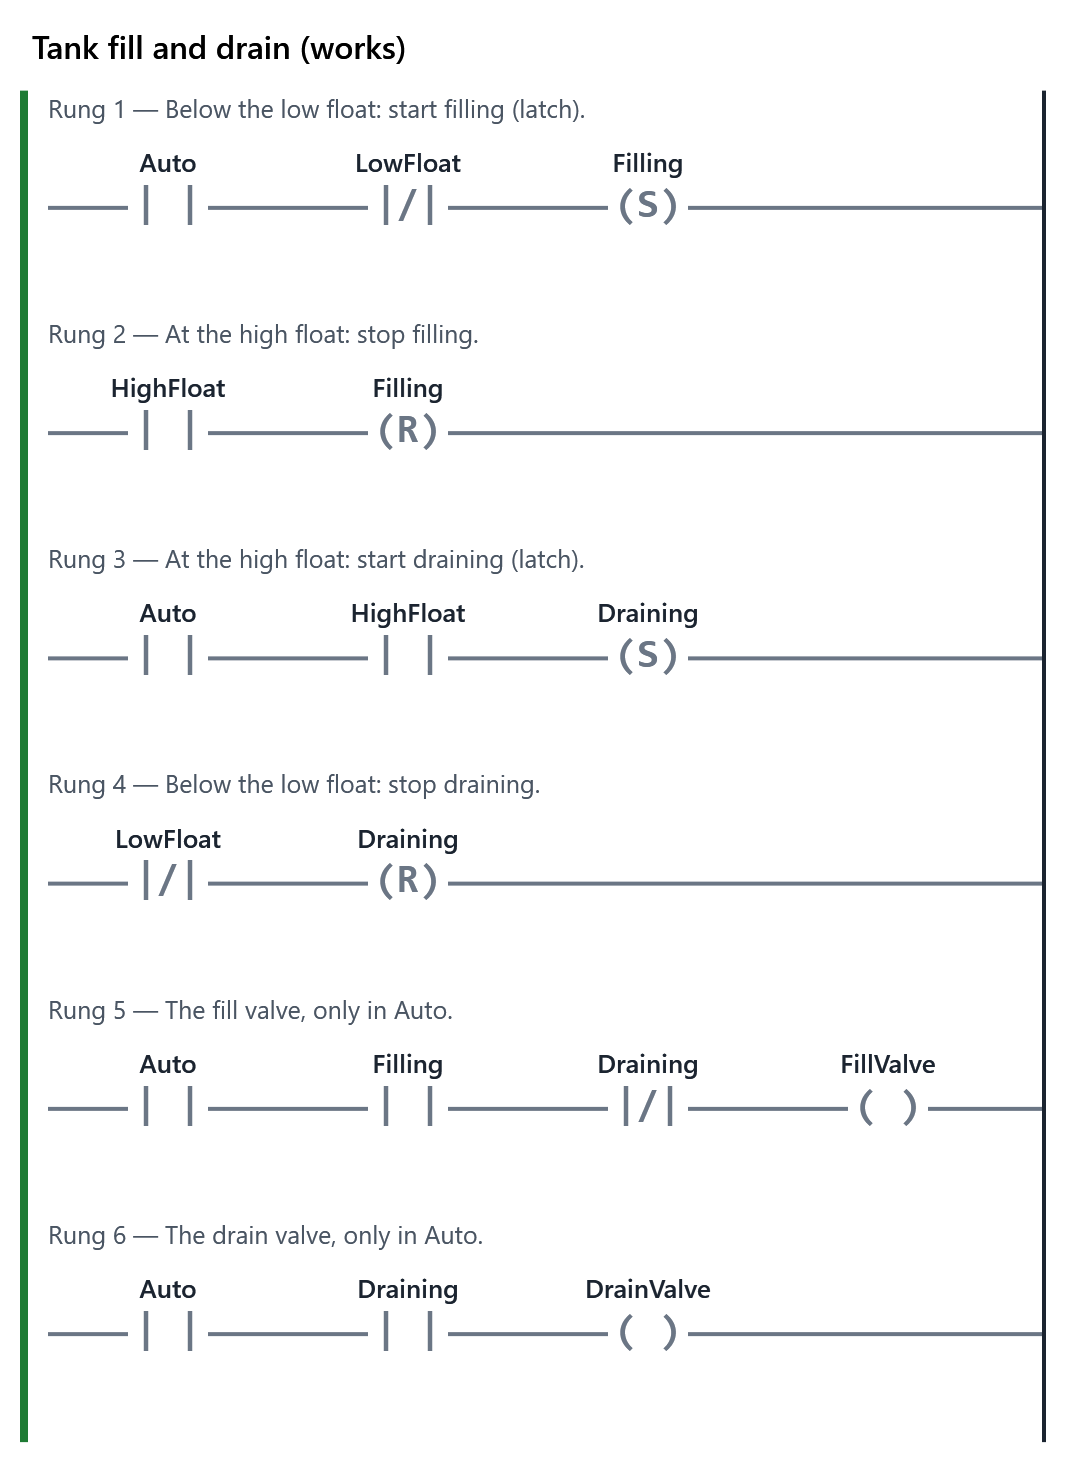
- The learner writes the program for: In Auto, fill the tank until the high float, then drain it until the liquid falls below the low float, then fill again, over and over. The two valves are never open together. Off closes both valves. PLC+ checks it with 3 tests (1 hidden). Passing every test completes the item.
- Reference
- Set and reset coils (latching), Sensors
The Learn tab
Set and reset: fill and drain a tank
A seal-in remembers that Start was pressed. A set coil and a reset coil are another way to remember:
- a set coil
-(S)-turns its tag on when power reaches it, and leaves it on; - a reset coil
-(R)-turns its tag off when power reaches it.
When power stops reaching a set coil, its tag stays on, unlike a normal coil. On the Allen-Bradley PLC these are OTL (latch) and OTU (unlatch).
The task
In Auto, fill the tank until the high float, then drain it until the liquid is below the low float, then fill again, over and over. The two valves are never open together. Off closes both.
The floats alone are not enough. Halfway up, the low float is covered and the high float is not, both when filling and when draining. The program has to remember which it is doing. Use two memory tags (tags that are not wired to anything), Filling and Draining:
- below the low float: set Filling and reset Draining;
- at the high float: reset Filling and set Draining;
- the fill valve follows Filling, and the drain valve follows Draining, only in Auto.
How to do it
- In the Example tab, see set and reset on an overheat alarm: turn the Thermostat to Too hot and back to Normal. The alarm stays on until you press Alarm reset on the machine. A common mistake (choose it in Program, above the machine) has no memory: the alarm clears itself as soon as the oven cools.
- Think about the tank the same way: what must the program remember between the low float and the high float? Without memory, the valves follow the high float alone, and the level chatters around 80 %.
- In the Exercise tab, type a new tag name such as Filling on a coil, and PLC+ declares it for you. Change the coil's kind to Set or Reset in the box beside the tag.
Your comments on this item
5.5 Edges and memory: sort metal from plastic
about 60 minutes · builds on 5.4
- Example
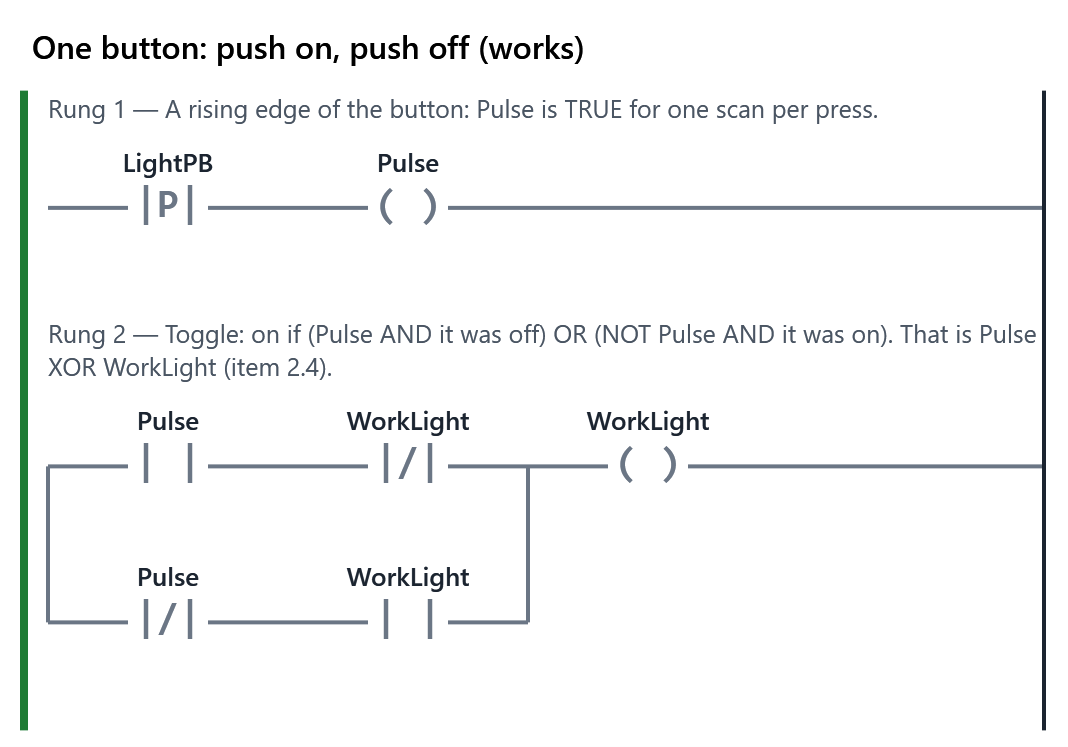
- The machine for “One button: push on, push off”, running the working program (also: A common mistake). The working program.
- Exercise
- The learner writes the program for: Start and Stop run the conveyor. Metal parts must be pushed into Bin A by the diverter; plastic parts ride on to Bin B. The metal sensor is earlier on the belt than the diverter, so the program must remember what it saw. PLC+ checks it with 3 tests (1 hidden). Passing every test completes the item.
- Reference
- Edges (one-shots), Set and reset coils (latching)
The Learn tab
Edges and memory: sort metal from plastic
Sometimes a program must act once, at the moment a signal changes, not all the time it is on. That moment is an edge:
- a rising edge contact
-|P|-passes power for one scan when its tag turns TRUE; - a falling edge contact
-|N|-passes power for one scan when its tag turns FALSE.
On the Allen-Bradley PLC a one-shot (ONS) after a contact does the same job.
The task
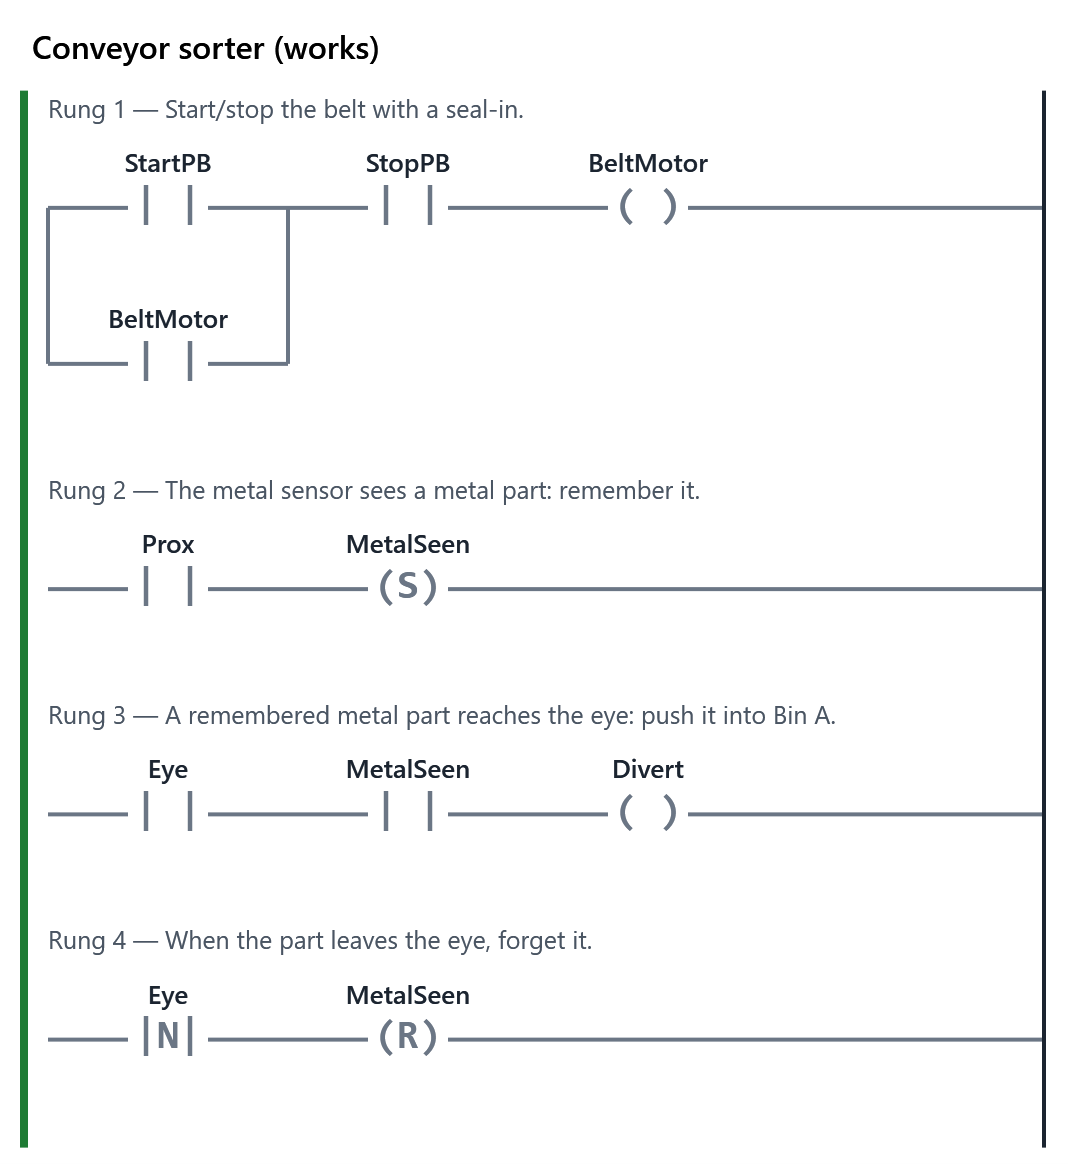
A conveyor carries metal and plastic parts. A proximity sensor (Prox) sees metal; further along, a photo eye (Eye) sees every part, and beside it a diverter (Divert) can push a part into Bin A. Metal parts go to Bin A; plastic parts ride on to Bin B. Start and Stop run the belt with a seal-in (from 5.2).
The sensor and the diverter are in different places, so the program must remember that it saw metal until that part reaches the diverter:
- Prox sees metal: set MetalSeen;
- a remembered metal part reaches the eye: Divert while MetalSeen AND Eye;
- when the part leaves the eye (a falling edge of Eye): reset MetalSeen.
How to do it
Run the Example first: one button that turns a work light on with one press and off with the next. Its rung 1 makes a one-scan Pulse from a rising edge of the button. A common mistake (choose it in Program, above the machine) uses a plain contact instead, so the light flips on and off every scan the button is held. Then write the sorter in the Exercise tab. Watch MetalSeen turn on at the sensor and off as the part leaves the eye. If you are tempted to divert using Prox directly, try it, and see which bin the metal ends up in.
Your comments on this item
5.6 Module check
about 15 minutes
- Module check
- Complete when every item it covers is: 5.1, 5.2, 5.3, 5.4, 5.5. Its questions, on the Exercise tab, are below; it is complete when those items are and the questions are passed. Once it is complete, the learner makes the PDF progress report to hand in (Hand in a report).
The Learn tab
Module check: basic ladder programming
This check covers the five exercises of module 5. Each is complete when its program passes every test on the Exercise tab.
The check itself is eight questions, on the Exercise tab. Two of them are find the fault: a machine runs the working program, but one of its wires is faulty. Work the machine, watch the rungs, and say what is wrong. You need 80 % to pass, and you can try again.
When all five exercises pass and you have passed the questions, the module is complete and ready to hand in: Hand in a report (the second row of the path) makes the PDF progress report for your instructor, with your score on each exercise and a picture of each program.
The questions (on the Exercise tab)
8 questions; the learner needs 80 % to pass and can try again. A wrong answer says “not quite, look again”; the reason is shown once the answer is right. The right answers are marked ✓ here only.
Choose one. Mode is TRUE in Auto and FALSE in Manual. Which contact passes power to Red only in Manual?
- -| |- Mode (normally open)
- ✓ -|/|- Mode (normally closed)
- -|P|- Mode (rising edge)
- -|N|- Mode (falling edge)
Why: A normally closed contact passes power while its tag is FALSE, which is Manual. An edge contact passes power for one scan only.
Fill in a truth table. Amber is lit by two contacts in series: PB1 then PB2. Fill in when Amber is on.
Truth table: PB1 AND PB2
PB1 PB2 PB1 AND PB2 FALSE FALSE FALSE FALSE TRUE FALSE TRUE FALSE FALSE TRUE TRUE TRUE ✓ Why: Contacts in series make AND: power passes only through both.
Find the fault: a machine with a faulty wire, running the working program. This motor station runs the working program, but something is wrong with its wiring. Try the buttons and watch the rungs. Which fault does it have?
Machine: Start and stop a motor; the fault:
Stop:open- ✓ The wire to Stop is broken: Stop always reads FALSE
- The wire to Start is broken: Start always reads FALSE
- Start is shorted: it always reads TRUE
- There is no seal-in in the program
Why: Start passes power when pressed, but the Stop contact never does: its input is FALSE all the time, as if Stop were held down. The motor cannot start, which is the safe way to fail.
Find the fault: a machine with a faulty wire, running the working program. This garage door runs the working program, but one input is faulty. Try Open, Close and Stop. Which fault does it have?
Machine: Open and close a garage door safely; the fault:
OpenLimit:shorted- ✓ The top limit switch is shorted: the PLC always thinks the door is at the top
- The bottom limit switch is broken
- The safety eye is blocked
- The Close button is shorted: it always reads pressed
Why: Open does nothing: on the rungs, OpenLimit reads TRUE although the door is at the bottom, so the Up rung never gets power.
Match each one. Match each instruction to what it does.
-(S)-→ Turns its tag on, and leaves it on-(R)-→ Turns its tag off-|P|-→ Passes power for one scan when its tag turns on-|N|-→ Passes power for one scan when its tag turns off
Why: Set and reset coils latch and unlatch a tag; edge contacts act once, at the moment a tag changes.
Choose one. Halfway up the tank, why can the valves not simply follow the floats?
- ✓ The floats read the same while filling and while draining, so the program must remember which it is doing
- The floats are too slow for the PLC
- A valve cannot be driven by a contact
- The PLC scans too fast
Why: Between the floats the inputs are the same either way. A memory tag (Filling, Draining) set and reset at the floats remembers.
A number. PLC+ scans every 10 ms. For how many milliseconds does a rising-edge contact pass power when its tag turns on?
✓ 10 ms (within 0)
Why: An edge contact passes power for exactly one scan.
Choose every one that is right. Which of these must the garage door's Down rung check? Choose every one.
- ✓ StopPB (not pressed)
- ✓ EyeClear (the doorway is clear)
- ✓ NOT ClosedLimit (not already at the bottom)
- ✓ NOT MotorUp (not going up: the interlock)
- OpenLimit (at the top)
Why: The door must be able to come down from part-way open, so the top limit is not needed.