← The review guideReference pages
Module 11 · Troubleshooting
First draft, for your review · about 5.5 hours
Recommended first
Module 6, Timers and counters (recommended, not enforced)
What the learner will be able to do
- Follow a troubleshooting method, and use diagnostic tools (live values on the rungs, the wiring list, stepping one scan, forcing, the replay of a failed test) to find where a fault is. (plc.m11.o1)
- Find the fault in a machine with a wiring or device failure (a broken wire, a short, two wires crossed, a stuck sensor, or an output device that does not work), and tell it apart from a program fault. (plc.m11.o2)
- Find a bug in a program that does not do what its task asks (a double coil, a seal-in on the wrong tag, a timer reset every scan), fix it, and test the fix. (plc.m11.o3)
Topics
A troubleshooting method · PLC+'s diagnostic tools, and forcing · Input faults: broken wires, shorts, crossed wires, stuck sensors · Output and device faults · Program faults: find and fix the bug
About this module
Machines stop. A good technician does not guess and swap parts until it works: they follow a method, and let the PLC show them where to look. This module teaches that method and the tools that go with it.
The PLC is the best meter on the machine. Its rungs show every input as the program sees it and every output as the program sets it. Compare that with what the machine is really doing, and the fault is in one of three places: the inputs (a sensor, a button or their wiring), the outputs (a motor, a valve, a lamp or their wiring), or the program.
Items 1 to 3 are readings with practice questions: the tools, then input faults, then output faults. Each practice question is a machine with a real fault for you to find, on machines you know from module 5. Items 4 to 6 are exercises of a new kind: My program starts as someone else wrote it, with a bug in it. You find the bug, fix it, and press Check my program. The module check mixes every kind of fault.
You need module 6 first, because one of the bugs is in a timer.
The items
Each item has four tabs in PLC+: Learn (the lesson below), Example (a machine running a working program), Exercise (the learner writes the program; PLC+ checks it) and Reference. Every item has a comment box under it.
- 11.1 A method, and the tools to use
- 11.2 Input faults: wires, shorts and stuck sensors
- 11.3 Output and device faults
- 11.4 Find and fix the bug: a double coil
- 11.5 Find and fix the bug: a seal-in on the wrong tag
- 11.6 Find and fix the bug: a timer reset every scan
- 11.7 Module check
11.1 A method, and the tools to use
about 45 minutes
- Example
- The machine for “Start and stop a pump”, running the working program (also: A common mistake). The working program.
- Exercise
- Practice questions (below). Passing them completes the item.
- Reference
- Troubleshooting: the method, Diagnostic tools
The Learn tab
A method, and the tools to use
When a machine misbehaves, it is tempting to guess: change a part, change the program, try again. Guessing is slow, costs parts, and can hide the real fault. A technician follows a method, the same way every time.
The method
- Observe the symptom. What should happen, and what happens instead? Make it happen again on purpose, and watch.
- Check the outputs. On the rungs, is the output's coil TRUE? If it is TRUE and the device does not move, the fault is on the output side (item 3). If it is FALSE, keep going.
- Check the inputs. On the rungs, does each input's contact change when you work its button or sensor? An input that never changes, or that is TRUE when nothing is there, points at that input (item 2).
- Compare with what the program expects. Read the rung that drives the output, contact by contact: which one does not pass power, and should it?
- Divide the problem. Each check cuts the machine in half (program or machine, inputs or outputs) until one part is left.
- Fix it, the smallest change that cures the cause, not the symptom.
- Test it. Work the machine through everything it should do, not only the part that failed.
- Record it: what you saw, what was wrong, what you changed.
PLC+'s tools
Every machine in PLC+ has these tools; the Reference tab lists their twins on a real PLC.
- Live values on the rungs. Under every contact and coil is its tag's value, TRUE or FALSE. A contact that passes power is green and thick. This is your meter: it shows what the PLC sees and what it sets.
- What every part is doing, under the machine (open it). Each part's real state in words: "Pump P1: running", "Stop button: not pressed", "Photo-eye: senses a part in front of it". When a rung says one thing and this list says another, the fault is between the PLC and that part.
- The wiring: which tag is which, under the machine. Every input and output tag and what it means: "PumpStop (input): Stop push button (normally closed): TRUE while it is NOT pressed". Read it before deciding a value is wrong.
- Pause / Run stops and starts the simulated clock. Step one scan (while paused) runs exactly one scan, 10 ms, so you can see which rung changes first.
- keep pressed, under each push button, holds the button down for you while you step.
- Reset starts again from power-up: every tag off, the machine as it began. It also removes every force.
- Forcing. Right-click a contact or coil of a wired tag and choose Force Tag ON or Force Tag OFF. The PLC then uses that value whatever the machine does, and the rung shows FORCED in place of the value. Choose Remove the force to let the tag follow the machine again. Forcing an input asks "does the program work if this input does?"; forcing an output asks "does the device work if the PLC turns it on?"
On an exercise there are two more. Check my program runs the task's tests; when one fails, Replay the failed test runs it again on the machine, pressing the buttons itself, and stops just after the moment it failed; the results say What happened in the test, step by step. And the Problems list under My program names anything the PLC cannot run, such as a contact with no tag. The Problems list cannot see a program that runs but does the wrong thing: only you and the tests can.
A word about forcing a real machine
A force can move a machine past the guards and interlocks the program checks. On a real machine, force only with permission and everyone clear, and remove the force when you are done. Allen-Bradley controllers light a FORCE light while forces are on, so the next person knows.
Try it
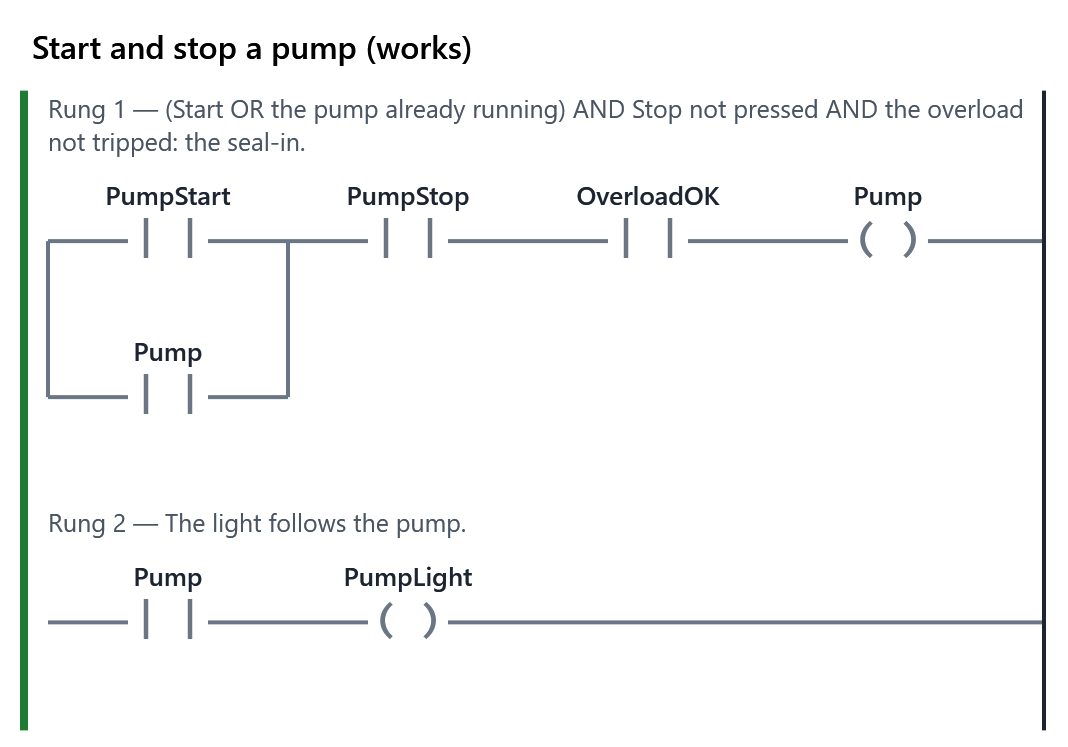
On the Example tab is the pump station from module 5, running its working program. Start the pump, then:
- Open What every part is doing and The wiring: which tag is which.
- Press Pause, tick keep pressed under Stop, and press Step one scan: watch PumpStop turn FALSE and the Pump coil drop in that one scan. Untick it and press Run.
- Right-click the OverloadOK contact and choose Force OverloadOK OFF: the pump stops, as if the overload had tripped, though the switch on the machine still says OK. Choose Remove the force, or press Reset.
Then answer the questions on the Exercise tab and press Check my answers.
The questions (on the Exercise tab)
7 questions; the learner needs 80 % to pass and can try again. Practice: a wrong answer shows the right one. The right answers are marked ✓ here only.
Choose one. A conveyor will not start. What is the first step of the method?
- ✓ Observe the symptom: press Start, and see exactly what does and does not happen
- Change the motor's contactor: it is the part most likely to fail on a conveyor
- Rewrite the Start rung: a program fault is the most common cause of no start
- Force the motor's output ON: if the belt then runs, the motor side is fine
Why: First see the symptom for yourself, on purpose. Changing parts or the program before you know where the fault is is guessing.
Choose one. On the rungs, the Motor coil is TRUE, but What every part is doing says the motor is stopped. Where is the fault?
- ✓ On the output side: between the PLC's output and the motor (wiring, contactor, overload, the motor itself)
- On the input side: in the Start button's wiring, so the PLC never saw Start pressed
- In the program: the Motor rung is wrong, so it turns on the coil at the wrong moment
- In the scan: the PLC is too slow, so the output is turned on too late for the motor
Why: The program has done its job: it turned Motor on. The inputs and the program are not the cause, so look past the output.
Match each one. Match each tool to what it tells you.
Live values on the rungs→ What the PLC sees and sets, tag by tagWhat every part is doing→ What each part of the machine is really doingThe wiring: which tag is which→ Which tag goes with which device, and when it is TRUEStep one scan→ One pass through the program, 10 ms, while pausedReplay the failed test→ A failed test run again on the machine, up to the moment it failed
Why: Comparing the first two is the heart of troubleshooting: where what the PLC sees and what the machine does disagree, the fault is in between.
Find the fault: a machine with a faulty wire, running the working program. This pump station runs its working program, but one input is faulty. Press Start and watch every contact on rung 1, and open What every part is doing. Which fault does it have?
Machine: Start and stop a pump; the fault:
OverloadOK:open- ✓ The overload relay's wire is broken: OverloadOK reads FALSE although the relay says OK
- The Stop button's wire is broken: PumpStop reads FALSE although nobody presses Stop
- The pump motor has failed: the PLC turns the pump on, but the pump does not run
- The Start button's wire is broken: PumpStart never turns TRUE when Start is pressed
Why: PumpStart turns TRUE when pressed and PumpStop is TRUE, but OverloadOK stays FALSE although the machine says the relay is OK. The pump coil never turns on, so it is not the motor.
Choose one. You right-click the contact of an input and choose Force … ON. What happens?
- ✓ The PLC uses TRUE for that input, whatever the machine does, until the force is removed or you press Reset
- The button on the machine is pressed for you, and the machine shows it held down until you let it go
- The PLC uses TRUE for that input for one scan, then reads the machine again as usual
- The wire to that input is mended, so it reads the machine correctly until you press Reset
Why: A force replaces what the PLC reads with the value you choose. The machine itself is unchanged; the rung shows FORCED in place of the value.
Choose one. A program has two coils of Horn on different rungs, and the Problems list is empty. Why does the Problems list not catch it?
- ✓ It lists only what stops the PLC running the program (a missing tag, a wrong type); a program that runs but does the wrong thing is found by testing
- It checks only the Example tab's program (a missing tag, a wrong type); My program is checked only when you press Check my program
- Two coils of one tag are always correct: the PLC runs both rungs, each sets the tag in turn, and the program does what it was written to do
- It is brought up to date only when you press Reset (a missing tag, a wrong type), so until then it still shows the last check's problems
Why: The program is written correctly, so it runs; it just does not do what the task asks. That is what the tests, the replay and your own eyes are for.
Choose every one that is right. On a real machine, which of these are right about forcing? Choose every one.
- ✓ Force only with permission, and with everyone clear of the machine
- ✓ A force can move the machine past the guards and interlocks the program checks
- ✓ Remove every force when you are done
- Forces are harmless, because the program still runs and checks the guards
Why: A forced output moves whatever the program says. On an Allen-Bradley controller the FORCE light shows that forces are on.
Your comments on this item
11.2 Input faults: wires, shorts and stuck sensors
about 50 minutes · builds on 11.1
- Example
- The machine for “A two-hand press guard”, running the working program (also: A common mistake). The working program.
- Exercise
- Practice questions (below). Passing them completes the item.
- Reference
- Kinds of fault, Troubleshooting: the method
The Learn tab
Input faults: wires, shorts and stuck sensors
An input fault means the PLC sees something different from what the button or sensor is doing. The program may be perfect: it acts on what it is told, and it is being told wrong.
The four kinds
| Fault | What the PLC sees | What you notice |
|---|---|---|
| A broken wire (open circuit) | the input is always FALSE | pressing the button or covering the sensor does nothing to its contact |
| A short (to the supply) | the input is always TRUE | its contact is TRUE with nothing there |
| Two wires crossed | the input follows the wrong device | its contact changes when you work another button or sensor |
| A stuck sensor | always TRUE, or always FALSE | the same as a short or a broken wire, but the fault is in the sensor itself |
A stuck sensor and a bad wire look exactly the same from the PLC. You tell them apart at the machine: a sensor has its own small light that shows what it thinks, and with the power safely isolated a meter can test the wire. In PLC+, What every part is doing plays the part of looking at the machine: it says what the part really does, and the rung says what the PLC sees.
Why the wiring of Stop matters
A Stop button is wired normally closed so that its input is TRUE while all is well. If that wire breaks, the input goes FALSE, and the machine stops or will not start: it fails safe. But a short on a Stop input makes it TRUE for ever, and Stop no longer stops anything. That is why emergency stops are wired straight into the power circuit as well, never only through a PLC input.
Finding an input fault
- Find the output that misbehaves, and read its rung.
- Work each input on that rung, one at a time, and watch its contact. Does it change when you press or cover it? Does it change when you work something else?
- Compare with The wiring: which tag is which. A normally closed Stop that reads TRUE while not pressed is right, not a fault.
- Confirm with a force. Force the suspect input to the value it should have. If the machine now works, the program is fine and the fault is in that input's device or wire.
A worked example
A motor station's motor will not start. Start's contact turns green when the button is pressed, but the Stop contact is FALSE and stays FALSE, though nobody is pressing Stop. The wiring list says Stop is TRUE while it is NOT pressed, so FALSE means "pressed" to the PLC. Forcing Stop ON lets the motor start. The fault: the wire to the Stop button is broken, or the button's contact has failed open. The motor failed safe.
Try it
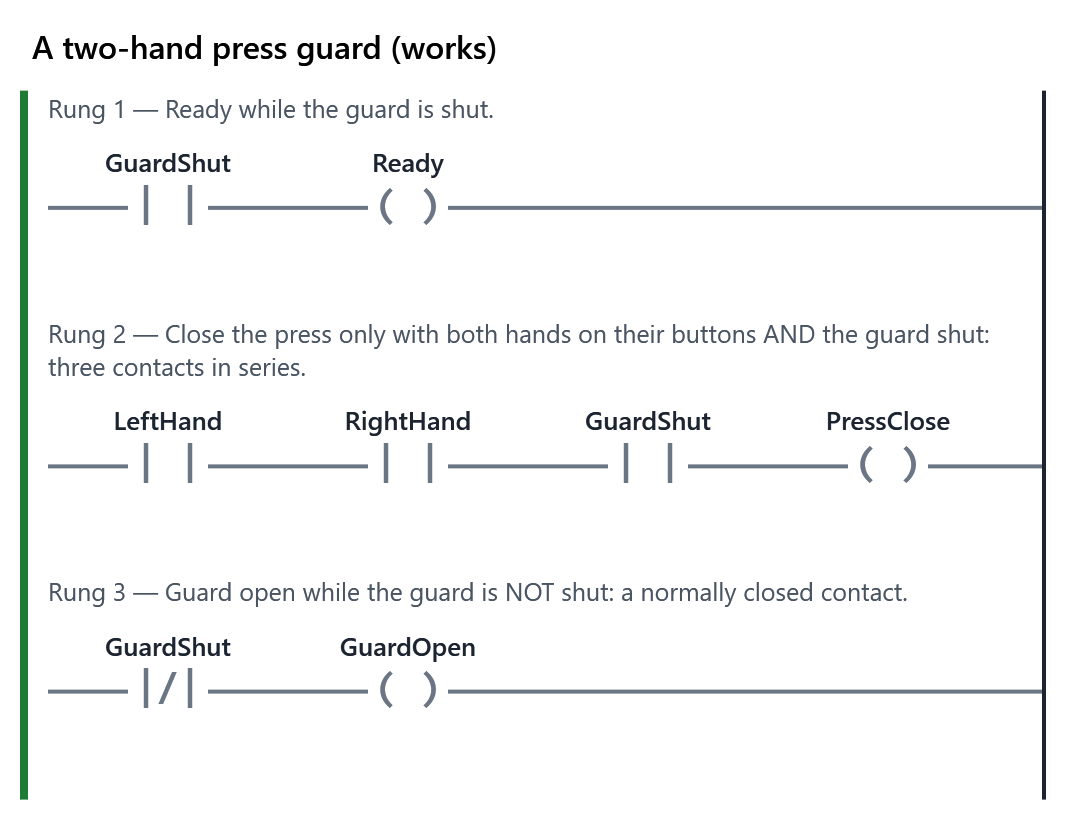
On the Example tab is the press guard from module 5, working. Practise reading inputs: press each hand button alone and watch which contacts on rung 2 turn green; turn the Guard switch and watch the three rungs. Then right-click the GuardShut contact and choose Force GuardShut ON with the guard open: Ready lights and the press can close, with the guard open. That is what a shorted guard switch would do, and why safety guards are not trusted to one input alone. Choose Remove the force.
Then open the Exercise tab. Each question is a machine you know from module 5, running its working program with one real fault. Work it as the question says, watch the rungs, and choose what is wrong. Press Check my answers.
The questions (on the Exercise tab)
8 questions; the learner needs 80 % to pass and can try again. Practice: a wrong answer shows the right one. The right answers are marked ✓ here only.
Find the fault: a machine with a faulty wire, running the working program. This pilot light station runs its working program, but one input is wired wrong. Press Button 1 alone, then Button 2 alone, and watch the PB1 and PB2 contacts. Which fault does it have?
Machine: Light the pilot lights; the fault:
PB2:swapped:PB1- ✓ PB2's input is wired to Button 1: PB2 turns TRUE when Button 1 is pressed, and Button 2 does nothing
- The wire to PB2 is broken: PB2 is always FALSE, so Button 2 does nothing and Amber never lights
- PB2 is shorted: PB2 is always TRUE, so Amber is lit with nothing pressed and Button 2 changes nothing
- The Amber light has failed: the PLC turns Amber on when Button 2 is pressed, but the lamp stays dark
Why: Button 1 alone lights Green and Amber, because PB1 and PB2 both turn TRUE. With nothing pressed PB2 is FALSE, so it is not a short; and Button 2 changes nothing, because no input is wired to it.
Find the fault: a machine with a faulty wire, running the working program. This motor station runs its working program, but one input is faulty. Watch the machine from Reset, then hold Stop and let go. Which fault does it have?
Machine: Start and stop a motor; the fault:
Start:shorted- ✓ The Start input is shorted: it is always TRUE, so the motor starts by itself
- The Stop wire is broken: Stop is always FALSE, so the motor will not run
- The Stop input is shorted: it is always TRUE, so Stop cannot stop the motor
- The program has no seal-in: the motor runs only while Start is held down
Why: Start reads TRUE with nobody pressing it, so the motor runs from power-up. Stop stops it only while held; let go and Start, still TRUE, starts it again.
Find the fault: a machine with a faulty wire, running the working program. This tank runs its working program, but one input is faulty. Turn the Mode switch to Auto and watch the tank rise past 80 %. Which fault does it have?
Machine: Fill and drain a tank; the fault:
HighFloat:open- ✓ The high float's wire is broken: HighFloat stays FALSE when the liquid reaches it, and the tank overflows
- The low float's wire is broken: LowFloat is always FALSE, so the pump never empties the tank
- The fill valve has failed: it stays open after the PLC turns it off, and the tank overflows
- The Auto switch's wire is broken: the PLC never sees Auto, so the tank never starts to fill
Why: The fill valve opens and the level rises, so Auto and the valve work. At 80 % What every part is doing says the high float senses the liquid, but HighFloat stays FALSE, so nothing stops the filling.
Find the fault: a machine with a faulty wire, running the working program. This garage door runs its working program, but one input is faulty. Press Open and let the door open fully, press Step into the doorway, then press Close. Which fault does it have?
Machine: Open and close a garage door safely; the fault:
EyeClear:shorted- ✓ The safety eye's input is always TRUE (stuck clear, or shorted): the door comes down on what is in the doorway
- The safety eye's wire is broken: EyeClear is always FALSE, so the door never closes at all
- The bottom limit switch is shorted: it always reads TRUE, so the door stops as soon as it starts
- The Close button is shorted: it always reads TRUE, so the door closes as soon as it is open
Why: EyeClear stays TRUE although something is in the beam, so the Down rung lets the door close on it. From the PLC, a stuck sensor and a shorted wire look the same: both read TRUE whatever happens.
Find the fault: a machine with a faulty wire, running the working program. This sorter runs its working program, but one input is faulty. Press Start and watch rungs 2 and 3 as the first metal part passes the metal sensor and then the photo-eye. Which fault does it have?
Machine: Sort metal from plastic; the fault:
Prox:open- ✓ The metal sensor's wire is broken: Prox never turns TRUE, so metal parts ride on to Bin B
- The photo-eye's wire is broken: Eye never turns TRUE, so no part is ever diverted
- The diverter has failed: the PLC turns Divert on for metal, but the arm does not move
- The photo-eye is shorted: Eye is always TRUE, so metal parts are diverted too early
Why: What every part is doing says the metal sensor sees the metal part, but the Prox contact never turns TRUE and MetalSeen is never set. The photo-eye's contact does turn TRUE as each part passes, so the eye is fine.
Find the fault: a machine with a faulty wire, running the working program. This reversing conveyor runs its working program, but one input is faulty. Press Forward, then hold Stop. Which fault does it have?
Machine: Run a conveyor forward and in reverse; the fault:
StopPB:shorted- ✓ The Stop input is shorted: StopPB is always TRUE, so Stop never stops the motor
- The Stop wire is broken: StopPB is always FALSE, so the motor never starts
- The Forward button is shorted: it is always TRUE, so the motor starts again after Stop
- The program has no interlock: Forward and Reverse can both be on at once
Why: StopPB stays TRUE while Stop is held down. This is the dangerous way for a Stop input to fail, and why an emergency stop is also wired straight into the power circuit.
Choose one. A photo-eye's input reads TRUE all the time, with nothing in front of it. From the PLC alone, can you tell a shorted wire from a sensor stuck ON?
- ✓ No: both make the input TRUE. Look at the sensor's own light, or test the wire with a meter with the power safely isolated
- Yes: a shorted wire always makes the PLC stop with a fault and show it, and a stuck sensor does not
- Yes: a stuck sensor reads TRUE only every other scan, and a shorted wire reads TRUE in every scan
- No, and it does not matter: both are fixed the same way, by changing the program to ignore it
Why: The PLC sees only the value at its terminal. Where the fault is, the sensor or the wire, is found at the machine.
Match each one. Match each input fault to what the PLC sees.
A broken wire→ Always FALSEA short to the supply→ Always TRUETwo wires crossed→ The value of another deviceA broken wire on a normally closed Stop→ As if Stop were held down
Why: A normally closed Stop reads TRUE while all is well, so a broken wire to it reads like a press: the machine fails safe.
Your comments on this item
11.3 Output and device faults
about 40 minutes · builds on 11.2
- Example
- The machine for “Run a conveyor forward and in reverse”, running the working program (also: A common mistake). The working program.
- Exercise
- Practice questions (below). Passing them completes the item.
- Reference
- Kinds of fault, Troubleshooting: the method
The Learn tab
Output and device faults
An output fault is the other half of the machine: the PLC turns an output on, and nothing happens. The motor does not turn, the valve does not open, the lamp stays dark, the cylinder does not move.
The lesson of this item
An output's tag being TRUE does not prove the device works. The coil on the rung shows what the program asks for. Between that and the moving part are the output terminal, a fuse, the wire, often a contactor or a relay with its overload, and the device itself. Any of them can fail, and the rung will still show TRUE.
So when an output's coil is TRUE and the machine does not respond, stop looking at the program and the inputs: they have done their job.
What fails on the output side
- A blown fuse on the output module or the output circuit.
- A broken wire between the output terminal and the device.
- A contactor or relay that does not pull in, or an overload that has tripped (it protects the motor by opening the circuit).
- The device itself: a burned-out motor, a solenoid valve stuck shut, a lamp with a dead bulb, a cylinder that is jammed or has no air.
On a real PLC, the output module has a small light for each output. If the light is on, the PLC is driving the terminal, and the fault is further out. If the coil is TRUE but the module's light is off, suspect the output module or its fuse.
Finding an output fault
- Work the machine until the output should come on, and look at its coil. FALSE? Then it is not an output fault: go back to the inputs and the program (items 2, 4 to 6).
- TRUE, but What every part is doing says the device is stopped, closed or dark? It is an output fault.
- Confirm with a force. Force the output ON. If the device still does nothing, the PLC and the program are not the cause. (Forcing an output ON on a real machine moves it, so only with permission and everyone clear.)
- Then follow the circuit out: the module's light, the fuse, the contactor, the overload, the device.
Watch for knock-on symptoms
A failed device often shows up somewhere else first. If the fill valve of a tank fails, nobody sees the valve: they see a tank that never fills, and a high float that never trips. If a cylinder does not extend, a sequence waits for its "fully out" sensor for ever. Follow the method from the symptom back to the first thing that did not happen: that is where to look.
A worked example
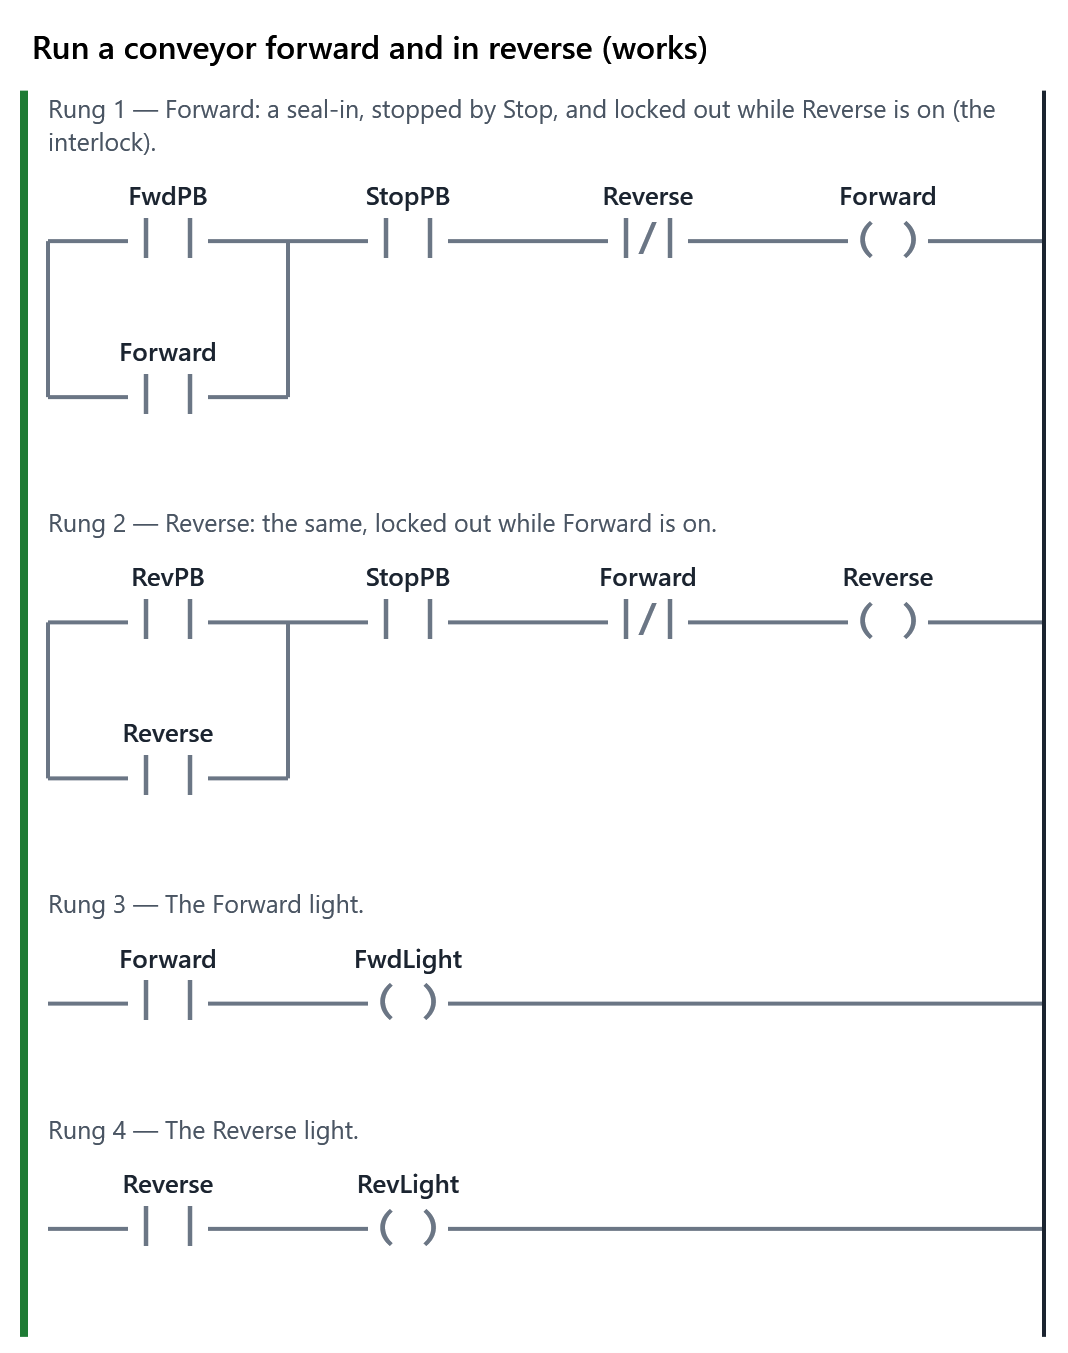
A reversing conveyor runs forward but not in reverse. Press Reverse: the Reverse light comes on, the Reverse coil on rung 2 is TRUE, and What every part is doing says the conveyor motor is stopped. RevPB, StopPB and the interlock all passed power, so the inputs and the program are fine. The light is lit by the same Reverse tag, so the PLC is asking for reverse. The fault is in the reverse contactor or its wiring.
Try it
On the Example tab is the reversing conveyor from module 5, working. Run it forward, then stop it, and right-click the Reverse coil: choose Force Reverse ON. The motor runs in reverse, though the program did not ask it to, and the rung shows FORCED. That is how a technician checks an output: if the device moves when forced, it works. Choose Remove the force, or press Reset.
Then open the Exercise tab. Each question is a machine with one fault; the wrong answers include input faults, so rule them out. Work it, compare the rungs with What every part is doing, and choose what is wrong. Press Check my answers.
The questions (on the Exercise tab)
7 questions; the learner needs 80 % to pass and can try again. Practice: a wrong answer shows the right one. The right answers are marked ✓ here only.
Find the fault: a machine with a faulty wire, running the working program. This motor station runs its working program, but something is faulty. Press Start, then look at the rungs and at What every part is doing. Which fault does it have?
Machine: Start and stop a motor; the fault:
Motor:failed- ✓ The motor or its contactor has failed: the PLC turns Motor on, and the motor does not turn
- The Start button's wire is broken: Start always reads FALSE, so Motor never turns on
- The program has no seal-in: Motor turns on only while Start is held down
- The Stop button's wire is broken: Stop always reads FALSE, so Motor never turns on
Why: The Motor coil is TRUE and stays TRUE, and the Running light (driven by the same tag) is lit, so the inputs and the program have done their job. The motor is still stopped: the fault is past the output.
Find the fault: a machine with a faulty wire, running the working program. This tank runs its working program, but something is faulty. Turn the Mode switch to Auto and wait a few seconds. Which fault does it have?
Machine: Fill and drain a tank; the fault:
FillValve:failed- ✓ The fill valve has failed: FillValve is TRUE on the rungs, but the valve stays closed and the level does not rise
- The low float is shorted: LowFloat is always TRUE, so the program never starts to fill
- The Auto switch's wire is broken: Auto is always FALSE, so FillValve never turns on
- The high float is shorted: HighFloat is always TRUE, so the program thinks the tank is full
Why: Auto is TRUE, LowFloat is FALSE (the tank is low), Filling is set and the FillValve coil is TRUE. What every part is doing says the fill valve is closed. The program asks for the right thing; the valve does not do it.
Find the fault: a machine with a faulty wire, running the working program. This reversing conveyor runs its working program, but something is faulty. Run it Forward, Stop it, then press Reverse. Which fault does it have?
Machine: Run a conveyor forward and in reverse; the fault:
Reverse:failed- ✓ The reverse contactor has failed: the Reverse coil is TRUE and the Reverse light is lit, but the motor does not turn
- The Reverse button's wire is broken: Reverse always reads FALSE, so the Reverse coil never turns on
- The interlock stops Reverse: the Forward contact on the Reverse rung keeps the Reverse coil off
- The Reverse light has failed: the motor turns in reverse, but the light that shows it stays dark
Why: Forward works, so the motor itself turns. In reverse the coil is TRUE and the light it drives is lit, but the motor stays stopped: the fault is in the reverse contactor or its wiring.
Find the fault: a machine with a faulty wire, running the working program. This overheat alarm runs its working program, but something is faulty. Turn the Thermostat to Too hot. Which fault does it have?
Machine: An alarm that stays on until it is reset; the fault:
Horn:failed- ✓ The horn has failed: the Horn coil is TRUE, but the horn is quiet
- The thermostat's wire is broken: it never reads Too hot
- The Alarm reset button is shorted: the alarm clears at once
- The program has no rung for the horn: no coil turns it on
Why: The Alarm light comes on, so the thermostat and the alarm memory work. Rung 4 turns Horn TRUE, yet What every part is doing says the horn is quiet.
Find the fault: a machine with a faulty wire, running the working program. This sorter runs its working program, but something is faulty. Press Start and watch the first metal part all the way along the belt, and rung 3. Which fault does it have?
Machine: Sort metal from plastic; the fault:
Divert:failed- ✓ The diverter has failed: Divert turns TRUE when the metal part reaches it, but the diverter stays in
- The metal sensor's wire is broken: Prox never turns TRUE, so MetalSeen is never set
- The photo-eye's wire is broken: Eye never turns TRUE, so Divert never turns on
- The program forgets MetalSeen before the part reaches the eye, so Divert stays off
Why: Prox sets MetalSeen, and when the part reaches the eye rung 3 turns Divert TRUE. The diverter does not move, so the metal part rides on to Bin B. Everything up to the output works.
Find the fault: a machine with a faulty wire, running the working program. This transfer arm runs its working program, but something is faulty. Press Start and watch the steps, the outputs and the two cylinders. Which fault does it have?
Machine: A transfer arm in four steps; the fault:
ArmOut:failed- ✓ The arm cylinder does not extend: ArmOut is TRUE in step 2, the arm stays in, and the sequence waits for ever
- The arm's fully-out sensor (ArmIsOut) has a broken wire: the arm goes out, but the sequence never sees it
- The gripper's fully-closed sensor (GripIsClosed) has a broken wire: the sequence never leaves step 1
- The Start button's wire is broken: Start never reads TRUE, so step 1 never begins
Why: The gripper closes and step 2 turns ArmOut on, but What every part is doing shows the arm still in. If the arm went out and only its sensor failed, you would see the arm out and ArmIsOut FALSE. A cylinder that does not move (no air, a jammed rod, a dead solenoid) shows up as a sequence that stops and waits.
Choose one. A pump does not run. Its coil is TRUE. You force the pump's output ON, and it still does not run. What have you learned?
- ✓ The program and the inputs are not the cause: look at the output circuit (module light, fuse, contactor, overload) and the pump
- The program is the cause: forcing did not help, so look again at the pump's rung, its contacts and its coil
- The inputs are the cause: the Start button or its wire is broken, so check them with a meter before anything else
- Nothing yet: forcing an output only tells you something once you have forced every input on its rung too
Why: Forcing takes the program out of the question. The device still does not respond, so the fault is between the output and the pump, or in the pump.
Your comments on this item
11.4 Find and fix the bug: a double coil
about 40 minutes · builds on 11.3
- Example
- The machine for “A doorbell with two buttons”, running the working program (also: A common mistake). The working program.
- Exercise
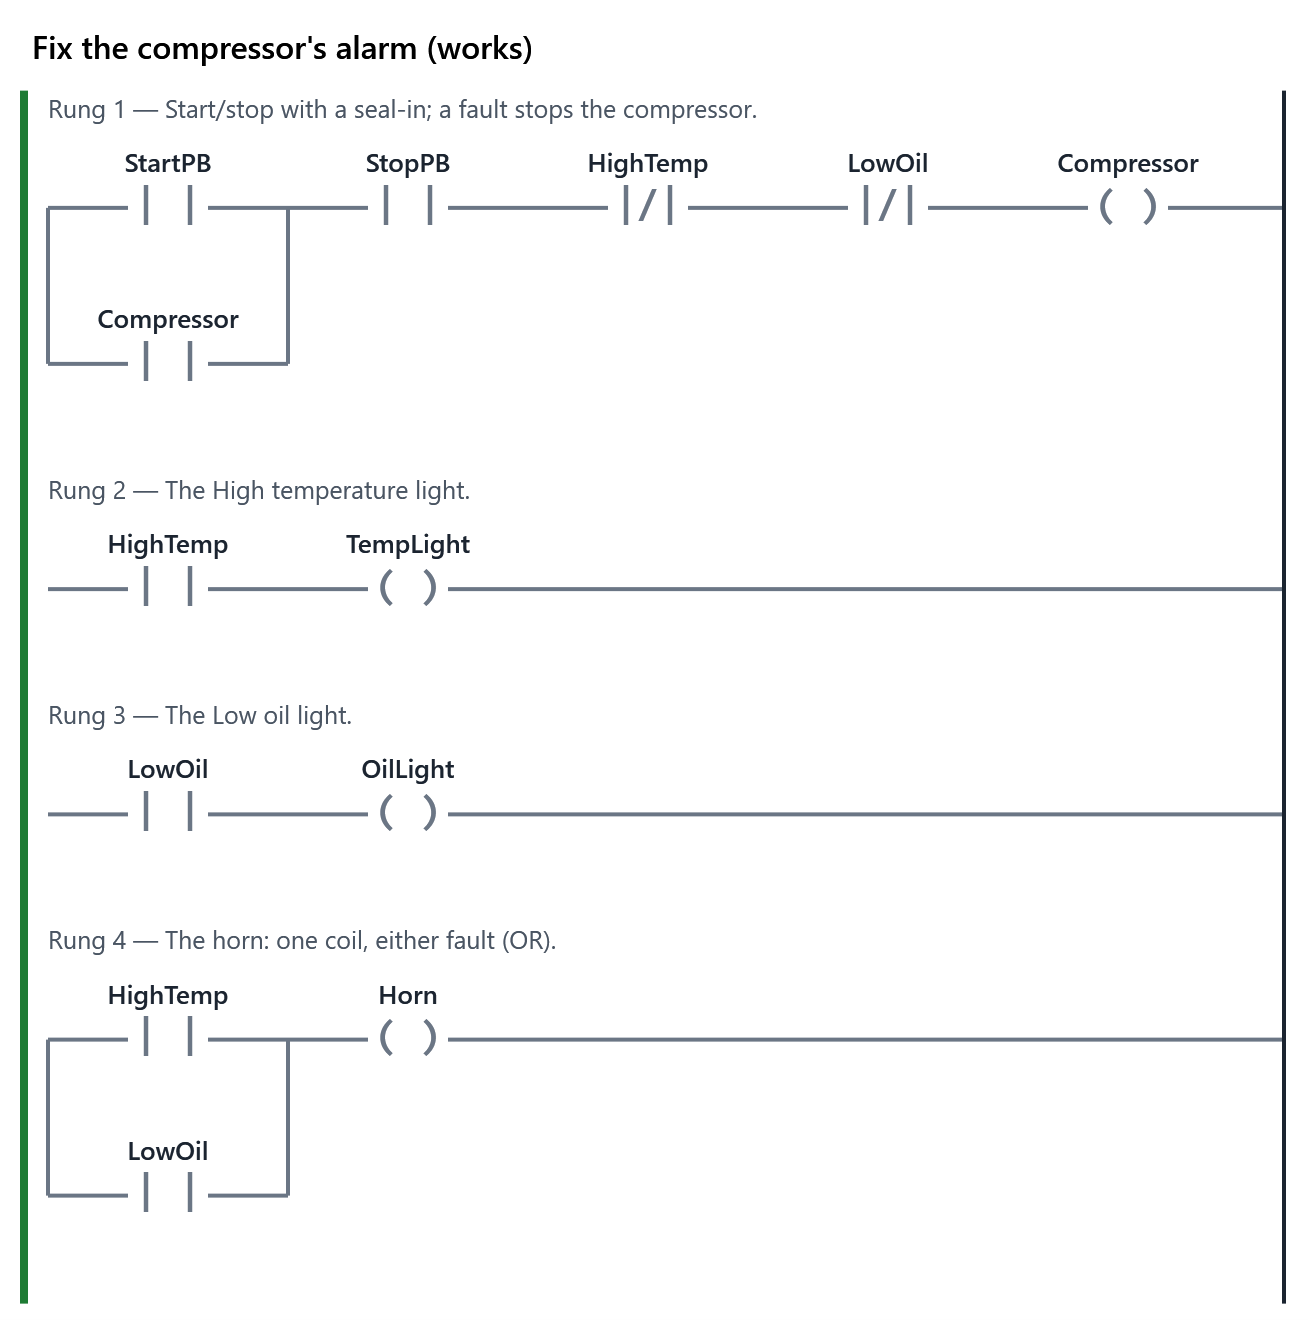
- The learner writes the program for: Start runs the compressor, and it keeps running; Stop stops it. If the temperature gets too high or the oil runs low, the compressor stops and stays stopped until someone presses Start again, that fault's own light comes on (High temperature or Low oil), and the horn sounds while either fault is there. Your program starts as someone else wrote it, and the horn does not always sound: find out when, and fix it. PLC+ checks it with 4 tests (1 hidden). Passing every test completes the item.
- Reference
- Troubleshooting: the method, The scan cycle
The Learn tab
Find and fix the bug: a double coil
Items 2 and 3 were faults in the machine: the program was right, and a wire or a device was not. Now the machine is fine and the program is wrong. Program bugs are found with the same method, and they leave the same kind of clue: the inputs are right, but an output is not what the task asks for.
From here on, My program on the Exercise tab does not start empty. It starts as someone else wrote it, with a bug in it. Your job is a technician's: make it fail, find the bug, fix it, and test the fix.
The double coil
You met it in module 4: two rungs with a coil of the same tag. The PLC runs the rungs from top to bottom in every scan, and each coil sets its tag as its rung runs. So the lower rung always has the last word:
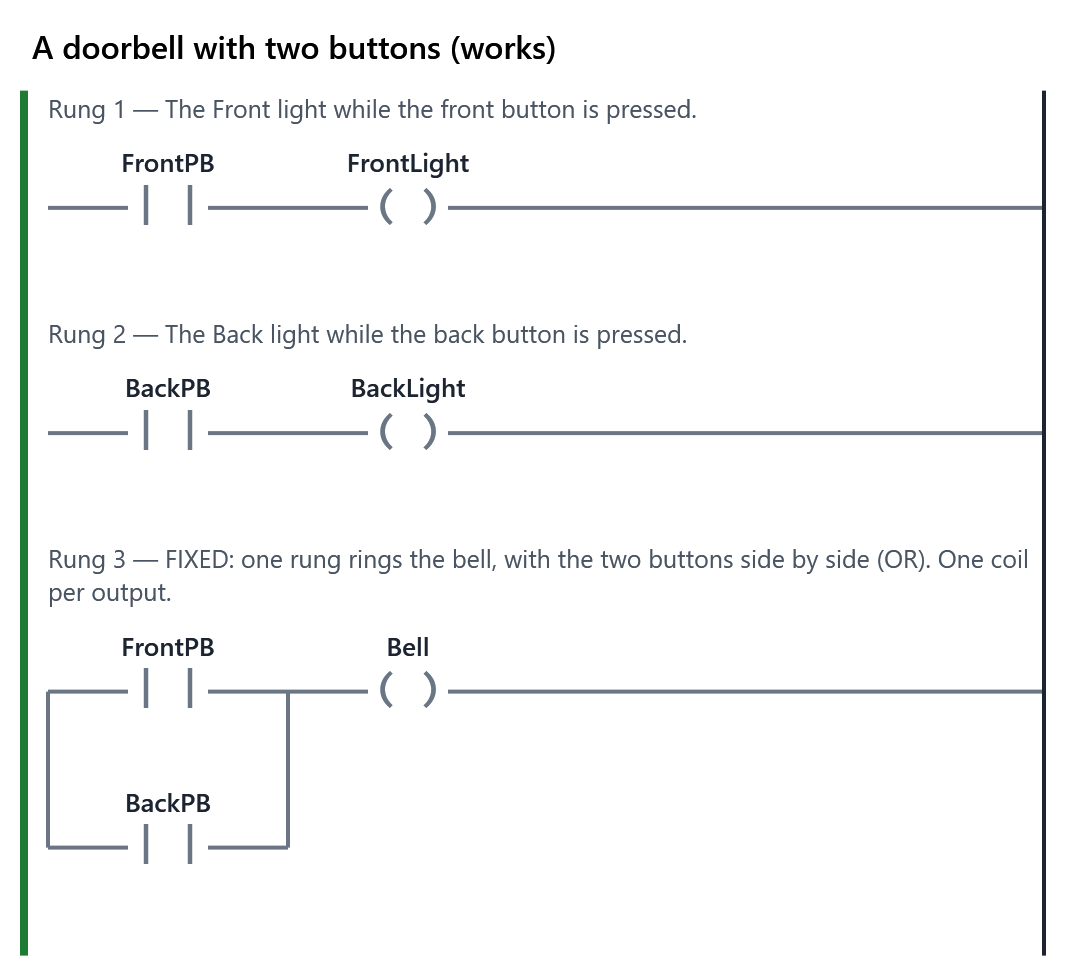
- rung 2: FrontPB → Bell
- rung 4: BackPB → Bell
Press the front button and rung 2 turns Bell on; two rungs later, in the same scan, rung 4 turns it off again, because BackPB is not pressed. At the end of the scan Bell is FALSE, and that is what goes to the output. The bell never rings from the front door.
How it gets there: a program grows. Someone adds "the back door rings the bell too" months later, on a new rung, without looking for the coil that is already there.
How to spot it
- An output works from one condition and not from another, though both inputs read correctly on the rungs.
- Look at the coils: one is green (power reaches it), yet the value under it says FALSE. The value is the tag's value at the end of the scan, after the lower rung has had its say.
- On a real PLC, search for every place a tag is written: Allen-Bradley's Cross Reference lists them, and Logix Designer's Verify warns about a duplicate destructive bit reference. PLC+'s Problems list does not warn about it, so count the coils yourself.
The fix
One coil per output. Put every condition that should turn it on onto one rung, side by side in a branch (OR):
- rung 3: (FrontPB OR BackPB) → Bell
Then delete the extra coil's rung. (Set and reset coils are the exception: they are meant to come in pairs, a set in one place and a reset in another.)
How to do it
- Example tab: a doorbell with two buttons. Choose A common mistake in Program, above the machine: that is the bug. Press each door button alone, watch the two Bell coils, and press Pause and Step one scan with keep pressed ticked under Front door. Then choose Works to see it fixed.
- Exercise tab: an air compressor's alarms. My program is the program someone else wrote. First make it fail: press Start, turn Temperature to Too hot, and watch the horn and the rungs; turn it back, press Start again, and try Oil level on its own.
- Find the bug, and fix it with the tools above the rungs: Branch adds a contact side by side with the selected one; Delete removes the selected element, or the whole rung when the rung is selected (click the words Rung 5 above it).
- Test it yourself, then press Check my program. If a test fails, Replay the failed test shows it on the machine.
If you want the program as it was given to you again, Start again ▾ offers it.
Your comments on this item
11.5 Find and fix the bug: a seal-in on the wrong tag
about 40 minutes · builds on 11.4
- Example
- The machine for “A workshop fan and light”, running the working program (also: A common mistake). The working program.
- Exercise
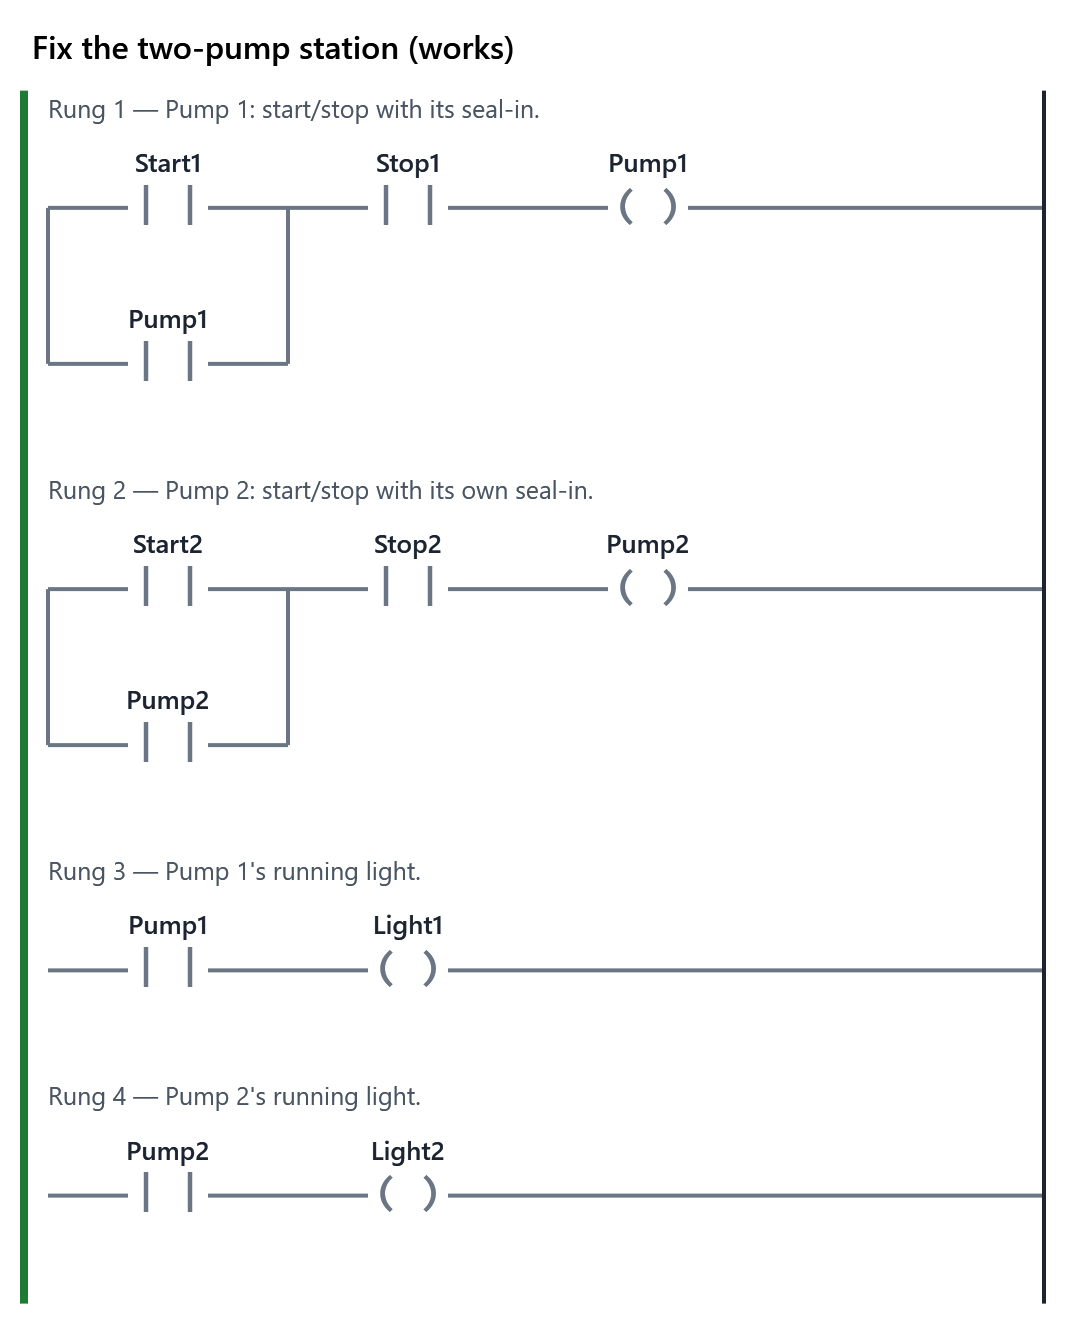
- The learner writes the program for: Pump 1 start runs pump 1, and it keeps running; Pump 1 stop stops it. Pump 2 works the same way with its own two buttons. The pumps are independent: starting or stopping one never starts or stops the other. Each running light is lit while its pump is told to run. Your program starts as someone else wrote it, and pump 2 misbehaves: find out how, and fix it. PLC+ checks it with 3 tests (1 hidden). Passing every test completes the item.
- Reference
- Troubleshooting: the method, The seal-in (holding) circuit
The Learn tab
Find and fix the bug: a seal-in on the wrong tag
A seal-in holds a coil on after its Start button is let go: a contact of the coil's own tag, in parallel with Start (module 5). The contact must read the same tag as the coil it holds. If it reads another tag, the program still runs, the Problems list stays empty, and the machine does two strange things at once.
How it happens
Copy and paste. A machine has two motors that work the same way, so the programmer writes the first rung, copies it, and changes the tags for the second motor, all but one:
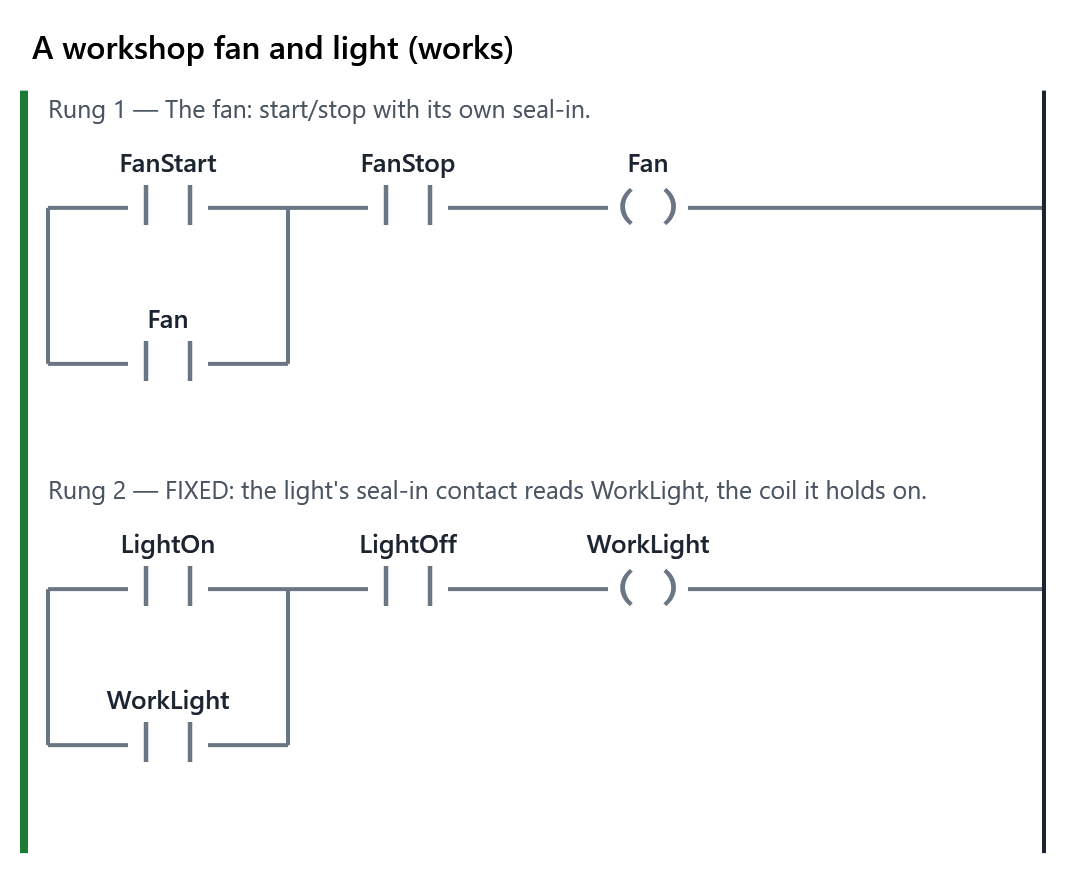
- rung 1: (FanStart OR Fan) AND FanStop → Fan
- rung 2: (LightOn OR Fan) AND LightOff → WorkLight
Rung 2's seal-in contact still reads Fan.
The two symptoms
Read rung 2 as the PLC does:
- The light does not stay on. Press Light on: WorkLight turns on. Let go: LightOn is FALSE, and the seal-in contact reads Fan, which is off. Nothing holds the light, so it goes out. It behaves like a light with no seal-in at all.
- The light comes on by itself. Start the fan: Fan is TRUE, so rung 2's seal-in contact passes power, and the light comes on though nobody pressed Light on. Light off turns it off only while held.
Neither symptom says "wrong tag" by itself. Together, and with the rung's live values in front of you, they do: the contact beside LightOn turns green when the fan starts, and that is the clue.
Reading a rung contact by contact
This is step 4 of the method, compare with what the program expects, done slowly:
- Pick the output that misbehaves, and find its rung (only one, after item 4!).
- For each contact, say aloud which tag it reads and why it is there: "LightOn starts it; this one holds it on, so it must be WorkLight; LightOff stops it."
- Watch each contact's value while you work the machine, and find the one that is green when it should not be, or dark when it should be green.
The fix
Change the seal-in contact's tag to the coil's own tag. Click the contact, type the right tag in its Tag box, and press Enter. One word, but test everything afterwards: each pump or motor on its own, each Stop, and both together.
How to do it
- Example tab: a workshop fan and light. Choose A common mistake in Program, above the machine: press Light on and let go; then start the fan and watch the light. Choose Works to see the fix, then try the same.
- Exercise tab: a two-pump station, as someone else wrote it. Make it fail first: start pump 1 alone and watch pump 2; then press Pump 2 start and let go. Read rung 2 contact by contact.
- Fix the bug, test each pump and each Stop yourself, and press Check my program. One of the tests is hidden: it checks that each Stop stops only its own pump.
If you change too much, Start again ▾ gives you the program as it was given to you, and Undo takes back the last change.
Your comments on this item
11.6 Find and fix the bug: a timer reset every scan
about 50 minutes · builds on 11.5
- Example
- The machine for “A spray washer: wash, then rinse”, running the working program (also: A common mistake). The working program.
- Exercise
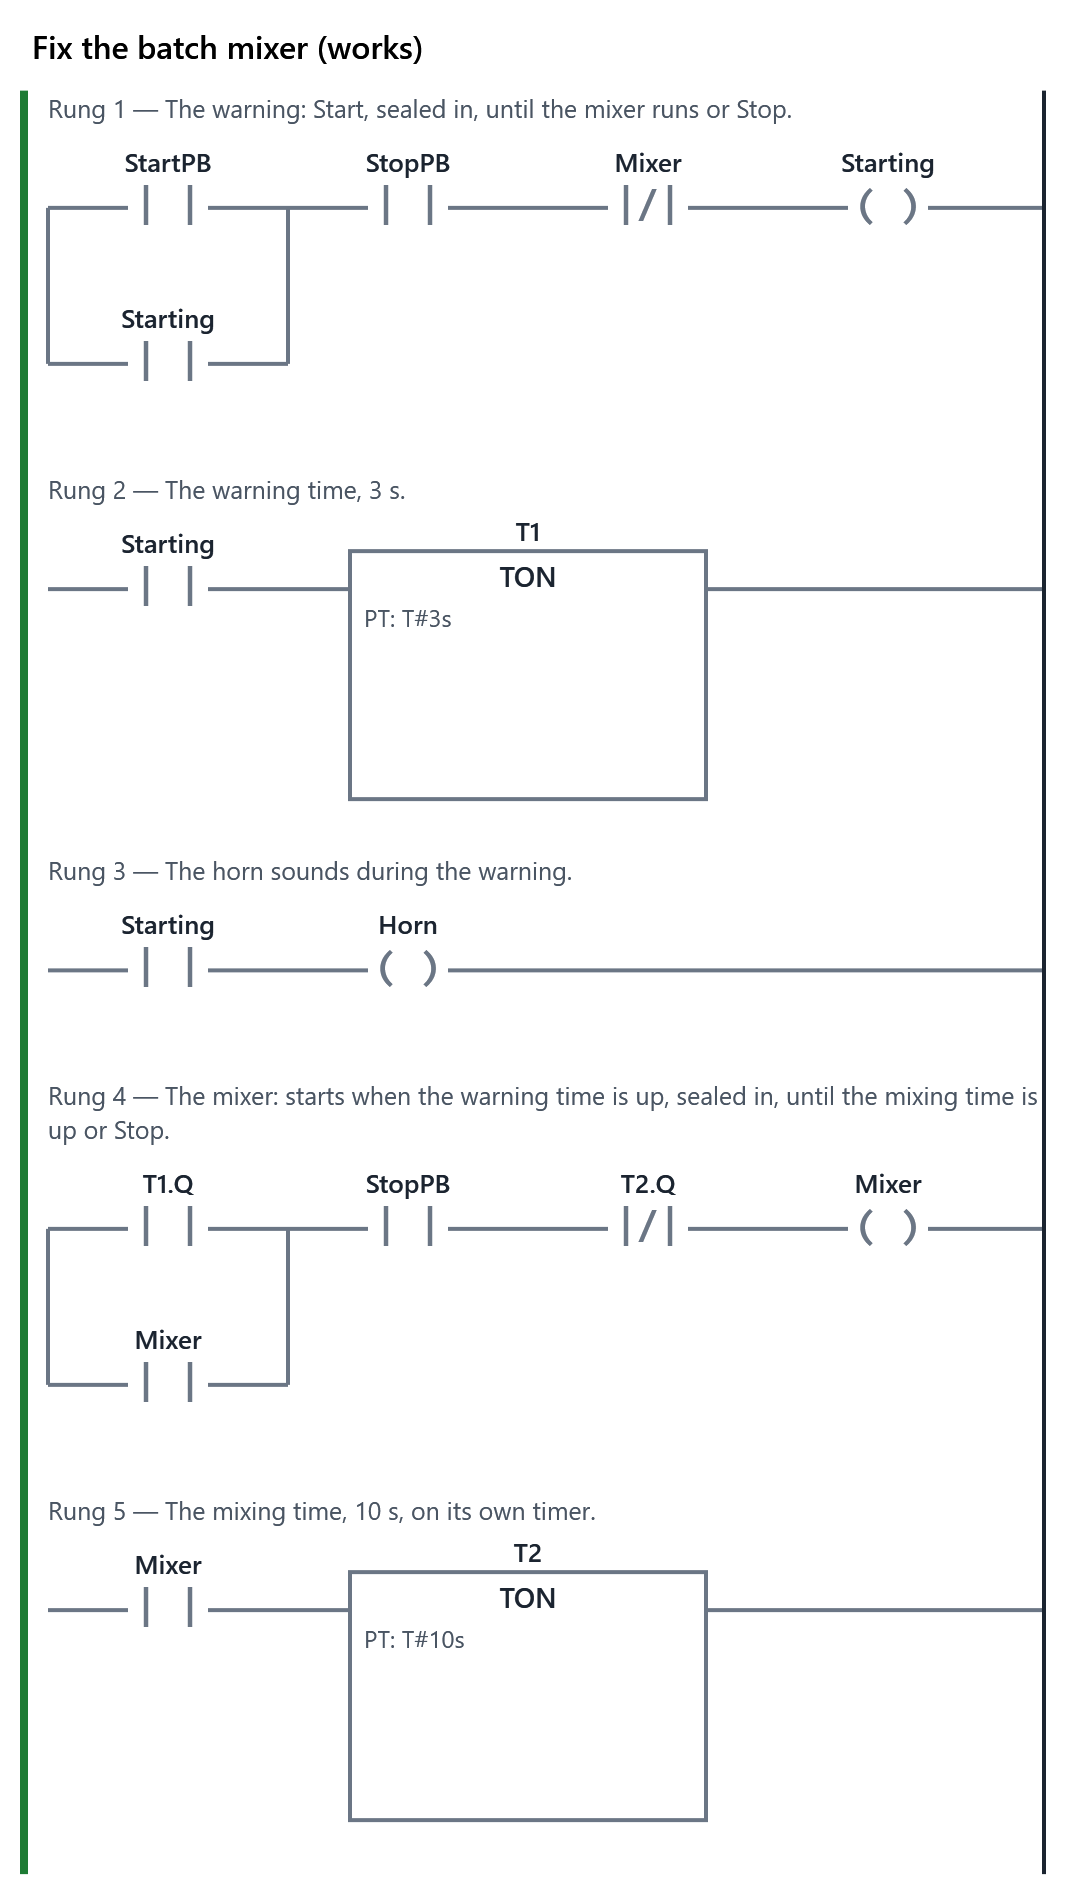
- The learner writes the program for: Before the mixer moves, it warns anyone near it: Start sounds the horn for 3 s, then the horn stops and the mixer runs for 10 s, then it stops by itself. Stop stops the horn or the mixer at any time. Your program starts as someone else wrote it, and it never gets past the horn: find out why, and fix it. PLC+ checks it with 4 tests (1 hidden). Passing every test completes the item.
- Reference
- Troubleshooting: the method, Timers
The Learn tab
Find and fix the bug: a timer reset every scan
A machine that should move on after a few seconds, and never does, usually has a timer that never finishes. The timer's rung has power, yet its time (ET, elapsed time) stays at 0. Something is resetting it.
How an on-delay timer resets
An on-delay timer (TON) counts while the power into it (IN) is on. The moment IN is off, it resets: ET goes back to 0 and Q (done) goes off. It does this every time its box runs, and the box runs once per scan, where it sits in the program.
So a timer resets every scan when:
- its rung loses power every scan, or flickers: for example, IN comes from a rising-edge contact, TRUE for one scan only; or
- the same timer is used by two boxes. One box, with power, starts it; the other, further down and without power, resets it, in the same scan. Next scan the same again. ET never gets past 0.
The second is the one in this item, and it comes from copy and paste: a rung with a timer box is copied for a second timing job, and the box's timer (T1) is not changed to a new one (T2).
A worked example
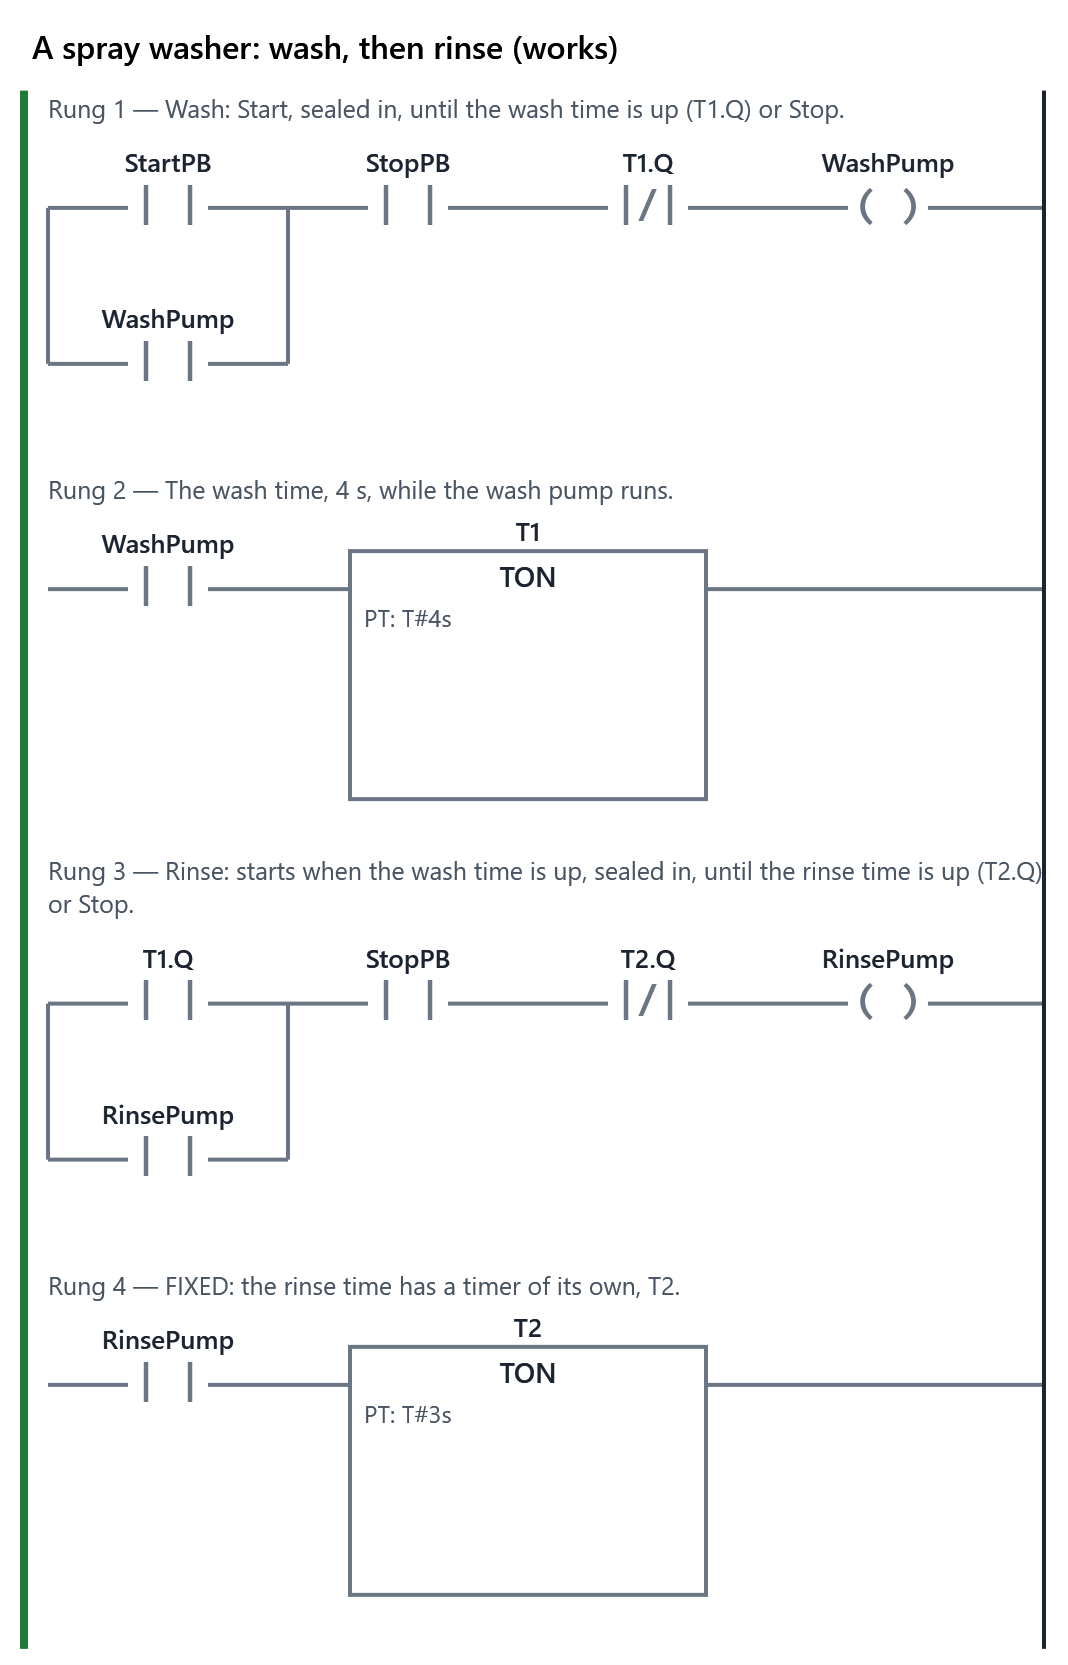
A spray washer: Start runs the wash pump for 4 s, then the rinse pump for 3 s.
- rung 2: WashPump → TON T1, 4 s
- rung 4: RinsePump → TON T1, 3 s (copied from rung 2)
Press Start: the wash pump runs, rung 2 has power and starts T1. Rung 4 runs later in the same scan: the rinse pump is off, so its box has no power, and it resets T1. At the end of every scan T1's ET is 0. The wash never ends, and the rinse never starts.
The clue on the rungs: rung 2 is green right up to the box, but the box's ET does not climb. The fix: give the rinse its own timer. Delete the box on rung 4 and add a new TON box in its place (Box ▾): PLC+ gives a new box a timer of its own, T2, and you set its PT to T#3s. Then check every contact that reads a timer: rung 3, which ends the rinse, must read T2.Q, not T1.Q.
On an Allen-Bradley PLC the same mistake is two TON instructions with the same timer tag, and Cross Reference finds it. A second classic there is a RES (reset) instruction on a rung that is always true: it, too, resets the timer every scan.
How to do it
- Example tab: the spray washer. Choose A common mistake in Program, above the machine, press Start, and watch the two T1 boxes and their ET. Choose Works and try again: T1 counts the wash, T2 the rinse.
- Exercise tab: a batch mixer that sounds a warning horn for 3 s before it mixes for 10 s. As it was given to you, it never gets past the horn. Press Start, watch the boxes, and find out why.
- Fix it. The box to replace is the mixing timer's, on rung 5: first read its PT (T#10s). Select that box and press Delete; then, with the rung's contact selected, add a TON with Box ▾ ▸ Timers ▸ TON and type the same PT, T#10s, in its PT box above the rungs. The new box gets its own timer, such as T2. Now look at rung 4, the mixer's rung. It reads T1.Q twice: the contact that starts the mixer must still read the warning timer, T1.Q. The normally closed contact that stops it must read the new timer: click it and type T2.Q in its Tag box. Test the whole batch yourself: the warning, the mixing, the stop after 10 s, and Stop at each stage. Then press Check my program. One test is hidden.
The batch takes 13 s: press Pause and Step one scan to watch the moment the horn stops and the mixer starts.
Your comments on this item
11.7 Module check
about 30 minutes
- Module check
- Complete when every item it covers is: 11.1, 11.2, 11.3, 11.4, 11.5, 11.6. Its questions, on the Exercise tab, are below; it is complete when those items are and the questions are passed. Once it is complete, the learner makes the PDF progress report to hand in (Hand in a report).
The Learn tab
Module check: troubleshooting
This check covers the six items of module 11: the three readings (each complete when its practice questions are passed) and the three programs you fixed (each complete when it passes every test on its Exercise tab).
The check itself is ten questions, on the Exercise tab. Four of them are find the fault: a machine runs its working program, but something on it is faulty, on the input side or the output side. Use the method:
- work the machine as the question says, and see the symptom;
- look at the outputs: is the coil TRUE while the device does nothing?
- look at the inputs: does each contact change when it should, and only then?
- compare the rungs with What every part is doing, and use a force to be sure.
The other questions are about the method and the three program bugs. You need 80 % to pass, and you can try again: a wrong answer says where to look again.
When all six items are complete and you have passed the questions, the module is complete and ready to hand in: Hand in a report (the second row of the path) makes the PDF progress report for your instructor, with your score on each exercise and a picture of each program you fixed.
The questions (on the Exercise tab)
10 questions; the learner needs 80 % to pass and can try again. A wrong answer says “not quite, look again”; the reason is shown once the answer is right. The right answers are marked ✓ here only.
Choose one. Which order follows the troubleshooting method?
- ✓ Observe the symptom, check the outputs, check the inputs, compare with the program, divide the problem, fix, test, record
- Fix what looks wrong, test, observe the symptom, check the outputs, check the inputs, compare with the program, record
- Change the parts most likely to fail, observe the symptom, check the inputs, check the outputs, divide the problem, test, record
- Compare with the program, rewrite the rungs that look wrong, check the inputs, check the outputs, divide the problem, test, record
Why: See the symptom first, then let the PLC show you which side of the machine it is on, and narrow it down before you change anything. Test everything after the fix, and write down what you found.
Find the fault: a machine with a faulty wire, running the working program. This doorbell runs its working program, but one input is wired wrong. Press the Front door button alone, then the Back door button alone, and watch FrontPB and BackPB on the rungs. Which fault does it have?
Machine: A doorbell with two buttons; the fault:
FrontPB:swapped:BackPB- ✓ FrontPB's input is wired to the back door button: the front button does nothing, and the back button lights both lights
- The front button's wire is broken: FrontPB is always FALSE, so the front button does nothing
- The program has a double coil of Bell: the lower rung turns the bell off for the front door
- The bell has failed: the PLC turns Bell on for either button, but the bell does not ring
Why: The front button changes nothing, and the back button turns FrontPB and BackPB both TRUE, so the Front light comes on for the back door. A broken front wire would leave the Front light dark when the back button is pressed.
Find the fault: a machine with a faulty wire, running the working program. This spray washer runs its working program, but something is faulty. Press Start and watch it for 8 s: the rungs, the timers and What every part is doing. Which fault does it have?
Machine: A spray washer: wash, then rinse; the fault:
RinsePump:failed- ✓ The rinse pump has failed: after 4 s RinsePump is TRUE for 3 s, but the rinse pump does not turn
- The same timer is used for the wash and the rinse: T1's ET stays at 0, so the wash never ends
- The Stop button's wire is broken: StopPB always reads FALSE, so nothing starts at all
- The Start button is shorted: StartPB always reads TRUE, so the wash starts again after the rinse
Why: The wash runs and ends on time, and T1 hands over to the rinse: the RinsePump coil is TRUE and T2 counts its 3 s. The program does everything right, and the rinse pump stays stopped.
Find the fault: a machine with a faulty wire, running the working program. This workshop fan and light run their working program, but one input is faulty. Start and stop the fan, then press Light on, and watch rung 2. Which fault does it have?
Machine: A workshop fan and light; the fault:
LightOff:open- ✓ The Light off button's wire is broken: LightOff is always FALSE, as if Light off were held down
- The Light on button's wire is broken: LightOn is always FALSE, as if nobody ever pressed it
- The work light's lamp has failed: the PLC turns WorkLight on, but the lamp stays dark
- The light's seal-in contact reads the wrong tag: the light goes out when Light on is let go
Why: The fan works. LightOn turns TRUE when pressed, but LightOff is FALSE with nobody pressing it, so rung 2 never passes power and the WorkLight coil stays FALSE. Light off is wired normally closed, so a broken wire fails safe: the light will not come on.
Find the fault: a machine with a faulty wire, running the working program. This sorter runs its working program, but one input is faulty. Press Start and watch the Prox and Eye contacts, MetalSeen and the diverter for the first two parts. Which fault does it have?
Machine: Sort metal from plastic; the fault:
Eye:shorted- ✓ The photo-eye's input is always TRUE: from the first metal part on, the diverter stays out and every part goes to Bin A
- The metal sensor's input is always TRUE: every part, metal or not, is diverted one at a time
- The diverter has failed: the PLC turns Divert on for each metal part, but the arm does not move
- The metal sensor's wire is broken: Prox is always FALSE, so no part is ever diverted
Why: Eye reads TRUE with no part in front of it. When Prox sees the first metal part, MetalSeen is set and Divert turns on straight away; Eye never turns off, so the falling edge that resets MetalSeen never comes, and the diverter stays out. Prox itself turns on only for metal.
Choose one. Rung 3 is HighTemp → Horn and rung 5 is LowOil → Horn. The temperature is too high and the oil is OK. Does the horn sound?
- ✓ No, never: rung 5 writes FALSE last, and the outputs are written at the end of the scan
- Yes, all the time: rung 3 turns Horn on, and a coil that has been turned on stays on
- It buzzes on and off: rung 3 turns it on and rung 5 turns it off, in every scan
- Only for one scan: rung 3 turns it on, then rung 5 turns it off from the next scan on
Why: Rung 3 sets the Horn tag TRUE and rung 5 sets it FALSE again, in the same scan. Only the value at the end of the scan is written to the output, so the horn never sounds, not even for a moment. A double coil: put both faults on one rung.
Choose one. Pump 2's rung is (Start2 OR Pump1) AND Stop2 → Pump2. What does the machine do?
- ✓ Pump 2 runs only while Start2 is held, and starts by itself whenever pump 1 runs
- Pump 2 works normally: the Pump1 contact only adds a second way to start it
- Pump 2 never runs: the Pump1 contact blocks the power from Start2
- Pump 2 runs and seals in, but pump 1 stops whenever pump 2 starts
Why: The seal-in contact reads Pump1, so nothing holds pump 2 on after Start2 is let go, and pump 1 running passes power to Pump2. The fix: the seal-in contact reads Pump2, the coil it holds.
Choose one. Press Start: the horn sounds, rung 2's TON box T1 has power, and its ET stays at 0 for ever. Rung 5, further down, also has a TON box called T1, and it has no power. What is wrong, and what is the fix?
- ✓ Rung 5 resets T1 in every scan. Give rung 5's box a timer of its own (T2), and make the contacts that read its time read T2.Q
- T1's preset is too long for the warning. Type a shorter PT in rung 2's box, such as T#3s, and test it again
- The horn is a double coil, and the lower rung wins. Delete rung 2 and put the horn's conditions on one rung
- The PLC scans too fast for the timer to count. Slow the scan down so that T1 has time to add to its ET
Why: A TON resets whenever its box runs without power. Two boxes on one timer means one starts it and the other resets it, every scan. One timer per timing job.
Choose every one that is right. A valve does not open when it should. Which of these show you whether the fault is in the program or outside it? Choose every one.
- ✓ Look at the valve's coil on the rungs: TRUE means the program asked for it
- ✓ Compare the rungs with What every part is doing: does the valve match its coil?
- ✓ Force the valve's output ON, and see whether the valve opens
- Rewrite the valve's rung from the start, and see whether the valve then opens
Why: The coil, the part's real state and a force divide the problem into program and machine. Rewriting a rung that may be right is guessing, and can add a bug.
Choose one. You have found and fixed a broken wire to a limit switch, and the door now opens. What should you do before you hand the machine back?
- ✓ Test everything it should do (open, close, stop, the safety eye), remove any forces, and record what you found and fixed
- Nothing more: the door opens, so the fault is fixed; leave any forces on for the next technician to remove
- Leave the force on the limit switch, in case the wire breaks again, and record what you fixed
- Test only the door's opening, since that is what failed, remove any forces, and hand it back
Why: Steps 7 and 8 of the method: test the whole machine, not just the part that failed, and write it down. A force left on hides the next fault and bypasses what the program checks.