Websites and GitHub Pages
Gamify+ can turn your whole game file into a website: a front page listing your games under their groups, and one page per game. You can hand that folder out as it is, or put it on the internet free with GitHub Pages, at an address you give your players. Building or publishing the website never changes your games.
All of it is on Website, in the tree under your game file (after the Picture library). Select it and it has two tabs: Build, for the website on this computer, and Publish, for putting it on the internet. The two buttons under WEBSITE in the blue strip on the left open them: Build the website builds it straight away and shows the Build tab; Publish website… opens the Publish tab, where nothing is published until you press Publish to GitHub Pages. The same two are in the Game File menu and when you right-click in the tree. Website's line in the tree says how the website stands: not built yet, built, published, or changed since it was published.
The version on the Microsoft Store today (1.1.0) does all of this in the Export section, one of five sections along the top of the window: Build a website at the top of it, Publish to the web (GitHub Pages) below. The buttons and boxes are the same; in Gamify+ 1.2, coming soon, they are on the Build and Publish tabs of Website, and the tree shows which games have changed since you published.
Build the website
- Press Build the website on the left of the window (or select Website in the tree, open its Build tab and press Build the website there). Gamify+ writes a folder with a front page and one page per game. Each group is a heading on the front page, with its description, and a game opens when it is clicked.
- Press Open the website to see the front page in your browser, exactly as a player would, or Open the folder to see the files. Choose another folder… changes where it is built (it is under Documents\GamifyPlus\Sites unless you choose elsewhere).
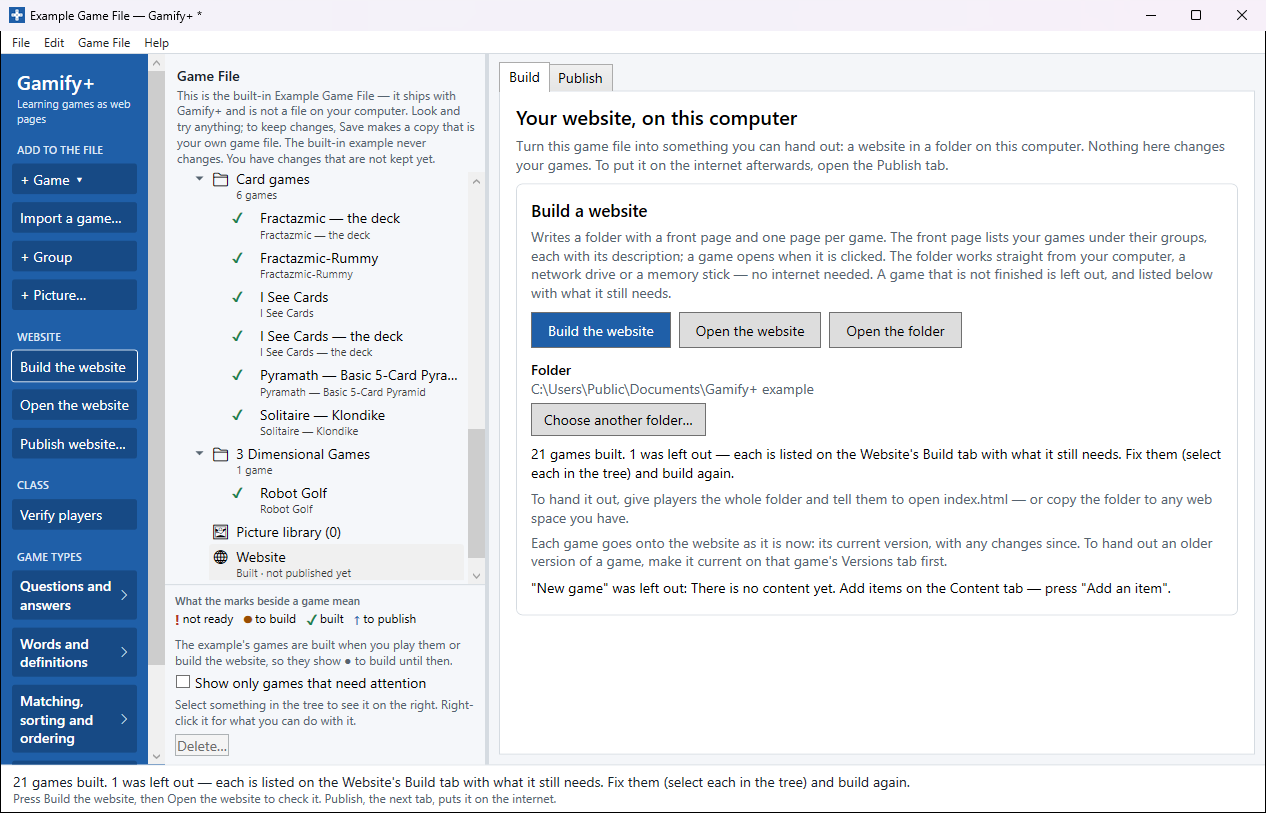
A game that is not finished is left off and listed with what it still needs; the others still build. Each game goes on the website as it is now — its current version. To hand out an older version, make it current on that game's Versions tab first.
To hand the folder out without the internet, give players the whole folder and tell them to open index.html — from a computer, a network drive or a memory stick — or copy it to any web space you have.
Putting it on the web: what GitHub is
GitHub is a free website for keeping files online. GitHub Pages is a free part of it that turns a folder of web pages into a website with its own address, such as https://yourname.github.io/GP-maths-games/. That address is what you give your players: it works on any phone, tablet or computer, and there is nothing for them to install or sign in to.
Gamify+ does the uploading. You do three things once — make an account, make a token, save it in Gamify+ — and after that every publish is one button. In the program, Step-by-step guide to GitHub on Website's Publish tab opens these same instructions in a window you can keep beside your browser. Allow about ten minutes, once.
GitHub has two different Settings pages, and this trips everybody up. Your account's Settings — your picture at the top right of any GitHub page, then Settings — is where tokens are made (Developer settings is at the very bottom of its menu). A repository's Settings — the Settings tab at the top of one repository's page — is where GitHub Pages is switched on, and it has no Developer settings. The links below go straight to the right page.
1. Make a GitHub account (once)
- Go to github.com/signup.
- Enter your e-mail, a password and a user name. Choose the user name with care: it becomes part of every web address, as in
https://yourname.github.io/…. Short and plain is best. - GitHub e-mails you a code to confirm the address. A free account is all you need.
2. Make a token, so Gamify+ can publish for you (once)
A token is a long password that lets one program do a few named things on your GitHub account — here, create the repository your website lives in, upload the website, and switch GitHub Pages on. You can cancel it on GitHub at any time.
- Sign in at github.com, then open github.com/settings/personal-access-tokens/new — or press GitHub token… on Website's Publish tab, then the link open GitHub's token page in that window.
- Token name: anything you will recognise, such as "Gamify+".
- Resource owner: your own account.
- Expiration: no more than a year from today. GitHub refuses anything later and then says nothing — the Generate button simply does not work. A preset such as 90 days is the simplest. When it runs out, publishing says so, and you make a new one the same way.
- Repository access: All repositories (Gamify+ creates a new repository for each game file).
- Permissions: set three repository permissions to Read and write: Administration, Contents and Pages. Leave everything else (Metadata turns itself on as Read-only; that is right).
- Press Generate token. In the box GitHub shows, check that it names the expiry date you chose — if it says "never expire", cancel and choose the expiration again. Press Generate token in the box, then copy the token straight away: it begins
github_pat_and is shown only once. - If Generate token does nothing, press Cancel, scroll up and look for a message in red (most often beside Expiration), put it right and try again. As a last resort a classic token works too: Developer settings ▸ Personal access tokens ▸ Tokens (classic) ▸ Generate new token (classic), tick repo, and set an expiration.
- In Gamify+, press Publish website… on the left, then GitHub token…; paste it into the window that opens, and press Check and save. Gamify+ checks it with GitHub and tells you whose account it belongs to. (Press F1 in that window for help with it.)
The token is saved on this computer only, encrypted for your Windows account. It is never put in a game file or a website. Remove the saved token, in the same window, deletes it from this computer.
3. Publish
Press Publish website… on the left of the window (or select Website in the tree and open its Publish tab). The Where you are box at the top says, line by line, what is done and what is not: whether a token is saved and for which account, whether the repository exists yet (and the address it will have), when the website was last built, and whether it has been published.
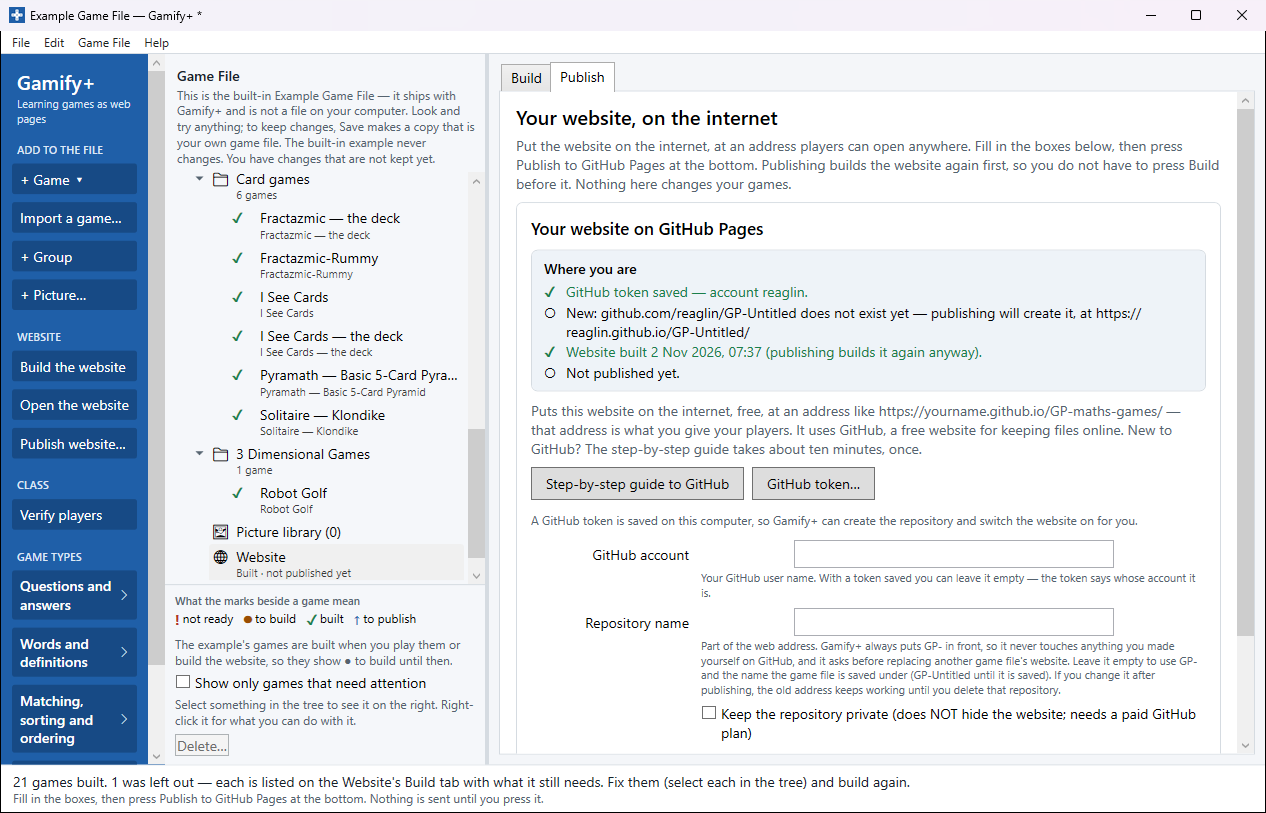
- Build the website and check it first (above). Publishing builds it again anyway, so this is only to look before it goes up.
- On the Publish tab, check the Repository name. It always starts with
GP-, so a publish never touches anything you made yourself on GitHub. Left empty, it isGP-and the name the game file is saved under. GitHub account can stay empty when a token is saved. - Press Publish to GitHub Pages. Gamify+ builds the website again, creates the repository the first time, uploads the website and switches GitHub Pages on. Stop, beside it while it works, stops it.
- The first time, the address takes a minute or two — until then it shows a "404 — There isn't a GitHub Pages site here" page. That is normal. Wait, then reload.
- The address appears under Published at. Press Copy the address and give it to your players — in your LMS, an e-mail or on the board. Open the published website opens it.
Gamify+ remembers the account and repository for each game file, so next time you just press Publish to GitHub Pages again. Changes you make are not on the web until you do: a game changed or added since the last publish shows ↑ beside it in the tree, and the game file's All games tab says "Publish again" for it (see The tree).
Without a token: using Git
If you would rather not make a token, Gamify+ can publish with Git for Windows, signing in through the window Git shows. Then you do two parts by hand:
- Make the repository first. On github.com, press + at the top right ▸ New repository. Name it exactly as the Repository name in Gamify+ (it begins
GP-), choose Public, leave every box unticked, and press Create repository. - In Gamify+, type your GitHub account name and press Publish to GitHub Pages.
- Switch the website on, once. Gamify+ prints the direct link when it has uploaded (
https://github.com/<account>/<repository>/settings/pages). Under Build and deployment, set Source to Deploy from a branch, the branch to main and the folder to / (root), and press Save. A minute or two later the address appears at the top of that page.
Good to know
- Anyone who has the address can see everything on the website, and search engines may find it. Put nothing there you would not put on a classroom wall — and never a student's name.
- A private repository does not hide the website. Keep the repository private hides the files on github.com, not the pages, and GitHub Pages from a private repository needs a paid GitHub plan. Leave it off unless you know you want it.
- To take the website down but keep the files: open the repository on github.com ▸ its Settings tab ▸ Pages ▸ Unpublish site. To remove everything: the repository's Settings tab ▸ General ▸ at the bottom, Delete this repository (this cannot be undone). Then press Forget this address… in Gamify+, so the next publish asks before putting it back.
- Two game files never share a website. If the repository name is already used by another game file's website, Gamify+ stops and asks before replacing it.
- "Gamify+ — The website could not be built" means Gamify+ could not write into the website's folder. Choose a different folder: select the game file at the top of the tree and change Website folder on its Properties tab (or press Choose another folder… on Website's Build tab).
- Results stay with you. Players' names and scores are never on GitHub: a result line goes from the player to you, and nowhere else.