Gamify+ help
Gamify+ makes games — for learning or just for fun — as ordinary web pages. You choose a kind of game (a quiz, a crossword, a matching game, a card game…), type the questions, and Gamify+ builds one web page that plays on any phone, tablet or computer. Your players need nothing installed and no account.
It is written for teachers and anyone else who wants to make a learning game without any technical background. These pages assume you have never used it before.
These pages describe Gamify+ 1.2, coming soon. The version on the Microsoft Store today, 1.1.0, has the earlier window: a welcome window first (Open Example Game File, Create New Game File, Continue), then five sections along the top — Game File, Game Types, Export, Settings and About — each filling the whole window, with New, Open and Save at the top of Game File and buttons under the tree (Add a group, Add a game, Import a game…, Add a picture…). In 1.1.0 the website is built and published in the Export section, Settings and About are sections rather than windows, and there is no menu bar, no blue strip on the left, no marks beside the games, no All games tab, no F1 help and no Check for a new version… (open the Microsoft Store app's Library and press Update instead). After the AI revises a game, 1.1.0's button says Keep this draft where 1.2 says Keep this version. The games, the tabs of a game, and what each button on them does are the same in both. To see which version you have, open Help ▸ About Gamify+… (in 1.1.0, the About section).
Getting started, step by step
- Install Gamify+ from the Microsoft Store (it is free), then open it from the Start menu.
- Gamify+ opens straight into its window. The first time, it opens the built-in Example Game File, on its Start here tab, which has three ways in:
- Open the Example Game File — one game of every kind, each saying how it was made. The best place to start: look, play, try. It is never saved over.
- Create a new Game File — an empty game file of your own, with one group, My games, to put games in. Give it a name on its Properties tab, then add your first game.
- Continue: name of a file — the game file you had open before this one. It is greyed out when there is none yet.
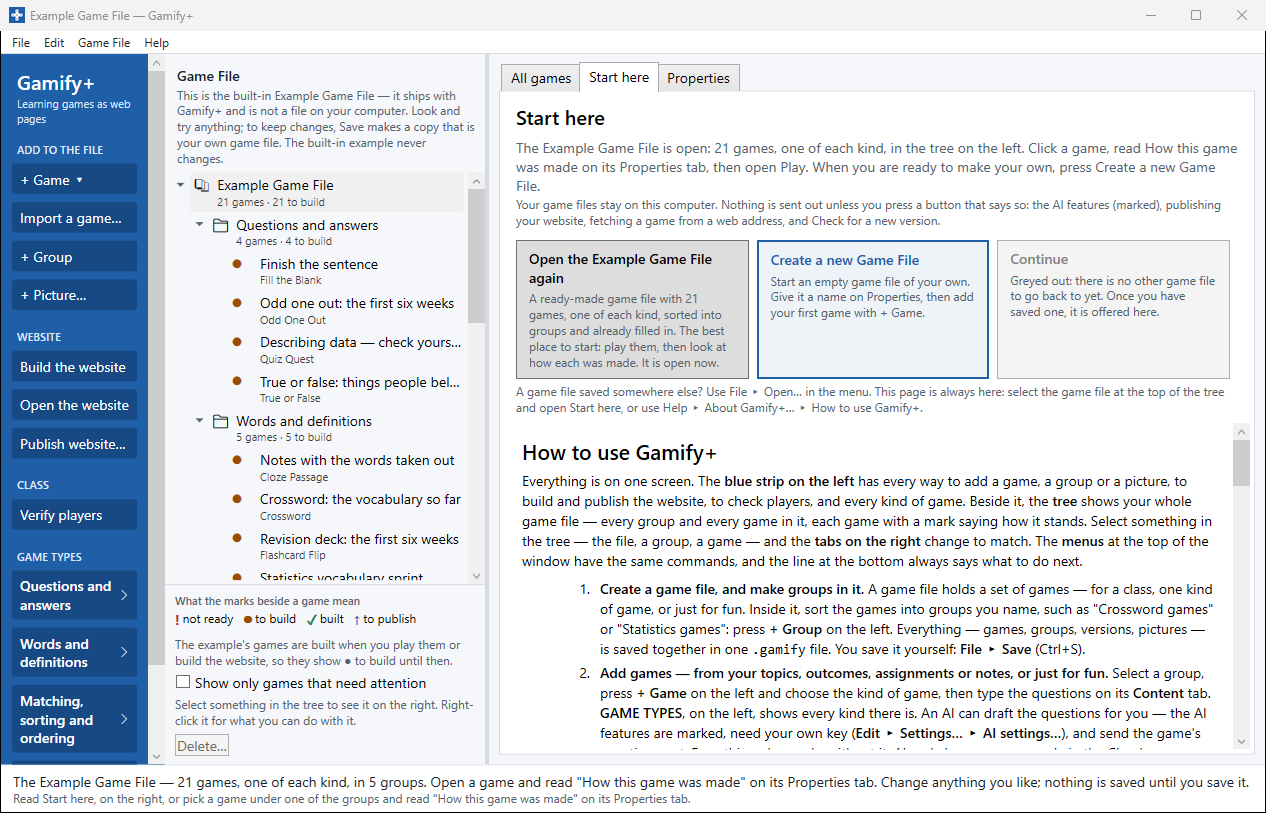
The first time: the Example Game File, on its Start here tab — the three ways in and the five steps. - Everything is on one screen. The window has four parts:
- The menus at the top — File, Edit, Game File and Help.
- The blue strip on the left, with every way to add to the game file (+ Game, Import a game…, + Group, + Picture…), to build and publish its website, to check players, and every kind of game under GAME TYPES.
- The tree beside it, which always shows your whole game file: every group, every game in each, with a mark beside each game saying how it stands.
- The tabs on the right, for whatever is selected in the tree — the file, a group, a game.
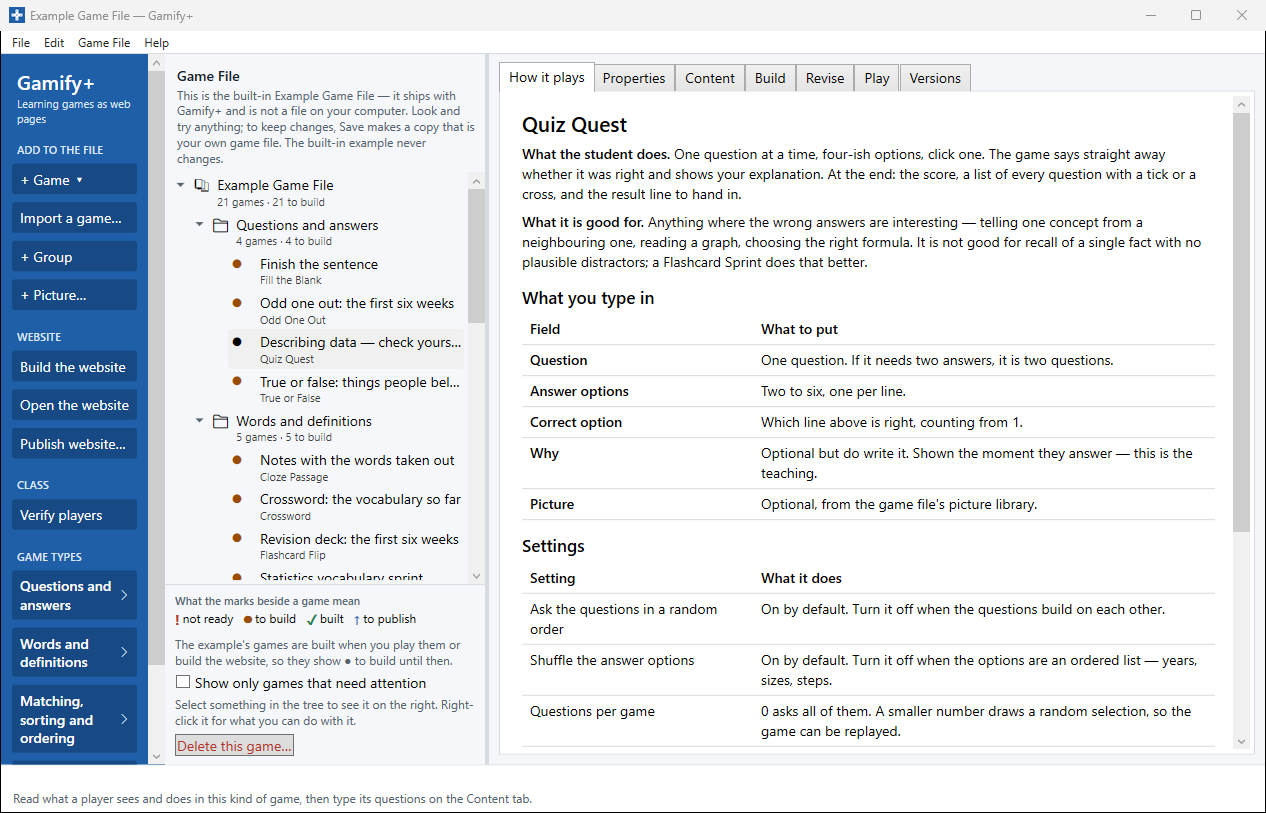
The Gamify+ window: the blue strip, the tree, and the selected game's tabs on the right. - Make a group and a game. Select a group in the tree, press + Game on the left and choose the kind of game from the list. The new game opens on Properties, to give it a name; on Content type the questions. (Making a game.)
- Play it. Open the game's Play tab: the game is built and plays right there, exactly as a player sees it. Change a question and open Play again. (Playing and results.)
- Save. File ▸ Save (or Ctrl+S). Nothing is saved until you do.
- Hand it out. Each game is one web page you can e-mail, put in your LMS or copy to a memory stick — or press Build the website on the left to make the whole game file one website, and Publish website… to put it on the internet free with GitHub Pages. (Websites and GitHub Pages.)
The same steps are always in the program, on the game file's Start here tab.
Help inside Gamify+: F1
You never have to leave the program to find out what a screen is for. On any screen, press F1 on the keyboard — or choose Help ▸ Help for this screen (F1) in the menu. A short page opens in a window of its own, titled for example "Gamify+ — Help: Versions". It says what the screen is for, what to do first, and what each of its buttons does. Keep it open beside the main window while you work; Close puts it away.
Each of those pages ends with More help: a link to the page on this site that covers the same screen, with pictures, and a link to this page. The smaller windows — Settings, About Gamify+, Import a game, GitHub token and the Save the changes? question — have their own F1 page too. Help ▸ Help on the web (softwareplus.ai/gamify) opens these pages in your web browser.
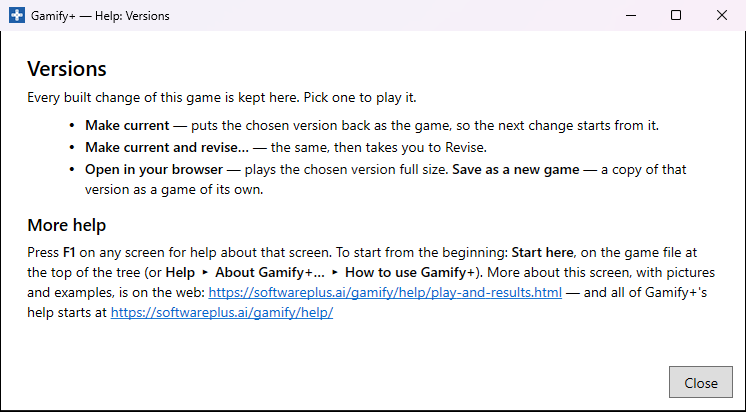
Two more kinds of help are always there:
- Tips. Rest the mouse pointer on any button, menu command or box, without clicking, and a short tip says what it does. A greyed-out button (one you cannot press yet) has a tip too, saying why it is greyed out and what to do first. The marks beside the games in the tree have tips as well.
- Messages that say what to do. When something goes wrong, the message is titled "Gamify+ — …" (for example "Gamify+ — That game file could not be saved"), says first what to do about it, and ends with a line beginning Details for support:. You can ignore that line; if you write to ask for help, copy it into your e-mail.
Which page here each F1 page links to:
| F1 page (the screen you are on) | Its page here |
|---|---|
| Start here; Save the changes? | this page (and Saving) |
| The Gamify+ window; All games; The picture library | The window, game files and groups |
| How it plays; Properties; Content; Build | Making a game |
| Revise; Settings | AI help (Settings is also on Settings, About and new versions) |
| Play; Versions; Verify players | Playing, handing out and results |
| Your website (its Build and Publish tabs); GitHub token | Websites and GitHub Pages |
| Import a game; Game pictures | Importing a game made elsewhere |
| A game type (chosen under GAME TYPES) | The game types |
| About Gamify+ | Settings, About and new versions |
The help pages
- The window, game files and groups — the menus, the blue strip on the left, the tree and the marks beside each game, the All games tabs, what a game file is, groups, the picture library, saving and where files are kept.
- Making a game — + Game and choosing a game type, the Properties and Content tabs, Build, and every version kept on the Versions tab.
- The game types — every kind of game that comes with Gamify+: what it is, how players play it, and what you type in.
- Playing, handing out and results — Play, handing out one game, the player's name and result line, Verify players, and what a result line does and does not prove.
- Websites and GitHub Pages — building the game file into a website, and putting it on the web free, step by step.
- AI help — drafting the questions, revising a game by asking, Make my own version, and AI keys: what they are and who pays.
- Importing a game made elsewhere — a game from the Claude app, ChatGPT or a colleague, its pictures, and changing it by asking.
- Sharing game types — game types are folders of files: sending one to a colleague, adding one, and sending Dr. Ron Eaglin an idea.
- Settings, About and new versions — the Settings window, the Help menu, the About Gamify+ window, and checking for a new version of Gamify+.
Words used here
- Game file — one
.gamifyfile holding a set of games: the games for a class, a collection of one kind of game, or just some fun games. Everything in it is saved together. - Group — a heading you make for some of your games, such as "Crossword games" or "Week 3: probability". Every game is in exactly one group.
- Game type — the kind of game: a quiz, a matching game, a crossword, a race against the computer. It decides how the game plays and what you type in.
- Version — every time a game's type or content is changed and built, the new version is kept, and so is every one before it.
- Result line — a line beginning
GP1that a player gets at the end of a game that asks for their name, to hand in to you. - Player — whoever plays the game: a student, or anyone.