The window, game files and groups
Everything you make in Gamify+ lives in a game file, and everything in Gamify+ is on one screen. This page explains each part of the window, what a game file is, how to sort your games into groups, and how saving works.
The version on the Microsoft Store today (1.1.0) has the earlier window: a welcome window first, then five sections along the top (Game File, Game Types, Export, Settings, About), New, Open and Save at the top of Game File, and the buttons Add a group, Add a game, Import a game… and Add a picture… under the tree. It has no menu bar, no blue strip, no marks beside the games and no All games tab. This page describes Gamify+ 1.2, coming soon; the game file, groups, pictures and saving work the same in both.
What a game file is
A game file holds a set of games — the games for a class, a collection of one kind of game, or just a group of fun games. Everything in it is saved together in one file ending .gamify: every game, every group, every version of each game, and the pictures. Copy that one file and you have copied all of it.
A game file is always open in Gamify+, and the tree shows all of it. Build the website makes the whole of it into one website (see Websites and GitHub Pages).
The Gamify+ window
Everything is on one screen, so you can always see every command and every game. From left to right: the blue strip with the commands, the tree with your games, and the tabs for whatever is selected in the tree. The menus are at the top, and the line at the bottom of the window always says what just happened and what to do next.
The menus
- File — New Game File (Ctrl+N), Open… (Ctrl+O), Recent (game files you have opened lately), Open the Example Game File, Save (Ctrl+S), Save as… (a copy under a new name or in another folder) and Exit. If the open game file has unsaved changes, you are asked about them first.
- Edit — Settings…: the AI and the folders Gamify+ keeps its files in (see Settings).
- Game File — the same commands as the blue strip and more: + Game (the 21 kinds of game under their five headings), Import a game…, + Group, + Picture…, Move to group, Move group up and Move group down, Delete selected… (or the Delete key in the tree), Build this game, Play this game and Copy this game… (for the game selected in the tree; greyed out until one is), Build the website, Open the website, Publish website… and Verify players.
- Help — Help for this screen (F1), Help on the web (softwareplus.ai/gamify) (these pages), Check for a new version… and About Gamify+… (see Settings, About and new versions).
The blue strip on the left
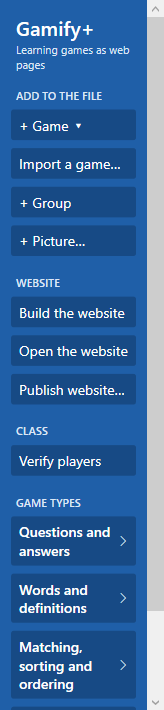
Every way to add something, build, publish and check is a labelled button here, so nothing is hidden. A button that is greyed out cannot be used yet; rest the mouse pointer on it and its tip says why.
- ADD TO THE FILE
- + Game ▾ — a new game in the group selected in the tree. A list of every kind of game opens; choose one, and the new game opens on its Properties tab, to give it a name.
- Import a game… — a game made elsewhere, as one web page (see Importing a game).
- + Group — a new heading for your games (see Groups).
- + Picture… — copies a picture into the game file, for any of its games to use (see The picture library).
- WEBSITE — Build the website makes the whole game file into a website on this computer; Open the website shows its front page in your browser once it is built; Publish website… opens the page where you put it on the internet. Both select Website in the tree (see Websites and GitHub Pages).
- CLASS — Verify players: check the result lines your players handed in (see Verify players).
- GAME TYPES — every kind of game, under five headings: Questions and answers; Words and definitions; Matching, sorting and ordering; Card games; 3 Dimensional Games. Press a heading to open it and choose a type: its page shows on the right, with Try this game type and Make a game of this type, while the tree stays in view (see The game types).
The tree
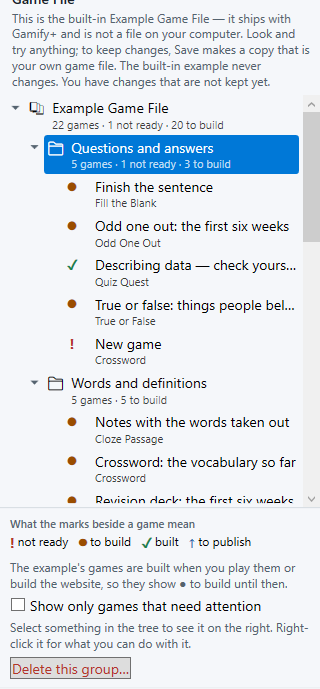
The tree, beside the blue strip, always shows the whole game file: the file at the top, then its groups, with the games inside each group, then Picture library, Website and Verify players. The line above it says where the game file is saved, or that it has not been saved yet. Drag the bar between the tree and the right side to make the tree wider or narrower.
The mark beside each game says how it stands, as a sign and a colour. Rest the mouse pointer on a mark for what to do about it.
| Mark | Means | What to do |
|---|---|---|
| ! | Not ready — something it needs is missing, usually its items. | Its Build tab says what is missing and where to fix it. |
| ● | To build — new, or changed since its page was last built. | Open its Play tab, or press Build the game on Build. |
| ✓ | Built — its page is up to date. | Nothing. |
| ↑ | To publish — changed or added since the website was published. Shown only once the website has been published. | Publish the website again (Publish website…). |
The game file and each group have a line that counts their games and what needs doing, such as "5 games · 1 not ready · 2 to build". Under the tree:
- What the marks beside a game mean — the legend, saying the same as the table above.
- Show only games that need attention — tick it to hide the games with nothing to do, so you see only the ones that are not ready, to build or to publish, and the groups they are in. The All games tabs then list the same games, and say how many are shown. Untick it to see every game again.
- Delete — its words follow what is selected (Delete this game…, Delete this group…, Delete this picture…); the Delete key in the tree does the same. It asks first, and is greyed out when nothing it can delete is selected. No game is deleted with a group: a group with games in it offers to move them to another group first.
The first time it opens, every game in the Example Game File shows ● to build: the example's games are built when you play them or build the website. The note under the legend says so.
Right-click anything in the tree for what you can do with it: + Game in this group, Import a game into this group…, + Group, + Picture…, Move to group, Move group up, Move group down, Build this game, Play this game, Copy this game…, Delete this game… (or group…, or picture…), Build the website and Publish website…. Commands that do not fit what you clicked are greyed out, and their tooltip says why.
The tabs on the right
Select something in the tree and the tabs on the right change to match:
- The game file (at the top of the tree) — All games, Start here (how to use Gamify+, and the three ways in) and Properties: the file's Short name (such as EGN3443 or MATH-FUN; it names the website's folder, so keep it short and without spaces), Made by (your name as it should appear on the website's front page), and the Website folder. The publishing settings (GitHub account, repository name, keep private) are on Website ▸ Publish, not here.
- A group — All games, Properties (its name and description) and About groups (F1 there opens "Groups").
- A game — How it plays, Properties, Content, Build, Revise, Play and Versions, in the order the work happens, and Game pictures for an imported game with pictures (see Making a game).
- Picture library — about the picture library, with a + Picture… button at the top; a picture under it has Properties (see below).
- Website — Build (the website on this computer) and Publish (on the internet, with GitHub Pages). Its line in the tree says whether it is built, published, or changed since (see Websites and GitHub Pages).
- Verify players — check the result lines your players hand in (see Playing and results).
The line at the bottom of the window says what just happened; it is cleared when you move to something else, and the line under it always says what to do on the tab you are on.
Not sure what a tab or button is for? Press F1, or Help ▸ Help for this screen (F1): it opens help about the tab you are on (see Help inside Gamify+).
All games: every game at a glance
The game file and each group open on an All games tab, so you can see every game and what still needs doing without opening them one by one.
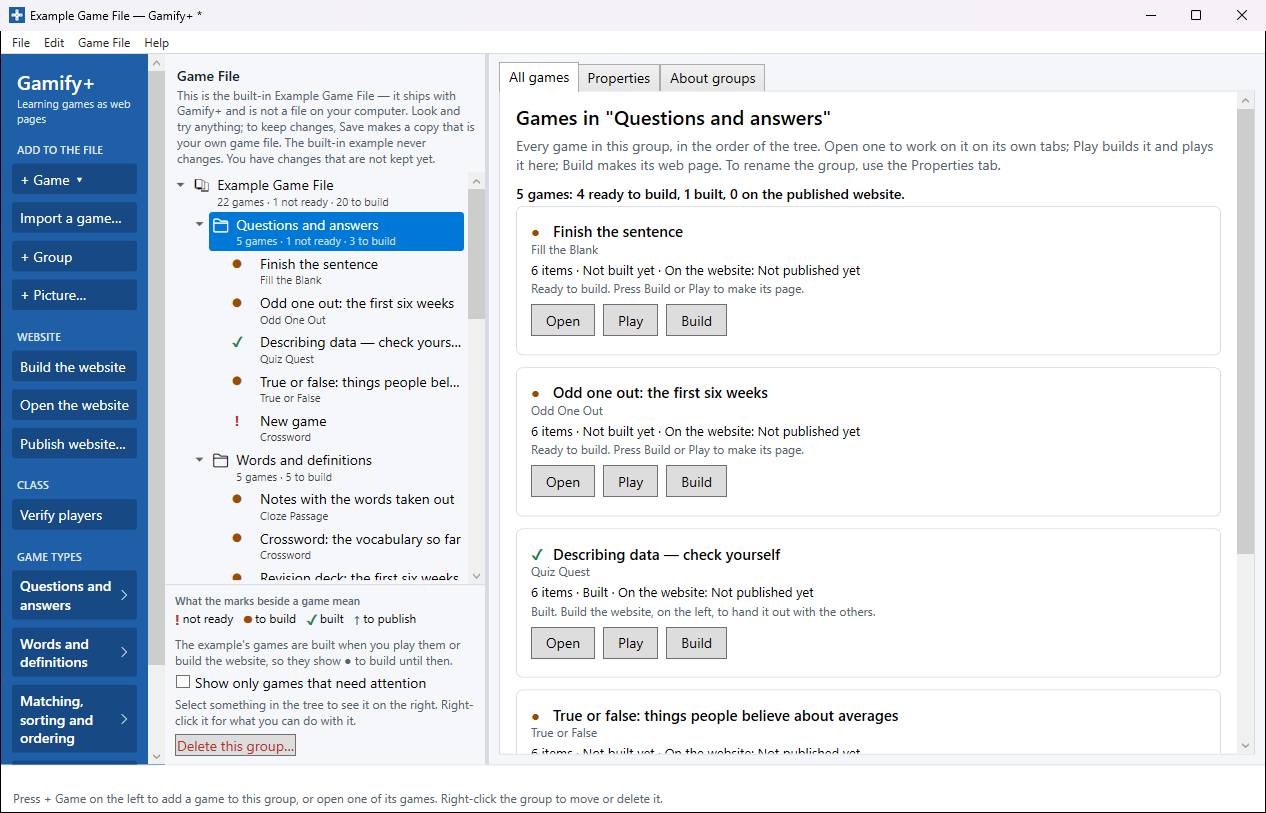
A group's All games shows a card for each of its games, in the order of the tree: its name, its kind, how many items it has, whether it is built and whether it is on the website, with the same mark as in the tree. A game that is not ready says what is missing. Each card has three buttons:
- Open — selects the game in the tree, to work on it on its own tabs.
- Play — builds the game and plays it, on its Play tab.
- Build — makes its web page, on its Build tab.
A group with no games yet says so, with a + Game ▾ button to add the first one. While Show only games that need attention is ticked, only the games with something to do are listed, and a line above the cards says so.
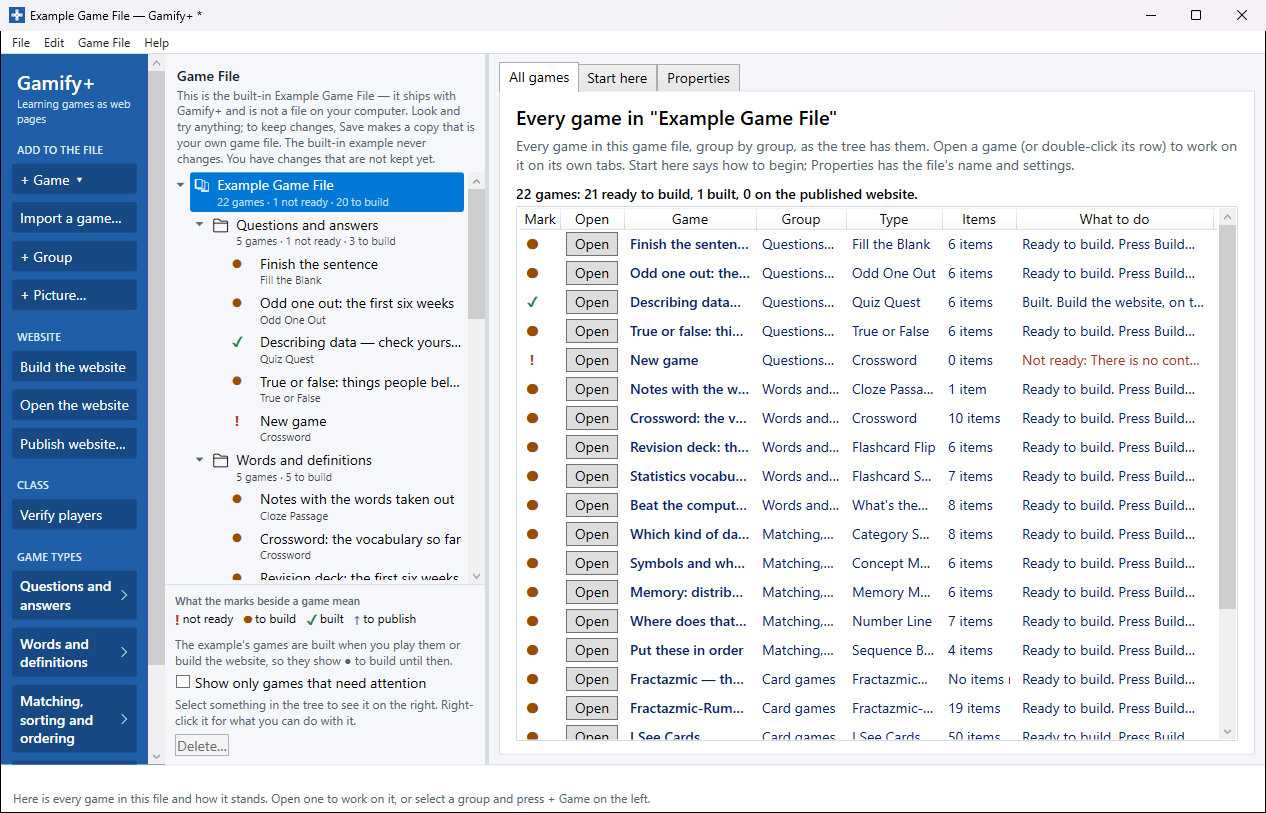
The game file's All games lists every game in every group as one table: Mark (the same mark as in the tree — point at it for what it means), Open (or double-click the row) to go to that game, Game, Group, Type, Items and What to do: what the game needs next, in words — what is missing, build it, publish again, or "Built and on the published website". Point at a row to read it whole. "On the website" is exact for each game: every publish records which games went up. With no games yet it says so, with a + Game ▾ button; the attention filter applies here too.
Groups
A group is a heading you choose for some of your games. Make as many as you like, and sort them whichever way suits you — by kind ("Crossword games", "Quick quizzes") or by topic ("Fractions", "Week 3: probability"). A new game file starts with one group, My games. Every game is in exactly one group.
On the website, each group is a heading on the front page: its name, its description, and its games listed underneath. A file with only one group shows no heading at all.
- Make a group — press + Group on the left (or right-click in the tree: + Group).
- Rename it, or give it a description — on the group's Properties tab. Players read the description on the website, so write it for them.
- Put a game in it — select the group and press + Game on the left, or right-click it and choose + Game in this group. For a game made somewhere else, Import a game…. Its All games tab shows every game in it at a glance.
- Move a game to another group — right-click the game and choose Move to group, use Game File ▸ Move to group, or pick the group on the game's Properties tab.
- Change the order — right-click a group: Move group up or Move group down (also in the Game File menu). The order here is the order on the website.
- Delete a group — select it and press Delete this group… under the tree (or the Delete key), or right-click it: Delete this group…. Your games are never deleted along with a group: a group with games in it offers to move them to another group first. The last group always stays.
Deleting a game — select it and press Delete this game… under the tree (or the Delete key), or right-click it and choose Delete this game…. Gamify+ asks first. There is no undo.
Copying a game — select it and choose Game File ▸ Copy this game… (or right-click it). Its Versions tab opens with a name for the copy typed in beside Save as a new game; change it if you like and press that button. The copy goes in the same group; the game you copied is not changed.
Your first game in the example — the first time you add a game or a group while the built-in Example Game File is open, Gamify+ asks Make it in a game file of your own?: Start my own game file (what most people want), Add it to the example (to try things out; not asked again until the example is opened again) or Cancel.
The picture library
Select Picture library in the tree (F1 there opens "The picture library"). Pictures added here can be used by any game in this game file, and they are kept inside the game file, so it is still one file to e-mail or copy. Some game types take one picture per item — a picture to sort, a picture to name — and say so on their How it plays page.
- + Picture…, on the left of the window, puts a copy of the picture file inside the game file, so it is still one file you can e-mail or copy to a memory stick.
- To rename a picture, select it in the tree and change its name on its Properties tab.
- To delete a picture, select it and press Delete this picture… under the tree (or right-click it: Delete this picture…); Gamify+ asks first. There is no undo.
- A game that names a picture you have since deleted is a warning, not a failure: the game still builds, and the warning says which picture is missing.
- Use pictures you are allowed to use. What you add is copied into every page you build and into the website, where anyone with the address can see it.
(A game you imported has its own pictures, on its Game pictures tab — see Importing a game.)
Saving, and where your files are
- Nothing is saved until you choose File ▸ Save (or Ctrl+S). The window's title ends with * while there are changes that are not saved.
- The "Save the changes?" question. If you close Gamify+, open another game file, or install a new version while there are changes, a window lists what you changed and where the file is, and offers three buttons: Save (Save… for a file never saved, Save as my own copy… for the example) keeps the changes; the one that goes on without saving — for example Close Gamify+ without saving or Install the new version without saving — loses the changes since you last saved; Go back closes nothing and loses nothing. Press F1 there for help with that window.
- If saving fails, the message "Gamify+ — That game file could not be saved" says why it may have happened: the file may be open in another program, or the folder may be read-only. Close the other program, or choose File ▸ Save as… and another folder.
- Game files go in Documents\GamifyPlus\Game Files unless you choose somewhere else.
- The Example Game File is never saved over. It is built into Gamify+, for looking and trying. To keep changes to it, File ▸ Save as… makes it your own copy.
- Built pages and websites are separate. Play and Build the website write web pages into Documents\GamifyPlus\Preview and Documents\GamifyPlus\Sites. They are made from the game file and can always be made again.
Two games cannot share a name. A game's name becomes its page's address, and it also signs the result lines players hand in, so Gamify+ refuses a second game with the same name rather than quietly renaming one.