PLC+ testing guide for instructors
This guide is for the PLC instructors invited to try PLC+ 1.0 before it goes to students. Thank you for helping. It takes about an hour to follow the tour below; after that, look at whichever modules you teach.
On this page
- What PLC+ is, and what we would like from you
- Install PLC+
- A guided tour
- What to look at in each module
- What helps most, and how to send it
- What we know is missing
1. What PLC+ is, and what we would like from you
PLC+ is a free Windows program for the home, self-paced half of a PLC course. The lab, with real PLCs, is the other half. A learner works from electrical and logic basics to ladder programming. They write programs that run on simulated machines on the screen, so they need no PLC at home, and PLC+ checks each exercise by what the program makes the machine do, not by how the rungs look. At each module check the learner saves a signed PDF progress report and hands it in, usually through your LMS. PLC+ works offline and sends nothing anywhere.
Nine of the twelve modules are written as first drafts. We would like you to judge them as a PLC instructor:
- Is what they teach correct, and is it how you would teach it?
- Are the modules and items in the right order, at the right difficulty?
- Are the words right for your students? What would a student new to PLCs get stuck on?
- What is missing that your course needs?
- Does it prepare students for your lab? The lab PLC here is Allen-Bradley.
Short notes are fine. Anything you find confusing is worth telling us. If it confused you, it will confuse a student.
2. Install PLC+
You need a Windows PC: Windows 11, or Windows 10 version 2004 or later. PLC+ is free.
Install PLC+ from the Microsoft Store link in your invitation e-mail. The Store page is hidden while instructors review PLC+, so searching the Store for "PLC+" will not find it; only the link opens it. The link opens in your web browser: press Get (or Get in Store app). If the browser asks whether to open Microsoft Store, choose Open; if a small installer file downloads instead, open that file. In the Store, press Get, wait for it to finish, then press Open. Afterwards PLC+ is in the Start menu like any other program. Some college computers block the Microsoft Store; if yours does, use a home computer. If you have lost the link, e-mail ron.eaglin@gmail.com.
The Store keeps PLC+ up to date by itself. To check for a new version yourself, press Check for a new version… on the start screen, or choose Help ▸ Check for a new version… once a learner is open.
On a lab computer, each Windows account installs PLC+ once from the link (the second is quick). Every account on the computer shares one folder of learners' files, so it works whether students share one Windows login or each have their own. For a lab, ask Ron for the lab install notes.
3. A guided tour
Follow these steps in order. The panel on the right says what each screen is for. The start screen always shows it; once a learner is open, F1 shows or hides it.
Step 1: make a learner
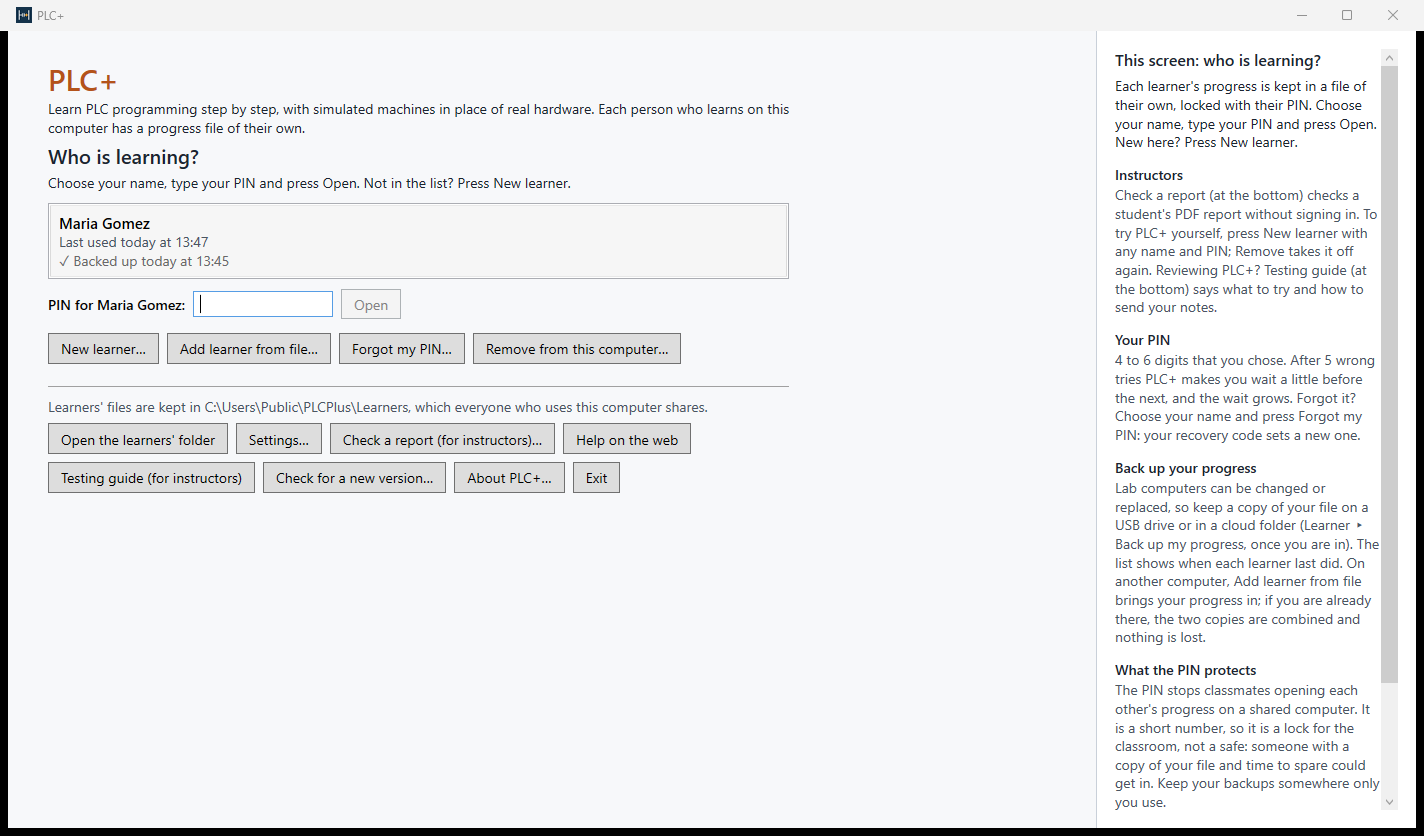
PLC+ opens on Who is learning?. Each person who learns on a computer has a progress file of their own, locked with a PIN.
- Press New learner.
- Type any name (yours, or a made-up student's). The student ID is optional.
- Choose a PIN of 4 to 6 digits and type it again.
- Press Create. PLC+ shows a recovery code once: print it or write it down (it is the only way to set a new PIN if the PIN is forgotten), tick I have written down or printed my recovery code, and go on.
Next time, choose the name, type the PIN and press Open. When you have finished reviewing, Remove from this computer on this screen takes the learner off again.
You do not need a learner to check a student's report: Check a report (for instructors) at the bottom of this screen does that without signing in (step 9).
Step 2: the learning path and My progress
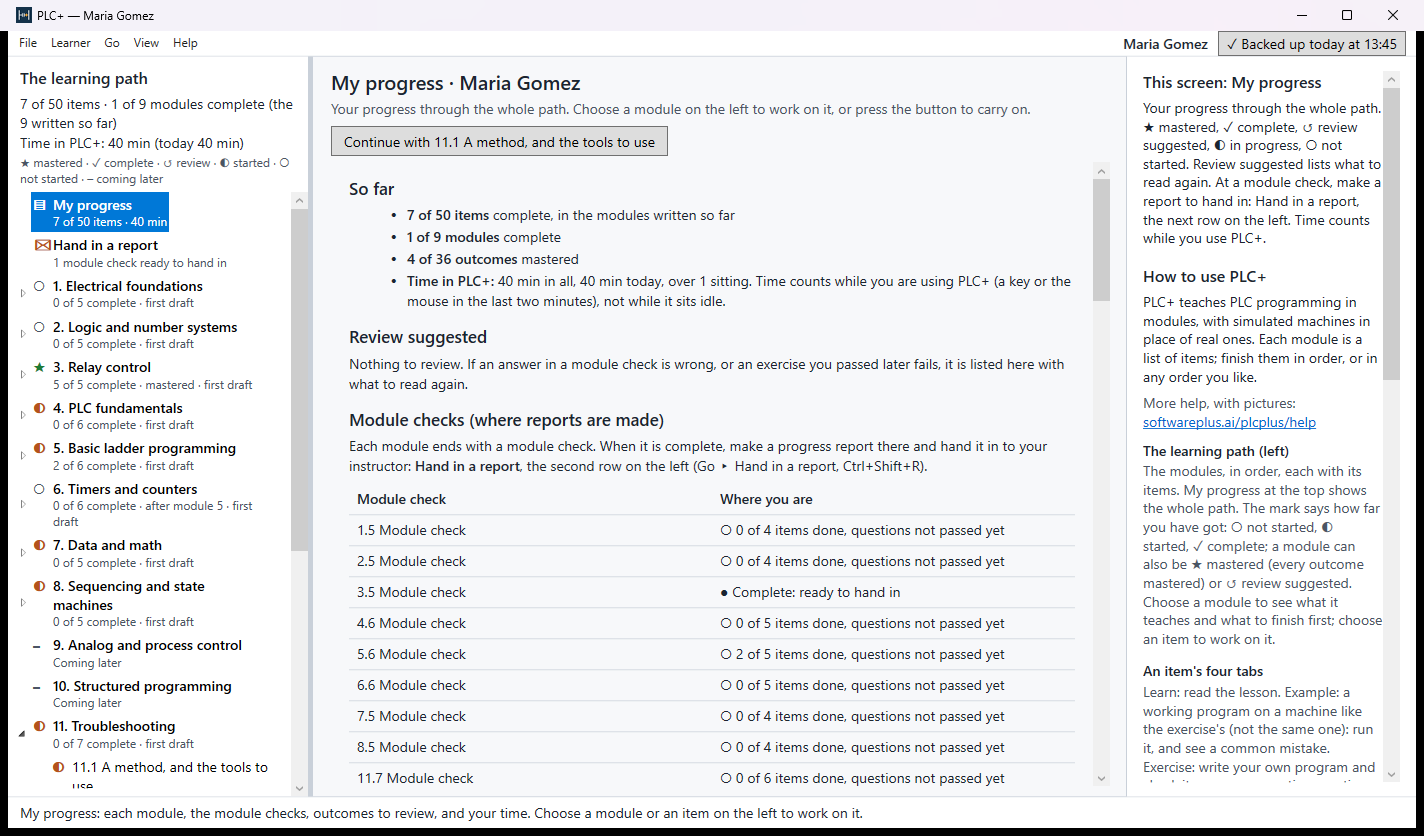
On the left is the learning path: the twelve modules in order, each a list of items. The mark beside each says how far the learner has got: ○ not started, ◐ started, ✓ complete, ★ mastered, ↺ review suggested, and – for a module still to come. The first row, My progress, shows the whole path on one page: items and modules complete, outcomes mastered, time spent, what to review, and where each module check stands. Its Continue with … button opens the next item to do (so does Go ▸ Continue where I left off).
Step 3: a module's first page
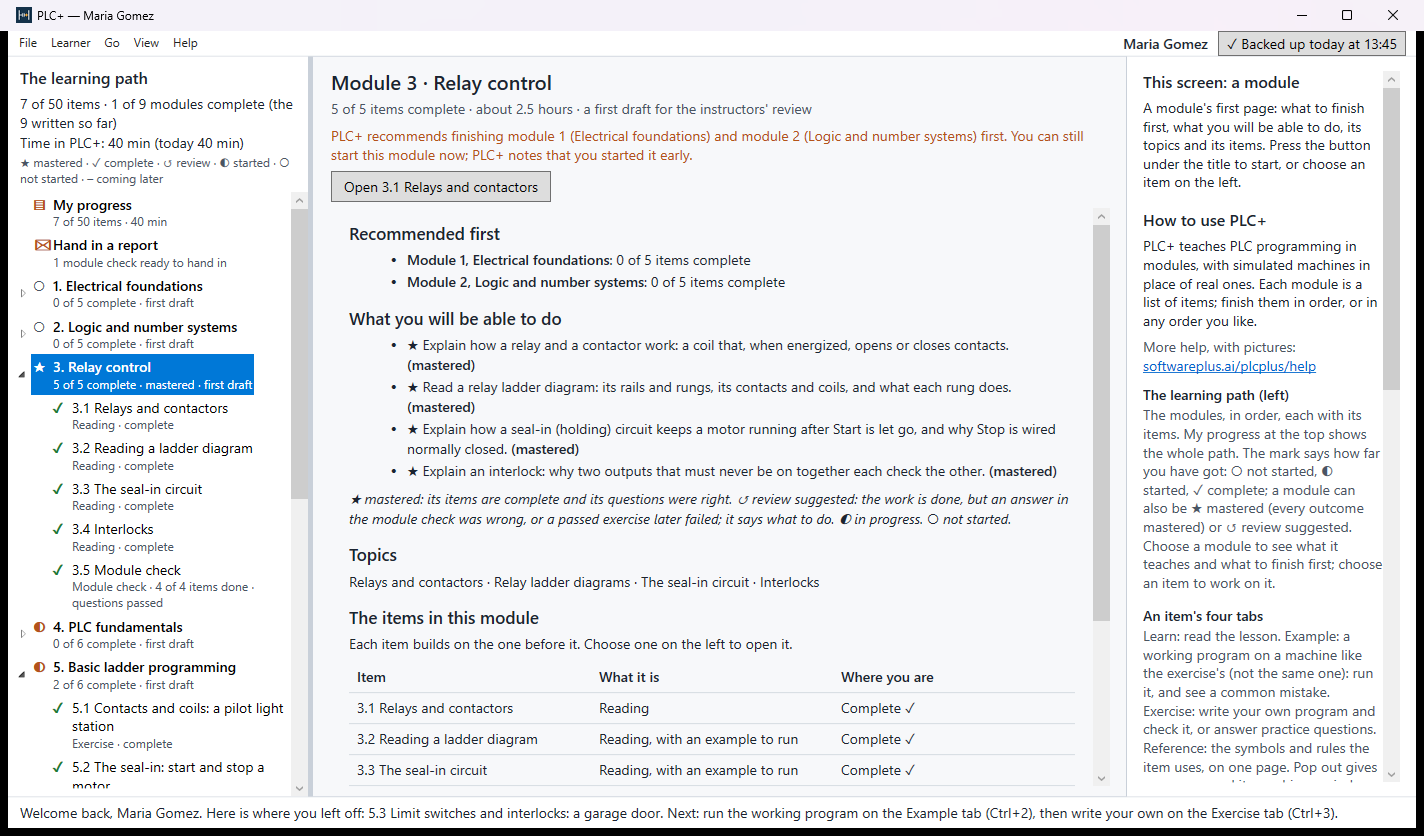
Choose a module's name on the left. Its first page shows the modules recommended first (recommended only: a learner can start anywhere, and PLC+ notes that they started early), what the learner will be able to do (the outcomes), its topics, and its items. The button under the title opens the first item.
Step 4: an item's Learn tab
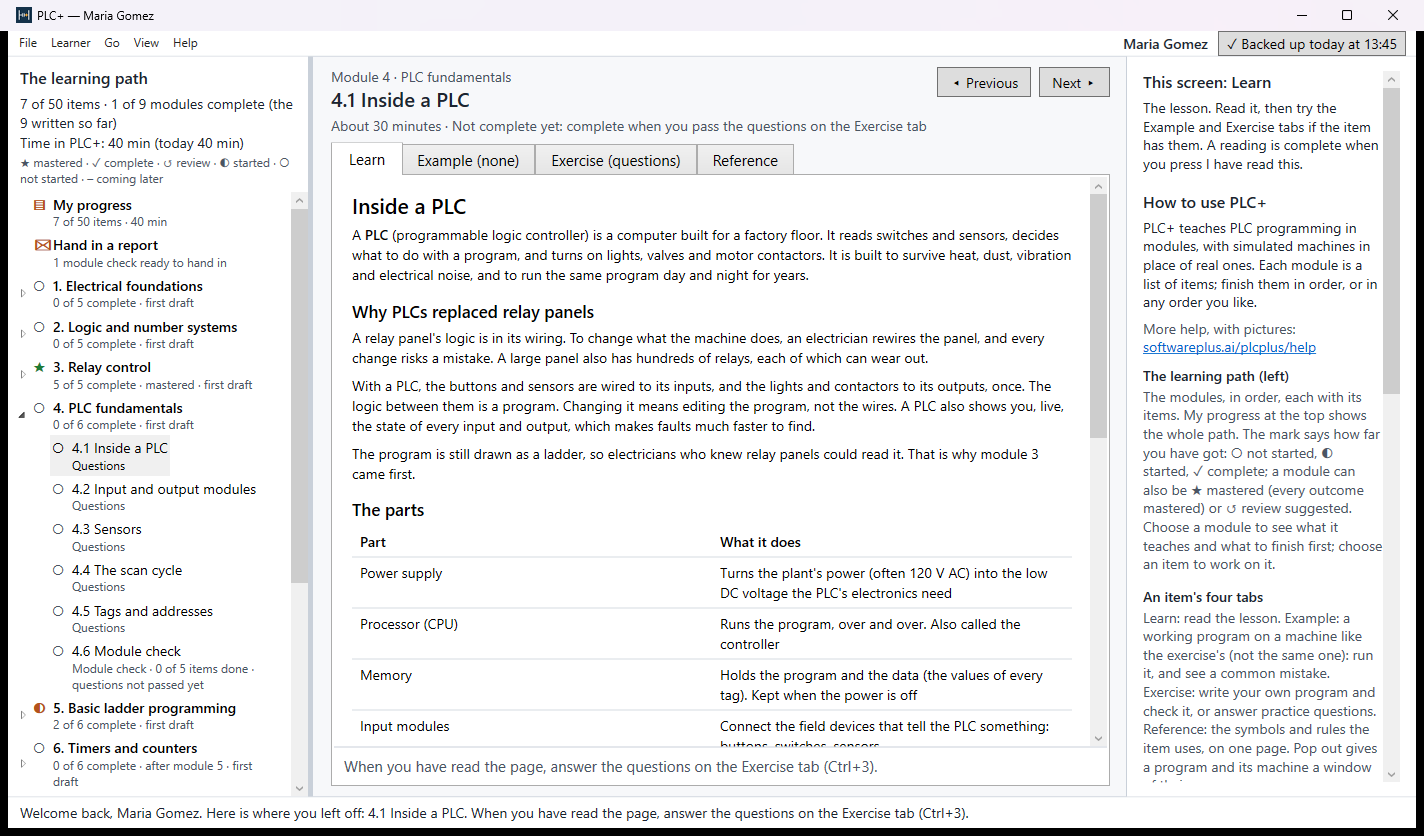
Each item has four tabs: Learn (the lesson), Example, Exercise and Reference (the symbols and rules on one page, with their Allen-Bradley names). Ctrl+1 to Ctrl+4 switch between them; Next ▸ and ◂ Previous at the top move along the path. Read a Learn page as a student would.
Step 5: an Example
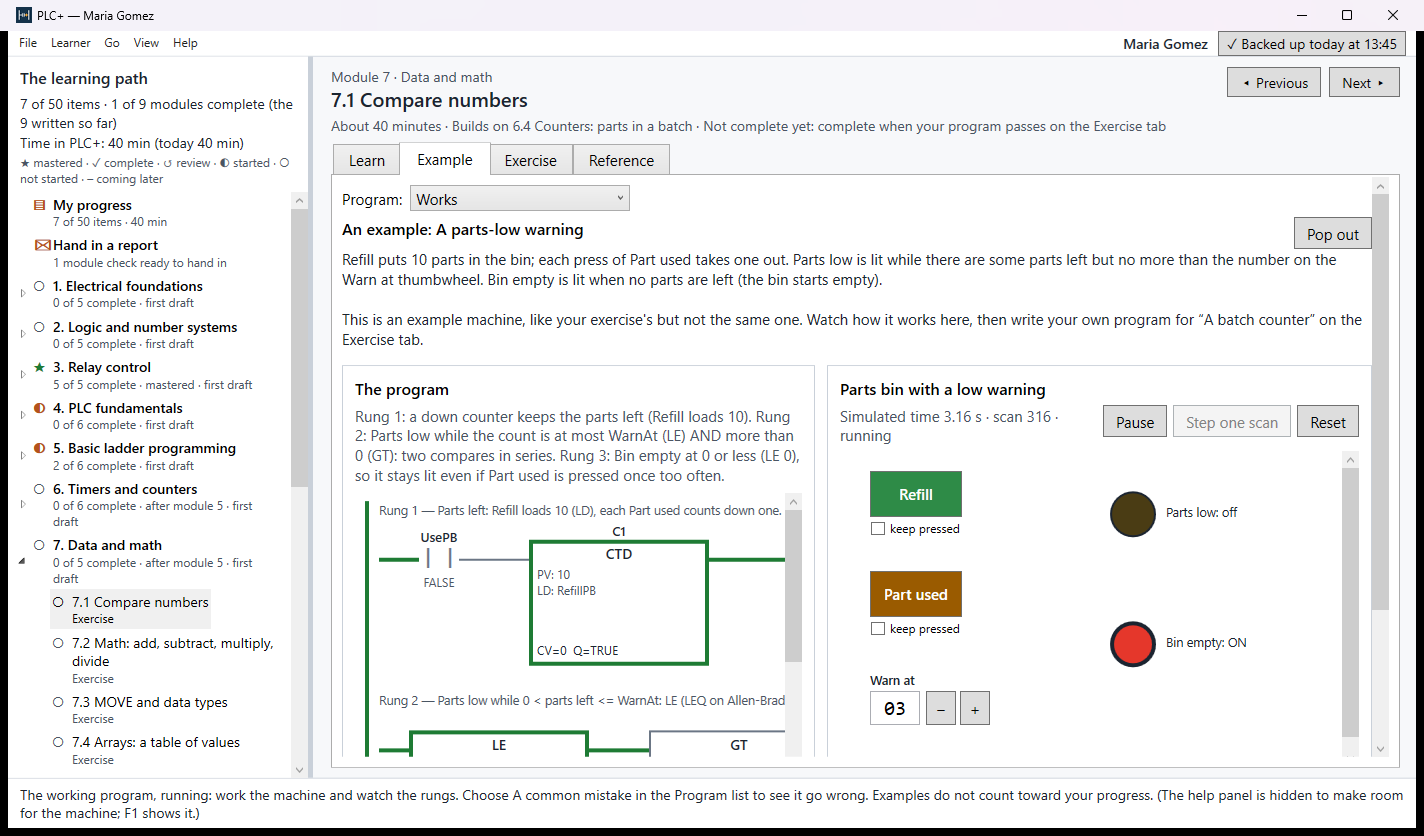
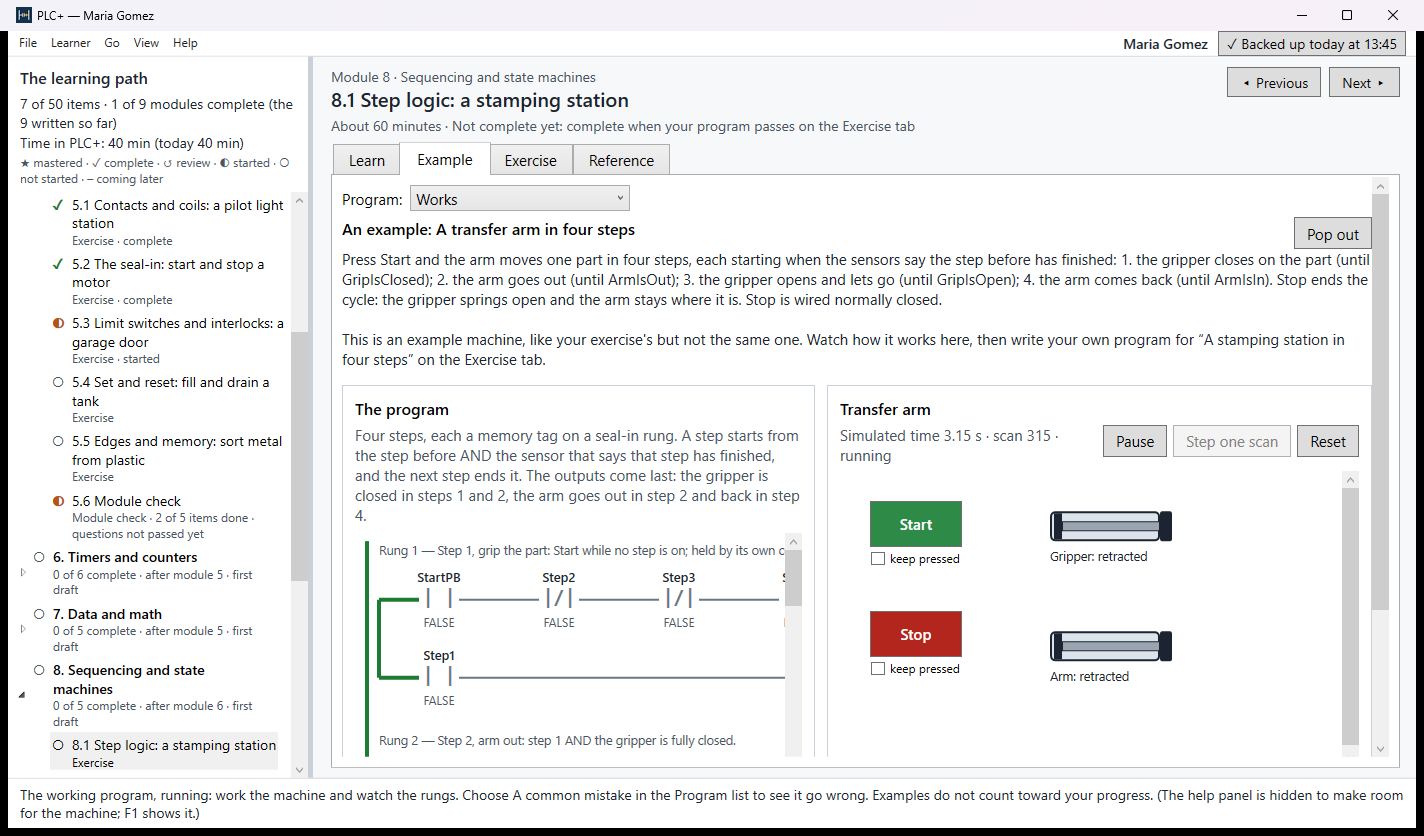
The Example tab runs a working program on a machine like the exercise's, never the same one, so the student sees the idea worked out and then has to apply it. On the left is the program as ladder rungs, running live: a contact or wire that passes power is green, thick and says TRUE. On the right is the machine: hold a button down to press it, or tick its keep pressed box. Then:
- Change Program from Works to A common mistake and see what goes wrong.
- Pause, Step one scan and Reset control the simulated PLC, which runs at 10 ms a scan.
- Pop out opens the program and its machine in a window of their own that you can make as large as you like. Close it (or press Esc) to come back.
Step 6: an Exercise
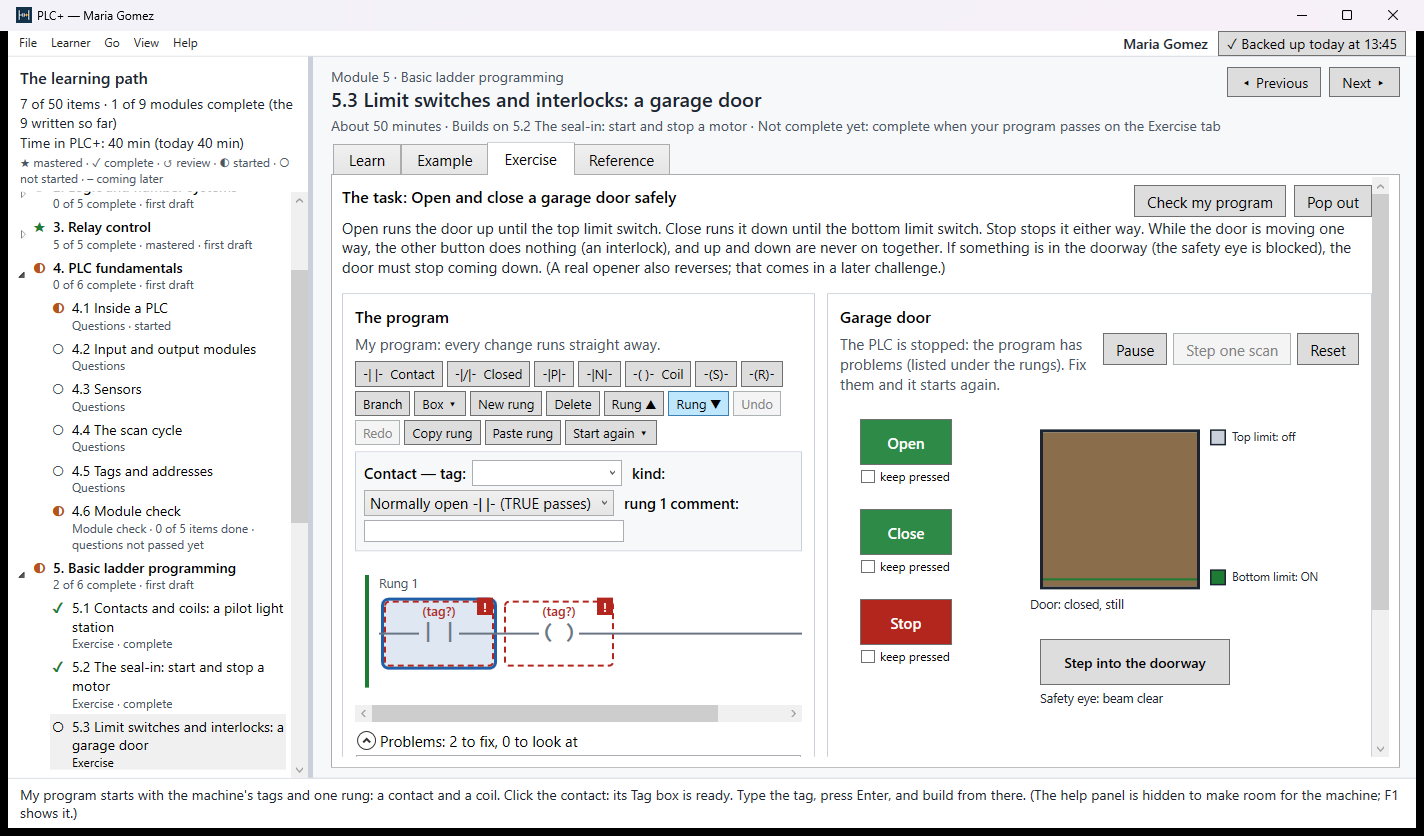
On the Exercise tab the learner writes the program. It starts with the machine's tags and one rung, a contact and a coil.
- Click the contact, type a tag in its Tag box and press Enter. The buttons above the rungs add contacts, closed contacts, coils, set and reset coils, branches, boxes (timers, counters, compares, math) and new rungs. The program runs as you build it, so you can work the machine at any time.
- Anything wrong (a tag missing, a box not filled in) is listed under the rungs under Problems.
- Press Check my program. PLC+ runs its tests much faster than real time: each test presses buttons at set times and watches the machine. Some tests are hidden, so a program cannot be fitted to the visible ones.
- If a test fails, PLC+ says what should have happened and when, and gives a hint. Replay the failed test plays back what actually happened, moment by moment.
- Start again ▾ can load the common mistake to fix, or (in module 11) the buggy program the exercise starts with.
Try to pass one exercise, and get one wrong on purpose to see what a student sees.
Step 7: a module check
Every written module ends with a module check, its last item on the left: questions of several kinds (choices, a number, a truth table, matching symbols to names, a typed answer such as a number in binary or hex), and in modules 4 to 8 and 11 machines with a fault to find. On a find-the-fault question, work the machine and watch the rungs: a wire is broken or shorted, or a device has failed, and the learner picks which. The pass mark is 80 %. A learner may try again as often as they like, and a wrong answer does not show the right one. Each learner sees the options in an order of their own. Answer the questions, then press Check my answers; PLC+ marks each question right or not.
Step 8: hand in a report
Choose Hand in a report, the second row on the left. Pick a module check (or everything so far), look at what the report will say, and press Save the PDF report. My details for reports adds a student ID, course and the class code an instructor may give the class. The report can be made before the check is complete; it is then marked Incomplete. The learner hands the PDF in the way you ask (usually an LMS assignment); Send to my instructor opens their own e-mail program with the message written. PLC+ never sends anything itself. The first time, PLC+ asks for the learner's details (only the name is needed); press Continue, then choose where to save the PDF. Part 3, Hand it in, then shows the report's result line, a one-line summary an instructor can check; Copy the result line copies it.
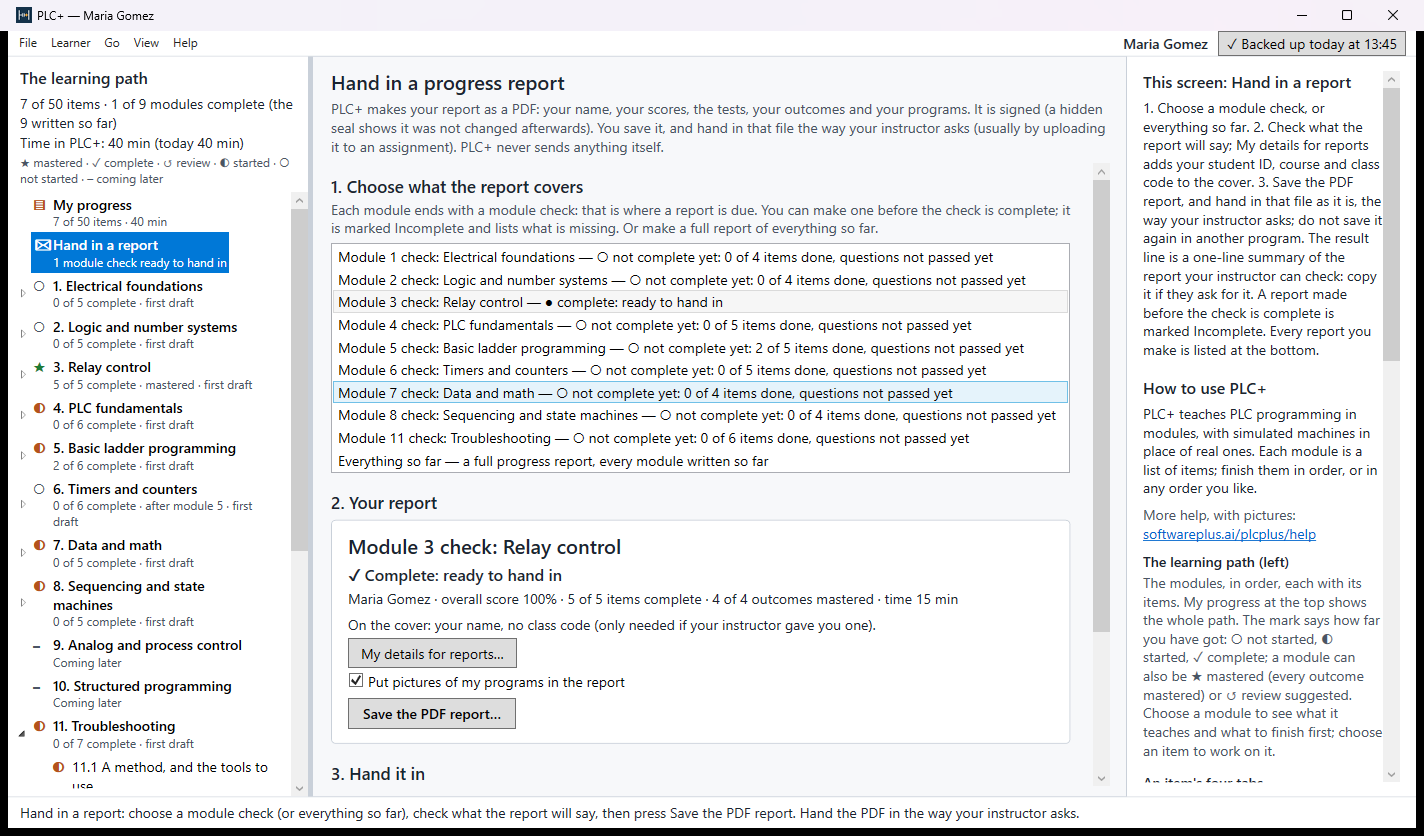
Please open the PDF and tell us whether it shows what you would need to grade or record the work.
Step 9: check a report
As an instructor, choose File ▸ Check a report (for instructors), or the button on the start screen, press Choose… and pick a student's PDF (or paste the result line a student sent you, or both), then press Check. PLC+ says whether the report is as it was made or has been changed since. If you give your class a class code, type it here too, and PLC+ says whether the report was signed with it; Make a new class code makes one to give a class. Nothing is sent anywhere. Try it on the report you just saved. Then open the PDF in Microsoft Edge, highlight a word, save it, and check it again: PLC+ says it was changed.
4. What to look at in each module
Modules 1 to 8 and 11 are written (first drafts). Modules 9, 10 and 12 show only their outcomes and topics; they come later.
- 1. Electrical foundations: voltage, current and resistance; series and parallel; AC and DC in a panel; lockout/tagout. Are the safety steps and panel voltages right?
- 2. Logic and number systems: binary, hex, BCD, AND/OR/NOT and truth tables. Are typed answers in binary and hex accepted the way your students write them?
- 3. Relay control: relays and contactors, reading a ladder diagram, the seal-in and interlocks.
- 4. PLC fundamentals: inside a PLC, I/O modules (sinking and sourcing), sensors, the scan cycle, tags and addresses (with Allen-Bradley addresses).
- 5. Basic ladder programming: five machines: pilot lights, a motor seal-in, a garage door, a tank, a sorter. Are they the right first exercises, in the right order?
- 6. Timers and counters: on-delay, off-delay and pulse timers, retentive timing, counters, cascading them.
- 7. Data and math: compare, math, MOVE and data types, arrays, with thumbwheels and numeric displays.
- 8. Sequencing and state machines: step logic, a step number, a state machine, and an introduction to SFC, with pneumatic cylinders.
- 11. Troubleshooting: a method, input faults, output and device faults, and three find-and-fix exercises that start from a program with a bug.
You can also read every module without the program on the review site, with each item's lesson, the machines' working programs and every question with its answer.
5. What helps most, and how to send it
Whatever you notice is welcome. These help most:
- Accuracy: anything wrong, or taught in a way you would correct in the lab.
- Order and difficulty: modules or items that should move, be split, or are too hard or too easy for where they are.
- Wording: lessons, hints and messages a student would misread.
- Missing topics or machines your course needs.
- The lab match: PLC+ uses the generic IEC 61131-3 names (TON, PT/ET/Q) with the Allen-Bradley name beside them (XIC/XIO/OTE, .PRE/.ACC/.DN). Is that enough to carry over to your Allen-Bradley lab?
- Reports: what you need to see on a student's report.
Two ways to send notes:
- Comment on the review site. Open the review link in your invitation (it ends
?user=yes; that switches commenting on, and your browser remembers it). Every item on the review site has a comment box under it, and the front page has one for general comments. Comments appear once Ron has approved them. - E-mail ron.eaglin@gmail.com, in any form: a few lines, a marked-up copy, or screenshots. Please say the module and item number (for example "5.3, Exercise tab"), and if something went wrong, what you did just before.
In PLC+, Help ▸ Testing guide and feedback (for instructors)…, or Testing guide (for instructors) on the start screen, opens this page.
6. What we know is missing
- The modules are first drafts, written to be reviewed. Modules 9 (analog and process control), 10 (structured programming) and 12 (industrial systems) come later.
- PLC+ uses the IEC 61131-3 instruction names, with the Allen-Bradley name beside them. An Allen-Bradley mode, with its own instructions and addresses, comes later.
- The ladder editor cannot yet rename a tag, set a tag's starting value, or declare DINT tags or arrays. The lessons say so where it matters.
- Answers to questions a learner has not yet checked are lost when PLC+ closes. Checked answers, progress and programs are saved as the learner goes.
- The garage door only stops when something is in the doorway; a real opener also reverses. Time runs on a simulated clock of exactly 10 ms a scan, so results never vary as they would a little on a real PLC.
Thank you. Your notes decide what changes before PLC+ goes to students.