
The Treatment Options screen is where you choose and enter the treatment (Best Management Practices, BMPs) for one catchment. Open it from General Site Information with button 2. Enter Treatment. Each button on the screen opens the worksheet for one type of BMP. A catchment can have one BMP of each type entered at the same time, so you can enter several options and compare their results. Only one of them is used in the analysis and routing: the one you select for the catchment in Configure Catchments. The others are saved with the project but do not affect the results.
The window title reads “Select Treatment Options for individual performance, not in series or in multiple catchments.” The results you see on each worksheet are for that BMP on its own, with runoff only from this catchment. To put more than one BMP in series on the same catchment, use BMPs in Series; routing between catchments is done in Configure Catchments.
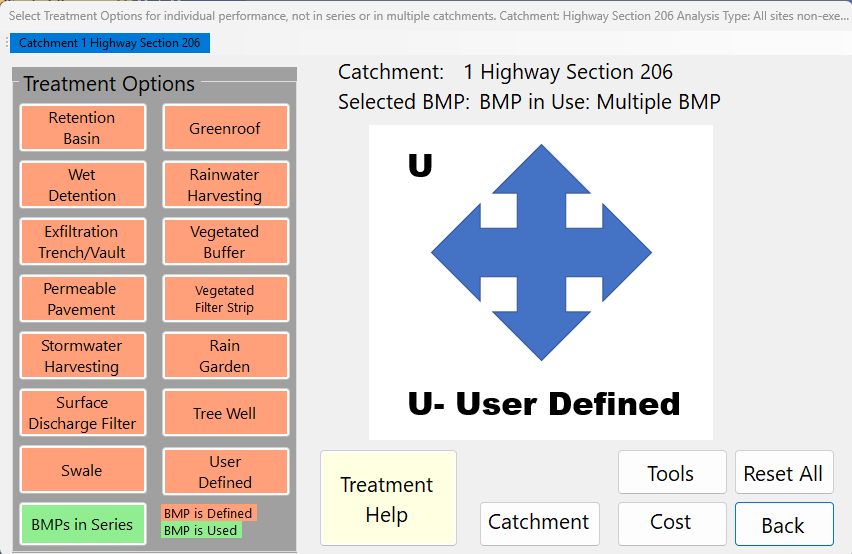
What the screen shows
- Catchment menu (top bar): one entry per catchment in the project. The highlighted entry is the catchment you are working on. Click another entry to switch catchments; the button colors and labels update for that catchment.
- Catchment: the number and name of the current catchment.
- Selected BMP: “BMP in Use: …” followed by the BMP type selected for this catchment in Configure Catchments. “Not Defined” means none could be read.
- Picture: shows the project’s catchment configuration diagram. When you rest the mouse on a BMP button, it shows a typical section of that BMP instead.
- Button colors (the key is in the lower right of the Treatment Options box):
- BMP is Defined (salmon): this BMP has values entered for this catchment.
- BMP is Used (green): this BMP has values entered and is the one selected for the catchment in Configure Catchments, so it is the one used in the analysis.
- Gray (default): no values entered yet.
A BMP that is selected in Configure Catchments but has no values entered is not shown in green. Enter its values first.
Treatment options (BMP worksheets)
Click a button to open that BMP’s worksheet for the current catchment. When you close the worksheet with Back, the button colors are refreshed.
| Button | Opens | Help page |
|---|---|---|
| Retention Basin | Retention System Worksheet | Retention |
| Wet Detention | Wet Detention worksheet | Wet Detention |
| Exfiltration Trench/Vault | Exfiltration Systems Worksheet | Exfiltration |
| Permeable Pavement | Permeable Pavement Worksheet | Permeable Pavement |
| Stormwater Harvesting | Stormwater Harvesting worksheet | Stormwater Harvesting |
| Surface Discharge Filter | Filtration worksheet | Surface Discharge Filter |
| Swale | Swale Worksheet | Swale |
| Greenroof | Greenroof worksheet | Greenroof |
| Rainwater Harvesting | Rainwater Harvesting worksheet | Rainwater Harvesting |
| Vegetated Buffer | Vegetated Natural Buffer worksheet | Vegetated Buffer |
| Vegetated Filter Strip | Vegetated Filter Strip worksheet | Vegetated Filter Strip |
| Rain Garden | Rain Garden worksheet | Rain Garden |
| Tree Well | Tree Well worksheet | Tree Well |
| User Defined | User Defined BMP worksheet (your own removal values) | User Defined |
| BMPs in Series | Multiple BMP worksheet: up to four BMPs in series on this catchment | BMP in Series |
Several worksheets have a Media button for pollution control media; see Media Mix. Their Cost button is described in Cost Analysis.
Other buttons
| Button | What it does |
|---|---|
| Treatment Help | Opens this page. |
| Catchments | Opens the catchment editor (Catchment Characteristics) for the current catchment. |
| Tools | Opens the Calculators (permeable pavement storage, harvesting efficiency, retention efficiency lookup tables, surface discharge filter sizing, media filter service life and others). The current catchment is passed to the tools that need one. As the Tools screen says, information entered there is not saved and has no effect elsewhere in the program. |
| Cost Report | Opens a report of the cost data for every BMP defined on the current catchment (treatment volume, land cost, expected life, fixed cost, cost per acre-foot, initial cost, maintenance, annual recovery, total annual cost, replacement cost, present value, N and P mass reduction, and present-value cost per pound of N and P removed). The same table is copied to the clipboard as tab-separated text, ready to paste into Excel. |
| Reset All | Clears every BMP entered for the current catchment and sets its selected BMP back to none. Where the catchment is routed to (set in Configure Catchments) is kept. You are asked to confirm first (“This will reset all values of all BMPs for this catchment and leave it with no BMP selected. Where the catchment is routed to is kept. Continue?”). |
| Back | Closes Treatment Options and returns to General Site Information. |
Notes
- You need at least one catchment. If the project has none, BMPFast asks “You must create a Catchment before defining treatment options, would you like to do that now?” before this screen opens, and this screen asks again if catchment 1 is missing. Answer Yes to open the catchment editor.
- Only one BMP of each type can be entered per catchment. To use two of the same type (for example two retention basins) in one catchment, use BMPs in Series, or split the area into two catchments and route one to the other in Configure Catchments.
- Each BMP worksheet shows, in a bar along its bottom edge, the project’s Maximum % Removal for TN and TP: the removal the analysis type requires. Compare the worksheet’s results against it.