
Each section below is the help that screen shows in Assessment+ itself, on its ℹ Help & Information tab (or F1), so it matches what you see on screen.
Back Up Data
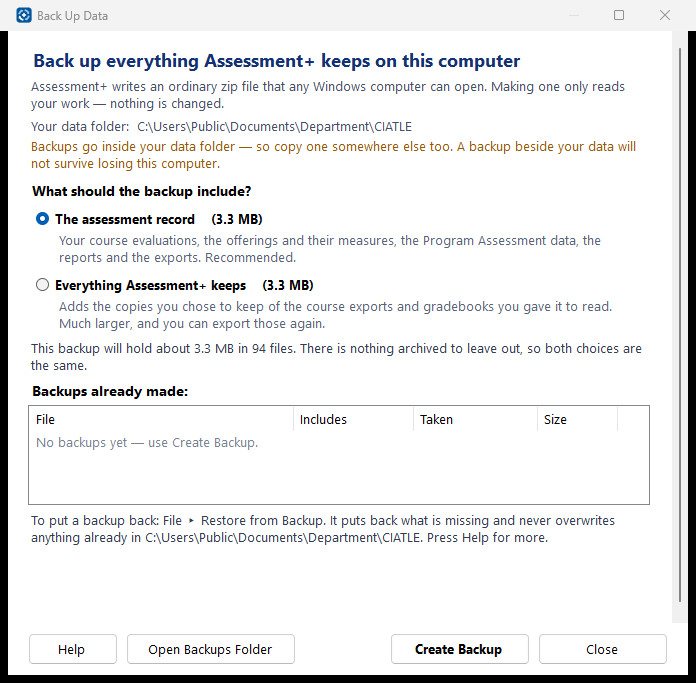
Makes a zip copy of everything Assessment+ keeps on this computer, so you can put it back if a file is damaged, deleted, or overwritten by a sync. Making a backup only reads your work — nothing is moved or changed.
How to use it
- Choose what to include. “The assessment record” is your course evaluations, the offerings and their measures, the Program Assessment data, the reports and the exports. This is the right choice almost always, and it is small enough to do often.
- “Everything in the data folder” adds the copies you chose to keep of the course exports (.imscc) and gradebooks you gave it to read. Those are usually most of the size, and you can export them from your LMS again, so they are left out unless you ask for them.
- Press Create Backup. The sizes beside each choice are measured from your own data folder, so you can see what you are about to write before you write it.
- Copy the zip somewhere that is not this computer — a USB drive, a network folder, or an email to yourself.
What it means, and what to watch for
- Putting a backup back: File ▸ Restore from Backup shows what the backup would put back, then puts back only what is missing. Nothing already in the folder is overwritten: a file that has changed since the backup is kept, and the backup's copy is set aside to compare.
- By hand, in File Explorer: close Assessment+, open the zip and copy files into your data folder. Copying "replace the files" overwrites newer work, which Restore never does. For the folder exactly as it was that day, rename the current data folder first and unzip into a new empty one.
- To recover one course only, open the zip and copy out just that course's .ciafce file.
- If the data folder is shared with colleagues, tell them before you restore — they will receive your restored copy.
- If your data folder is in OneDrive or similar cloud storage, backups made here are uploaded too. That is a second copy, not a substitute for one you keep yourself — anything deleted in the folder is deleted everywhere it syncs to.
- Video files (.mp4 and the like) are never put in a backup, whichever option you choose. They are not assessment data, and they are large enough that including them would make backing up something you stop doing. Keep your recordings with your other files.
- Every backup contains backup-manifest.txt saying when it was taken, which folder it came from, and anything that was left out of it or could not be read.
- Backups are never included inside later backups, so they do not pile on top of each other. Old ones are yours to delete — use Open Backups Folder.
See also
- Tools ▸ Settings — shows and changes where your department folder is.
- Open Backups Folder — opens the folder these are written to in File Explorer.
Restore from Backup
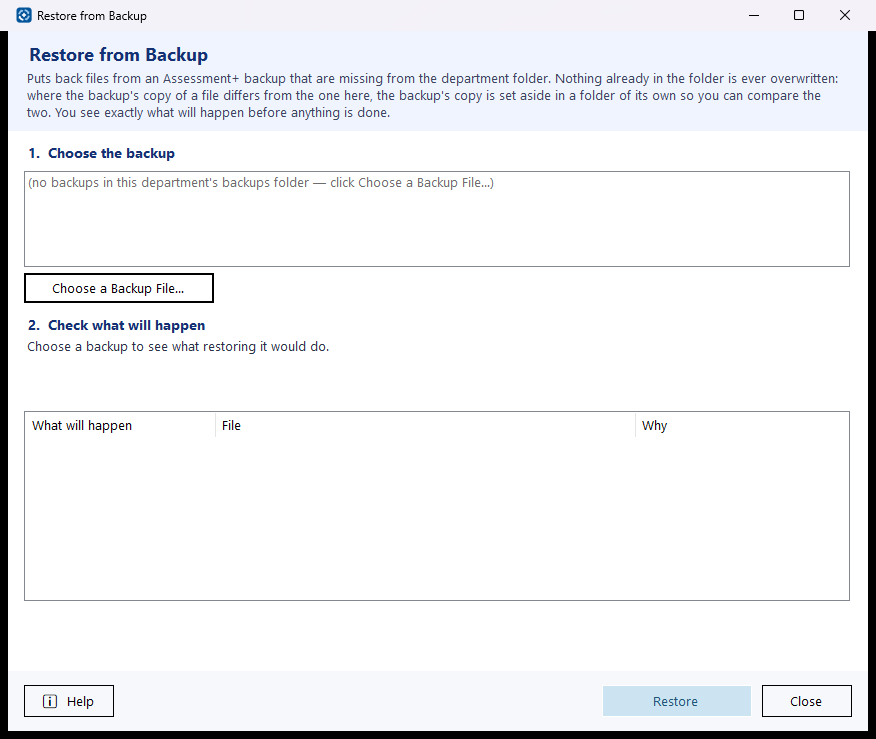
Gets files back from a backup made with File ▸ Back Up Data — a course file that was deleted, or a folder that was lost — without risking anything that is in the department folder now.
How to use it
- Pick a backup from the list (the department's backups folder, newest first), or choose a backup zip kept somewhere else, such as a USB drive.
- Read what will happen. Every file in the backup is listed with what the restore will do with it.
- To bring back only some files, untick the "Put back" rows you do not want — for example, to get one deleted course back without everything else deleted since the backup.
- Click Restore. When it finishes, the folder with the set-aside copies and the log is offered to open.
What it means, and what to watch for
- Put back — the file is not in the department folder, so it is copied in.
- Already here — the file in the folder is exactly the same as the backup's (compared by content, not by date). Nothing to do.
- Set aside (different) — a different version of the file is already here. The one here is kept, because it is probably newer work. The backup's copy is put in the backups folder, in a folder named Restored- and the date and time (e.g. Restored-2026-09-23_101500), under set-aside, so you can open both and decide. Set-aside copies never appear under Courses.
- Set aside (duplicate) — the backup has a course file under a name that is not here, but the same course is already here under another name. Restoring it would give one course two files, which Assessment+ would then report under Assessment Issues. It is set aside instead.
- Refused — a file whose path points outside the department folder. A real Assessment+ backup never has one; it is never written.
- Nothing is written until you click Restore, and nothing that is already here is changed. Files are unpacked to a holding folder first, so an interruption leaves the department folder as it was.
- A backup from another computer or another folder does not combine with this one. Files that exist in both are kept as they are here, so that folder's program list and assessments are set aside, not added. To bring another department's programs in, use Export Everything (.ciaall) there and File ▸ Import ▸ Import Transfer Package here. To work in that department's data, create an empty folder, open it with File ▸ Open Department Folder, and restore into it.
- To go back to the backup's version of a set-aside file: close Assessment+, and copy it from the set-aside folder over the one in the department folder.
- If the department folder is shared, the files put back reach everyone who uses it.
- A log of everything done is kept as restore-log.txt in the Restored folder.
- Stop (shown while a restore runs, or closing the window) stops after the file it is working on. Stopped while unpacking, nothing is put back. Stopped while setting copies aside, the files already put back stay. No file is ever left half-written.
See also
- File ▸ Back Up Data — makes the backups this screen restores from.
- File ▸ Assessment+ Files — Backup, Restore and Import — what every kind of Assessment+ file contains.
Backups (.zip)
A backup is a zip copy of the department folder, made with File ▸ Back Up Data. It is how you get work back after a file is deleted, damaged, or overwritten by a sync.
How to use it
- File ▸ Back Up Data. Choose "The assessment record" (almost always right) or "Everything".
- The zip is saved in the department folder's backups folder, named with the date, e.g. CIATLE-Backup-assessment-record-2026-09-23_0915.zip.
- Copy it somewhere that is not this computer: a USB drive, a network folder, an email to yourself.
What it means, and what to watch for
- What is inside: every file in the department folder, in the same folders, plus backup-manifest.txt saying when it was taken, from where, what was left out, and how to put it back.
- The assessment record leaves out Evaluations\Sources — the copies of course exports, gradebooks and workbooks you chose to keep, filed by course, which are most of the size and can be exported from your learning management system again. "Everything" includes them.
- Always left out: the backups folder itself (or each backup would contain all the earlier ones) — so removed courses, programs, accreditations and academic years kept there are not in a backup either — and video files (.mp4, .mov and others): recordings are not assessment data.
- A file that could not be read (open in another program, not yet downloaded by OneDrive) is listed in the manifest as missing, so an incomplete backup never looks complete.
- Student information: a backup is a copy of the folder, so it contains whatever the folder does. "Everything" includes the archived gradebooks, which list students and their scores. Both kinds include transfer evaluations (student names, IDs and transcripts) if you have made any. Keep backups where you would keep a gradebook.
See also
- Restore from Backup — putting a backup back.
- File ▸ Back Up Data.
Restoring a backup
File ▸ Restore from Backup puts back files from a backup that are missing from the department folder. It never overwrites anything already there.
How to use it
- File ▸ Restore from Backup. Pick a backup (or choose a zip kept elsewhere).
- Read the list: every file in the backup, and what will happen to it.
- Click Restore. The files that were missing are put back; the rest are left as they are.
What it means, and what to watch for
- Put back — not in the folder, so it is copied in.
- Already here — identical to the backup (compared by content). Nothing happens.
- Set aside (different) — a different version is already here. The one here is kept; the backup's copy goes to the backups folder (a Restored- folder named with the date, under set-aside) so you can compare them and choose. Set-aside copies never appear under Courses.
- Only some files: untick the Put back rows you do not want.
- Set aside (duplicate) — the backup has a course file under a name not used here, but the same course is already here under another name. It is set aside, because two files for one course is an Assessment Issue.
- A log of everything done is kept as restore-log.txt beside the set-aside files.
- Doing it by hand also works: close Assessment+, open the zip in File Explorer and copy files into the department folder. Unlike Restore, copying "replace the files" overwrites newer work.
See also
- Backups (.zip).