
Each section below is the help that screen shows in Assessment+ itself, on its ℹ Help & Information tab (or F1), so it matches what you see on screen.
Program Courses
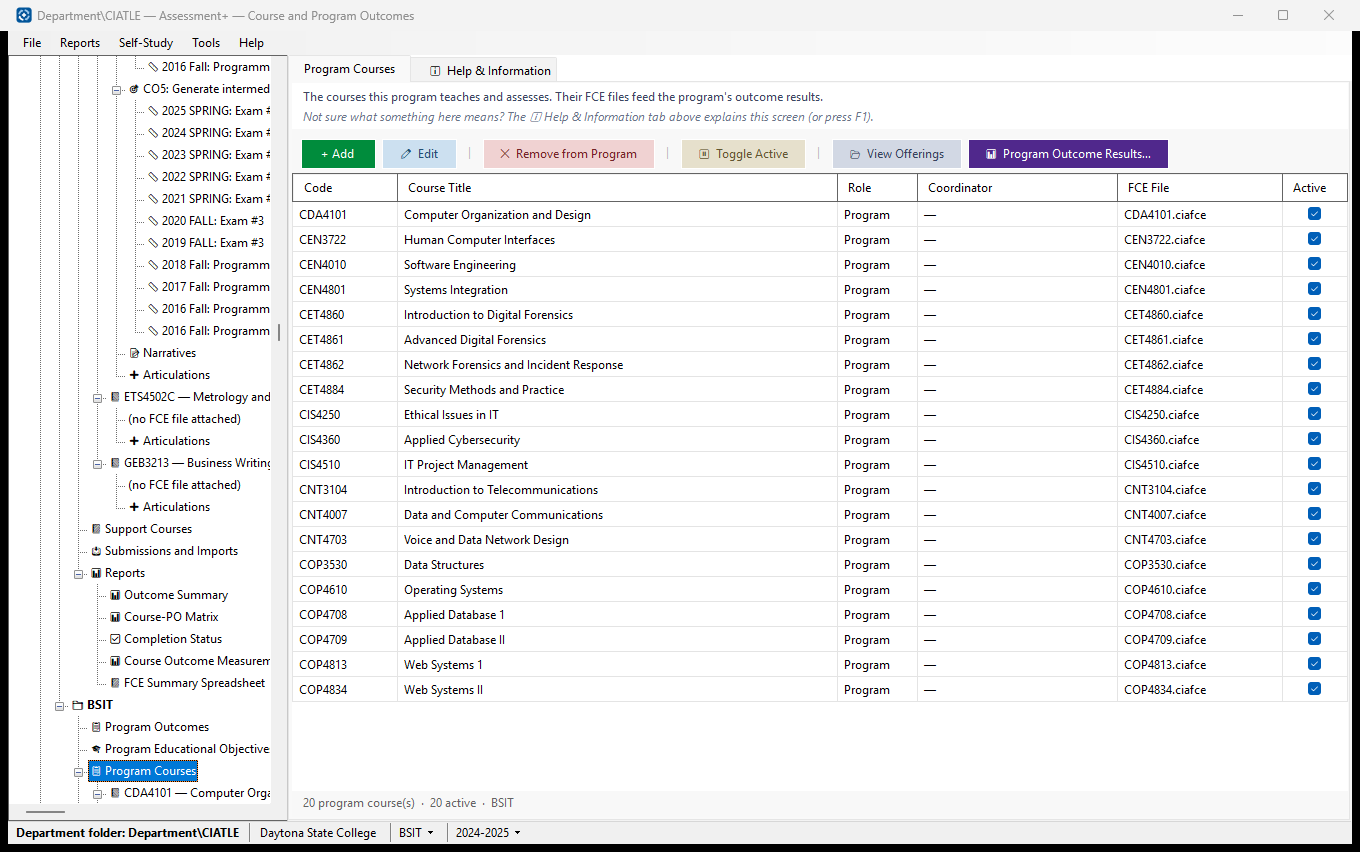
The courses this program lists. Program courses are taught and assessed by the program, and their Faculty Course Evaluation (FCE) files feed the program's outcome results. Support courses are required but taught by another department; the program keeps only their description and informational outcomes.
How to use it
- Click + Add to put a course in this program: enter its code and title and choose Program course or Support course.
- Select a course and click ✏ Edit (or double-click it) to change its details, attach its FCE file (.ciafce) or record informational outcomes.
- Click 📂 View Offerings to read, without changing anything, every semester recorded in the selected course's FCE file.
- Click 📊 Program Outcome Results… to see the program's outcome results for the academic year chosen in the status bar — the same figures as the program's Outcome Summary — or, by choosing All years in that window, added up from every offering in the FCE files of all active courses.
- When a course is no longer taught, select it and click ⏸ Set Inactive. It keeps its history and is shown in gray; ▶ Set Active brings it back.
- Expand a course in the tree to see its course outcomes (🎯), 📝 Narratives and ➕ Articulations.
What it means, and what to watch for
- Role — Program (taught and assessed by this program) or Support (required, taught elsewhere).
- Coordinator — the faculty member responsible for the course; "—" means none is recorded.
- FCE File — the file that holds the course's semesters. "missing: name" in red means a file was attached but is not on this computer any more: click ✏ Edit and Browse… to attach it again. For a support course with no file, this column shows how many informational outcomes are recorded.
- Active — inactive courses are left out of Program Outcome Results but keep their history.
- 📊 Program Outcome Results… is available once an academic year is chosen in the status bar or an active course has an FCE file. The one-year view also uses imported submissions; "All years" needs at least one attached course file. Courses without a readable file are listed as warnings.
- ✕ Remove from Program takes the course out of this program's list only. What the program keeps about it — role, coordinator, syllabus link, informational outcomes — is set aside in backups\Removed courses in the data folder, and 📚 Courses ▸ ♻ Removed Courses… brings it back with its articulations. The FCE file is not moved, and other programs keep the course.
- The status line at the bottom counts the courses, how many are active, and names the program.
See also
- 📚 Courses — every course on this computer; faculty record semesters and run reports there.
- Program Outcomes (in the tree) — the outcomes these courses are mapped to.
- 📊 Reports ▸ Completion Status — which offerings still need data.
Course in a Program
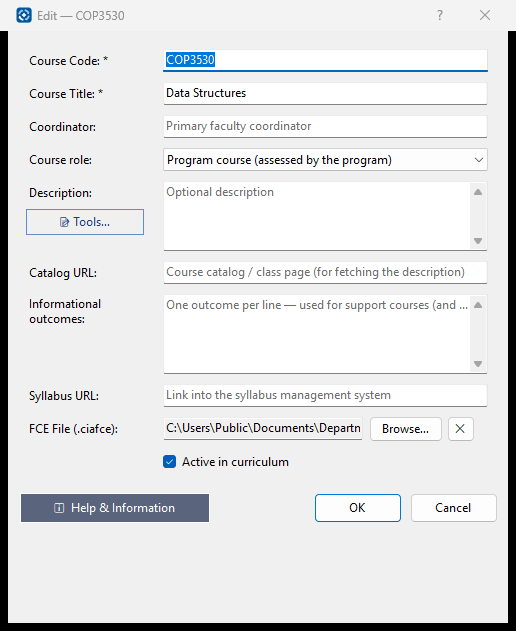
What this program keeps about one course: its code and title, who coordinates it, whether it is a program or support course, its description and links, and which FCE file holds its semesters.
How to use it
- Enter the Course Code and Course Title (both required). Write the code exactly as the course file and catalog do, e.g. ETP4240 — courses are matched by code.
- Choose the Course role: Program course if this program teaches and assesses it; Support course if it is required but taught by another department.
- Optionally fill in Coordinator, Description (📝 Tools… fetches it from the catalog page or drafts one from the outcomes), Catalog URL and Syllabus URL.
- For a support course — or a program course with no FCE file yet — type its Informational outcomes, one per line.
- For a program course, click Browse… beside FCE File to attach its .ciafce file; ✕ detaches it without deleting the file.
- Untick Active in curriculum when the course is no longer taught; its history is kept.
- Click OK to save, or Cancel to leave everything as it was.
What it means, and what to watch for
- Informational outcomes — outcome statements kept here rather than in an FCE file. Articulations and transfer evaluations compare against them; they are not measured and do not count toward program outcome results.
- The course code is saved in capitals.
- Catalog URL — the page 📝 Tools… reads the description from.
- Syllabus URL — a link into your syllabus management system.
See also
- The course's own screen (Programs ▸ the program ▸ 📋 Program Courses ▸ the course) — 📁 Attach FCE… does the same as Browse… here.
- 📚 Courses — where the FCE file's semesters are recorded.
A course in the program
This course as this program sees it: which FCE file holds its semesters, which of those semesters count for the academic year being assessed, and a summary of its outcome measures and narratives.
How to use it
- If the FCE file box is empty, click 📁 Attach FCE… and choose the course's .ciafce file. Support courses are taught elsewhere and usually have none.
- Choose the academic year in the list in the status bar at the bottom of the window.
- In the offerings list, tick the semesters that count for that year and untick any that do not. Each change is saved straight away, for that year only.
- Read the sentence beside the list: it says what this course adds to the year. If it has no offering in the year (no data), or you do not want it in that year's reports, tick "Leave this course out of {year}'s program reports". Untick it to count the ticked offerings again.
- Read the summary below: each active course outcome, the measures from the ticked offerings, their combined result, and the narratives.
- Click 🔗 Map Outcomes to say which program outcome each course outcome supports.
- Click ✏ Open in Editor to change the course file, or 👁 View Offerings to read every semester without changing anything.
- Click 📝 Description… to fetch the catalog description from the course's web page, or draft one from its outcomes.
What it means, and what to watch for
- Offerings counted — until you choose, Assessment+ ticks the offerings whose term falls inside the academic year. Your choice is saved with that academic year only; other years keep their own.
- Leave this course out — the course adds nothing to that year's Outcome Summary, Course-PO Matrix, FCE Summary Spreadsheet, annual and self-study reports, even from an imported submission, and each of them says it was left out by choice. Completion Status shows it in grey as "Left out by choice", not as missing work. The ticks stay as they were (greyed) and count again when you untick the option.
- Nothing ticked is not the same as left out — the course stays in the year but adds nothing, and the reports list it as missing (Completion Status in red, a warning on the Outcome Summary), so a slip of the mouse cannot quietly take a course out of an accreditation report.
- No offering in the year — the sentence beside the list turns amber and asks whether to leave the course out. Nothing is decided for you: until you tick the option, the reports list it as missing.
- The option works without a course file too — for example a program course not taught this year.
- n/N — students meeting the threshold out of students measured. ► aggregate adds the ticked offerings together.
- 📁 Change FCE… attaches a different file; the old file is not deleted.
- If the attached file has moved (for example into OneDrive), Assessment+ finds it again by name in the department folder and remembers the new place.
- Opening this screen writes this program and its current program outcomes into the course file when they are missing, so 🔗 Map Outcomes always offers today's outcomes.
- After 📝 Description… you are asked whether to write the description into the FCE file too, because the self-study's Appendix A reads it from there first.
See also
- 🎯 CO nodes under this course — one outcome's results, offering by offering.
- 📝 Narratives under this course — every offering's narratives side by side.
- ➕ Articulations under this course — external courses evaluated against it.
- 📚 Courses ▸ this course — where faculty record semesters and run reports.
Course Outcome
How students did on one course outcome (CO) in every semester recorded in the course's FCE file: one bar per offering, newest at the top.
How to use it
- Read each bar: the percentage of measured students who met the threshold in that offering, with the count (met/measured) beside it.
- Dark bars with bold labels are the offerings counted for the academic year chosen in the status bar at the bottom; choose another year there to see a different set.
- Read the list under the chart for each offering's individual measures, their counts, their thresholds and their targets.
- To change which offerings count for the year, select the course above this outcome and tick them there.
What it means, and what to watch for
- Threshold — the score a student must reach on a measure to count as meeting it. Target — the percentage of students expected to reach the threshold; a bar at or past the target is met.
- The dashed red line shows the target most of the measures use; each measure's own threshold and target are in the list below. A measure with no separate target uses its threshold as its target.
- A bar adds together every measure of this outcome in that offering: students meeting ÷ students measured.
- no data — that offering has no measures with counts for this outcome.
- Only active outcomes appear in the tree. An outcome made inactive keeps its history in the file.
See also
- The course (above in the tree) — choose the offerings counted for the year, or ✏ Open in Editor to correct a measure.
- 📊 Reports ▸ Outcome Summary — every program outcome for the year.
Narratives
The four improvement narratives written for every offering of this course, side by side, so the course's improvement over time can be read in one place.
How to use it
- Read across a row for one semester; read down a column to follow one narrative over time.
- Rows marked ◄ and shaded are the offerings counted for the academic year chosen in the status bar at the bottom; choose another year there and the highlight follows.
- To change which offerings count, select the course above and tick them there.
- To change a narrative, select the course above and click ✏ Open in Editor.
What it means, and what to watch for
- Lessons Learned — what the instructor learned from that semester.
- Issues & Deficiencies — problems found in students' results or in the course.
- Proposed Improvements — the changes planned in response.
- Results of Improvements — what happened after an earlier change was made; this is the evidence of closing the loop that reviewers look for.
- An empty cell means that narrative was not written for that offering.
- This screen only reads the course's FCE file; nothing here changes it.
See also
- The course (above in the tree) — the outcome measures behind these narratives.
- 📚 Courses ▸ this course ▸ 📝 Faculty Course Evaluations — where narratives are written.