
Each section below is the help that screen shows in Assessment+ itself, on its ℹ Help & Information tab (or F1), so it matches what you see on screen.
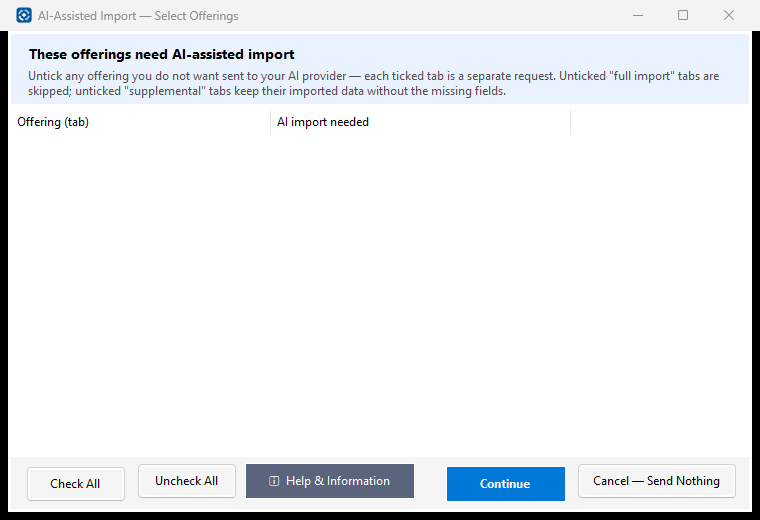
AI-Assisted Import — Select Offerings
Some tabs in the Excel file could not be read completely by Assessment+'s own importer. These are the tabs that would be sent to your AI provider to be read; choose which ones to send.
How to use it
- Untick any tab you do not want sent to the AI. Check All and Uncheck All change every tick at once.
- Click Continue. For each ticked tab you then see any student information found in it, then the exact text that will be sent, and you can still skip it.
- Cancel — Send Nothing sends no tab to the AI: the import goes on with only what Assessment+ read by itself.
What it means, and what to watch for
- Tab — one worksheet in the Excel file; usually one offering (one semester of the course).
- Full AI import — the tab's layout was not recognised; the AI reads the whole tab to find the offering. Unticked, the tab is not imported.
- Supplemental AI — the tab was imported, but its grade counts or N / N>T values were not found; the AI looks only for those. Unticked, the offering is kept without them and you can type them in later in the course editor.
- N — students measured on an outcome. N>T — how many of them met the threshold.
- Each tab is a separate request to your AI provider, billed by the provider.
- Closing this window with the X is the same as Cancel — Send Nothing.
See also
- Tools ▸ AI Settings — the provider that reads the tabs.
Check What the AI Found
Shows which parts of the offering the AI found in this tab of the Excel file (✓) and which it did not (✗), before anything is added to the course.
How to use it
- Read the list. When everything was found, click Continue → to see the offering in full.
- When something is missing, you can type where it is in the worksheet in the boxes below — a cell range such as E3:F9, or words such as "grade labels in E3:E9, counts in F3:F9" — and click Re-run with Hints. The button is available once at least one box has text.
- Or click Enter Missing Data Manually to type the numbers yourself.
- Skip This Tab leaves the tab out of the import. Closing this window with the X does the same.
What it means, and what to watch for
- Program / Major — the program the offering belongs to.
- Grade Distribution — how many students received A, B, C, D, F, FN (failure – no show) and W (withdrawn).
- Outcome Measures — the assignments or exams used to judge each course outcome.
- N — students measured. N>T — students who met the threshold.
- A re-run is another request to your AI provider, with the same tab content. If it finds nothing more, the first result is kept.
- AI notes — anything the AI said about the tab.
See also
- The course editor — anything still missing can be entered there after the import.
Enter Missing Data
The AI could not find these numbers in the tab. Type them here so the offering is imported complete.
How to use it
- Grade Distribution — type how many students received each grade. Leave a box empty for none.
- Outcome N / N>T — for each measure, type N (students measured) and N>T (students who met the threshold).
- Click Apply & Continue. You then see the whole offering before it is added.
What it means, and what to watch for
- FN — failure, no show (a student who stopped attending). W — withdrawn.
- Only whole numbers of 0 or more are accepted, and N>T can never be more than N; you are told which box to correct.
- Import Without These Numbers — the offering is imported with these numbers blank; enter them later on the course editor's Grade Distribution and Outcomes & Measures tabs.
- Skip This Tab — the tab is left out of the import (a tab that was already imported keeps what it had, without the AI's additions). Closing the window with the X does the same.
See also
- The course editor — Grade Distribution and Outcomes & Measures tabs.
AI-Assisted Import — Review the Offering
Everything the AI read from one tab of the Excel file, laid out for you to check before it becomes an offering in this course.
How to use it
- Read each section: the offering, the grade distribution, the course outcomes with their measures, and the narratives.
- Compare anything doubtful with the worksheet itself.
- Click ✓ Accept this offering to add it, or ✕ Skip this offering to leave it out. Esc or the X also skips it.
What it means, and what to watch for
- Offering Label — the name the offering gets in the course; usually the tab's name or its semester.
- Major — the program the offering belongs to.
- [PO n] — the program outcome the course outcome is mapped to in the worksheet.
- (inactive) — an outcome no longer used for new offerings; its history is kept.
- Threshold — the score counted as meeting the outcome; shown as 70% when the tab gave none.
- N — students measured. N>T — students who met the threshold. In the grade distribution, N is the total of all grades.
- A grade shown as 0 may also mean the AI found no number for it.
- If the course already has outcomes and the tab words them differently, you are asked next which wording to keep.
- Values the AI got wrong can be corrected in the course editor after the import.
See also
- Import Summary — shown at the end, listing every tab and what happened to it.
Outcome Conflicts
The workbook you are importing words some course outcomes differently from this course file, under the same CO numbers. Choose which wording to keep.
How to use it
- Read each CO: Current is this course file's wording, Workbook is the wording in the worksheet being imported.
- Click Keep Current Outcomes (recommended), or Use the Workbook's Wording to replace the course's wording.
What it means, and what to watch for
- Grades, measures and narratives from the worksheet are imported either way.
- Closing the window keeps the current outcomes.
- Replacing the wording changes it for every offering of the course, because outcomes belong to the course.
See also
- Course Outcomes tab — edit an outcome's wording afterwards.
Import Summary
A record of everything this Excel import did: which tabs became offerings, which were skipped and why, and what was found or missing in each.
How to use it
- Read the Summary at the end first: how many offerings were imported and how many were skipped.
- Look for ✗ lines (not found) and ⚠ lines (errors or warnings); each names the tab it belongs to.
- If the workbook may be needed again, leave Keep a copy in the department folder ticked (shown when an offering was imported); untick it if not.
- Click Close. When at least one offering was imported, the course opens in the course editor as a new, unsaved course file — fill in anything marked ✗, then save it.
What it means, and what to watch for
- Standard Import — tabs Assessment+ read with its own rules, with no AI.
- AI-Assisted Import — tabs your AI provider read. Supplemental AI Import — tabs read by the rules and then completed by the AI.
- N (NumberMeasured) — students measured. N>T (NumberMeetingThreshold) — students who met the threshold.
- Skipped — left out, either by you or because the tab was empty or could not be read.
- If nothing could be imported, delete the tabs listed as errors from the Excel file, save it and import it again.
- Keep a copy in the department folder — ticked, a copy of the workbook is filed under the department folder's Evaluations\Sources\<course code> and listed under the course's 📥 Inputs as an FCE workbook. Unticked, only a note of where the workbook was is listed. Your choice is remembered on this computer; a workbook already in the department folder is never copied again.
See also
- The course editor — Grade Distribution, Outcomes & Measures and Narratives tabs.
Import One Offering
Lists every offering found in the workbook you chose, so you can bring a single one into the open course.
How to use it
- Select the offering to import. Each line shows its term, how many measures it has, and the instructor.
- Click Import, or double-click the line.
What it means, and what to watch for
- The list is newest first.
- Nothing else in the workbook is imported.
- If the course already has an offering for that term, you are asked whether this is another section.
- Keep a copy in the department folder — ticked, a copy of the workbook is filed under the department folder's Evaluations\Sources\<course code> and listed under the course's 📥 Inputs. Unticked, only a note of where it was is listed. Your choice is remembered on this computer.
See also
- File ▸ Import ▸ Import Course from Excel (.xlsx) — bring in the whole workbook as a course.